
If you own a Gigabyte B450M DS3H motherboard, updating the BIOS is an essential task to ensure optimal performance and compatibility with the latest hardware and software. The BIOS, or Basic Input/Output System, is responsible for initializing and configuring the hardware components of your computer. By updating the BIOS, you can take advantage of bug fixes, performance improvements, and new features.
Updating the BIOS on the Gigabyte B450M DS3H is a straightforward process that can be done in a few simple steps. Before you begin, it’s important to note that updating the BIOS carries some risks, so it’s essential to follow the instructions carefully and ensure that your computer is connected to a reliable power source throughout the process.
To update the BIOS on the Gigabyte B450M DS3H, you’ll need to download the latest BIOS version from the Gigabyte website. Make sure to select the correct model and version of your motherboard to avoid compatibility issues. Once you’ve downloaded the BIOS file, you’ll need to extract it to a USB flash drive formatted in FAT32.
Next, restart your computer and enter the BIOS setup by pressing the “Delete” key during the boot process. Once in the BIOS setup, navigate to the “Q-Flash” or “BIOS Update” section. Here, you’ll find an option to select the BIOS file from the USB flash drive. Select the file and follow the on-screen instructions to initiate the BIOS update process.
During the BIOS update, it’s crucial not to interrupt the process or turn off your computer. Doing so can result in a corrupted BIOS, which can render your motherboard unusable. Once the update is complete, your computer will automatically restart, and you’ll be able to enjoy the benefits of the latest BIOS version on your Gigabyte B450M DS3H motherboard.
In conclusion, updating the BIOS on the Gigabyte B450M DS3H is a necessary step to ensure optimal performance and compatibility. By following the step-by-step guide outlined above, you can safely and effectively update the BIOS on your motherboard. Remember to exercise caution and carefully read the instructions provided by Gigabyte to avoid any potential issues. Happy updating!
Preparation
Before you begin the update process, it is important to make sure you have everything you need to successfully update the BIOS on your Gigabyte B450M DS3H motherboard.
Here are the steps you should follow:
- Backup your data: Updating the BIOS can sometimes result in data loss, so it is important to back up any important files or documents before proceeding.
- Download the latest BIOS update: Visit the Gigabyte website and navigate to the support page for the B450M DS3H motherboard. Download the latest BIOS update file to your computer.
- Prepare a USB drive: Format a USB drive to FAT32 file system and create a new folder on it to store the BIOS update file.
- Extract the BIOS update file: Open the downloaded BIOS update file and extract its contents to the folder you created on the USB drive.
- Connect the USB drive: Insert the USB drive into one of the USB ports on your Gigabyte B450M DS3H motherboard.
- Enter BIOS: Restart your computer and press the appropriate key (usually Del or F2) to enter the BIOS setup utility.
- Locate the Q-Flash utility: Once inside the BIOS, navigate to the “Advanced” or “Settings” tab and find the Q-Flash utility.
- Select the BIOS update file: Use the Q-Flash utility to browse and select the BIOS update file from the USB drive.
- Start the update process: Follow the on-screen instructions to start the BIOS update process. Do not interrupt the update or turn off your computer during this time.
- Restart your computer: Once the update is complete, restart your computer to apply the changes.
By following these steps, you will be well-prepared to update the BIOS on your Gigabyte B450M DS3H motherboard.
Check the current BIOS version
Before you begin the update process, it is important to check the current BIOS version on your Gigabyte B450M DS3H motherboard. This will help you determine if an update is necessary and which version you need to download.
To check the current BIOS version, follow these steps:
| Step | Description |
|---|---|
| 1 | Start your computer and enter the BIOS setup by pressing the designated key (usually Del or F2) during the boot process. |
| 2 | Navigate to the “System Information” or “BIOS Information” section using the arrow keys on your keyboard. |
| 3 | Look for the “BIOS Version” or “BIOS Revision” entry. This will display the current BIOS version installed on your motherboard. |
| 4 | Take note of the BIOS version, as you will need this information when downloading the update from the Gigabyte website. |
Once you have checked the current BIOS version, you can proceed with the update process to ensure that your Gigabyte B450M DS3H motherboard is running the latest firmware.
Download the latest BIOS update

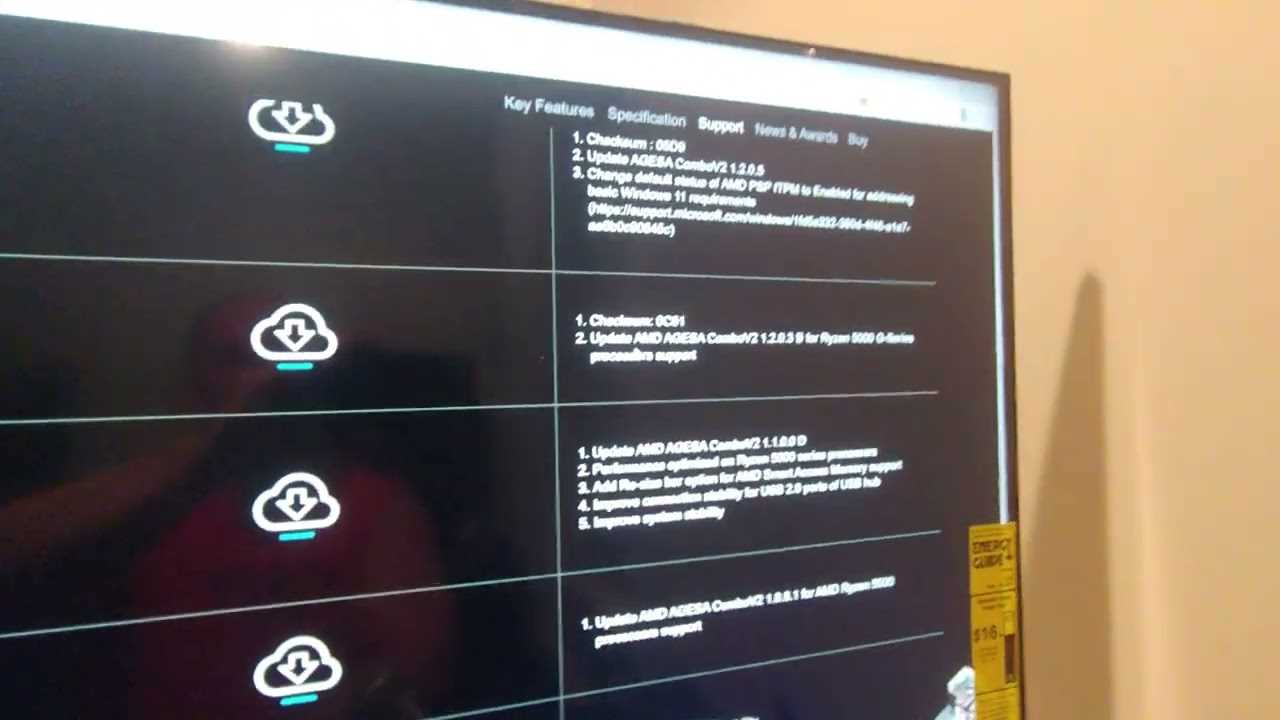
To update the BIOS on your Gigabyte B450M DS3H motherboard, you will need to download the latest BIOS update from the Gigabyte website. The BIOS update contains important bug fixes, performance improvements, and compatibility updates for your motherboard.
To download the latest BIOS update, follow these steps:
- Go to the Gigabyte website.
- Navigate to the Support section of the website.
- Enter the model name of your motherboard, which is B450M DS3H, in the search bar.
- Click on the “Downloads” tab.
- Scroll down and find the latest BIOS update for your motherboard.
- Click on the “Download” button next to the BIOS update.
Make sure to download the correct BIOS update for your specific motherboard model. Using the wrong BIOS update can cause serious issues and potentially damage your motherboard.
Once the BIOS update is downloaded, you can proceed to the next step of the BIOS update process.
Prepare a USB flash drive

In order to update the BIOS on your Gigabyte B450M DS3H motherboard, you will need a USB flash drive. This flash drive will be used to store the updated BIOS file and transfer it to your motherboard.
Before you begin, make sure that the USB flash drive is formatted to FAT32. This is the recommended file system for BIOS updates. If your flash drive is not formatted to FAT32, you will need to format it before proceeding.
Next, download the latest BIOS update file from the Gigabyte website. Make sure to choose the correct BIOS update file for your specific motherboard model, in this case, the B450M DS3H.
Once the BIOS update file is downloaded, extract it if necessary. You should now have a file with a .bin extension.
Copy the .bin file to the root directory of the USB flash drive. Do not place it in any folders or subdirectories.
Now, safely eject the USB flash drive from your computer.
Your USB flash drive is now prepared and ready to be used for updating the BIOS on your Gigabyte B450M DS3H motherboard.
Updating BIOS
Updating the BIOS on your Gigabyte B450M DS3H motherboard is an important step to ensure that your system is running smoothly and efficiently. The BIOS, or Basic Input/Output System, is responsible for controlling the hardware and software settings of your computer.
To update the BIOS on your Gigabyte B450M DS3H motherboard, follow these steps:
Step 1:
Before you begin the BIOS update process, it is important to ensure that you have a stable power supply and a reliable internet connection. This will help prevent any interruptions or issues during the update.
Step 2:
Visit the Gigabyte website and navigate to the support page for the B450M DS3H motherboard. Here, you will find the latest BIOS update file available for download.
Step 3:
Download the BIOS update file and save it to a USB flash drive. Make sure to format the USB drive to FAT32 before saving the file.
Step 4:
Restart your computer and enter the BIOS setup by pressing the designated key during the boot process. This key is typically displayed on the screen during startup.
Step 5:
In the BIOS setup, navigate to the “Q-Flash” section. This is where you can update the BIOS using the USB flash drive.
Step 6:
Select the option to update the BIOS from the USB drive. The system will detect the BIOS update file on the USB drive and prompt you to confirm the update.
Step 7:
Follow the on-screen instructions to complete the BIOS update process. It is important to not interrupt the update or turn off your computer during this process, as it can cause irreversible damage to your motherboard.
Step 8:
Once the BIOS update is complete, restart your computer and enter the BIOS setup again to verify that the update was successful. You should see the updated BIOS version displayed in the system information.
By following these steps, you can easily update the BIOS on your Gigabyte B450M DS3H motherboard and ensure that your system is up to date with the latest features and improvements.


