If you are a developer working with Node.js, you may have come across Yarn, a popular package manager for JavaScript. Yarn offers a number of advantages over the default package manager, npm, including faster installation times and better dependency management. In this guide, we will walk you through the process of installing Yarn on Ubuntu.
To install Yarn on Ubuntu, you will need to have Node.js and npm already installed. If you don’t have them installed, you can easily install them by running the following command in the terminal:
sudo apt-get install nodejs
sudo apt-get install npm
Once you have Node.js and npm installed, you can proceed with installing Yarn. The easiest way to install Yarn on Ubuntu is by using the npm package manager. Simply run the following command in the terminal:
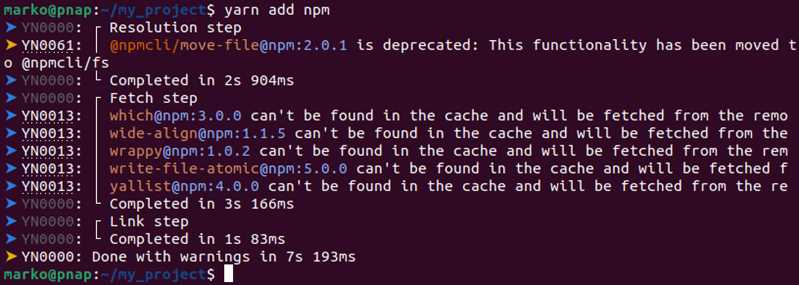
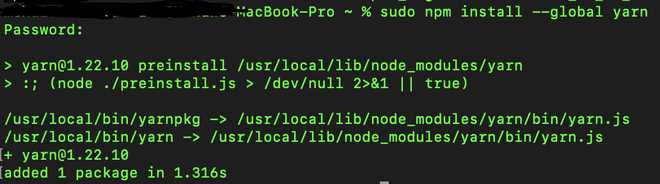
sudo npm install -g yarn
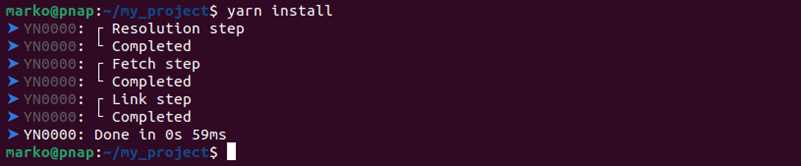
This command will install Yarn globally on your system, making it available for use in any project. After the installation is complete, you can verify that Yarn is installed by running the following command:
yarn –version
If Yarn is installed correctly, you should see the version number displayed in the terminal. Congratulations, you have successfully installed Yarn on Ubuntu!
Prerequisites

Before you can install Yarn on Ubuntu, you need to have a package manager and Node.js installed on your system. Yarn is a package manager that helps you manage dependencies for your Node.js projects.
If you don’t have a package manager installed, you can install one using the following command in your terminal:
sudo apt-get install npm
Once you have npm installed, you can use it to install Node.js by running the following command:
sudo npm install -g n
After installing Node.js, you can proceed with installing Yarn. Yarn is a package manager that is designed to be fast, reliable, and secure. It allows you to manage your project’s dependencies and install packages from the npm registry.
To install Yarn on Ubuntu, open your terminal and run the following command:
sudo npm install -g yarn
This will install Yarn globally on your system, allowing you to use it from any directory in the terminal.
Ubuntu Operating System
Ubuntu is a popular open-source operating system based on the Linux kernel. It is known for its user-friendly interface and extensive package manager, which allows users to easily install and manage software on their systems.
One of the most common ways to install software on Ubuntu is through the terminal. The terminal is a command-line interface that allows users to interact with the operating system by typing commands.
Yarn is a package manager for JavaScript that allows developers to manage dependencies and install packages. It is commonly used in web development projects to streamline the installation process and ensure that all necessary dependencies are met.
To install Yarn on Ubuntu, you can use the terminal and run the following command:
sudo apt install yarn
This command will download and install the Yarn package manager on your Ubuntu system. Once the installation is complete, you can use Yarn to install packages and manage dependencies for your projects.
Overall, Ubuntu provides a powerful and flexible operating system for developers and users alike. With its extensive package manager and easy-to-use terminal, installing and managing software like Yarn is a breeze.
Internet Connection
Before you can install Yarn on Ubuntu, you need to make sure that you have a stable internet connection. Yarn is a package manager that allows you to install, update, and manage dependencies for your Node.js projects.
To install Yarn, you will need to use the command line or terminal. Open your terminal and run the following command:
sudo apt-get install yarn
This command will install Yarn and all its dependencies on your Ubuntu system. Make sure you have administrative privileges to run this command.
Once the installation is complete, you can verify that Yarn is installed by running the following command:
yarn --version
If Yarn is installed correctly, you will see the version number displayed in the terminal.
Now that you have Yarn installed, you can start using it to manage your Node.js packages and dependencies. Yarn provides a more efficient and reliable way to install and manage packages compared to the default package manager for Node.js, npm.
Installation Steps
To install Yarn on Ubuntu, follow the steps below:
Step 1: Open the terminal on your Ubuntu system.
Step 2: Add the Yarn repository to the package manager by running the following command:
curl -sS https://dl.yarnpkg.com/debian/pubkey.gpg | sudo apt-key add –
Step 3: Add the Yarn repository to the package manager’s list of sources:
echo “deb https://dl.yarnpkg.com/debian/ stable main” | sudo tee /etc/apt/sources.list.d/yarn.list
Step 4: Update the package manager:
sudo apt-get update
Step 5: Install Yarn:
sudo apt-get install yarn
Step 6: Verify that Yarn has been installed successfully by running the following command:
yarn –version
If the installation was successful, the version number of Yarn will be displayed in the terminal.
Update Package Manager

In order to install Yarn on Ubuntu, you need to update your package manager. The package manager is a command-line tool that helps you manage software packages and their dependencies.
To update the package manager, open a terminal and run the following command:
sudo apt-get update
This command will update the package manager’s list of available packages and their versions. It will also update the dependencies of the installed packages.
Updating the package manager ensures that you have the latest version of the package manager and its dependencies, which is necessary for installing Yarn.
Once the package manager is updated, you can proceed to the next step and install Yarn on Ubuntu.
Install Node.js
To use Yarn, you need to have Node.js installed on your Ubuntu system. Node.js is a JavaScript runtime built on Chrome’s V8 JavaScript engine. It allows you to run JavaScript code on the server-side.
To install Node.js, you can use the package manager that comes with Ubuntu. Open the terminal and run the following command:
- sudo apt update
- sudo apt install nodejs
This command will update the package manager and then install Node.js on your system. It will also install npm, the default package manager for Node.js, which you will need to manage dependencies for your projects.
Once the installation is complete, you can verify that Node.js and npm are installed by running the following commands:
- node -v
- npm -v
If you see the version numbers for Node.js and npm, then the installation was successful.
Now that you have Node.js installed, you can proceed with installing Yarn.
Add Yarn Repository
To install Yarn on Ubuntu, you need to add the Yarn repository to your package manager. Follow the steps below:
- Open the terminal on your Ubuntu system.
- Run the following command to import the repository’s GPG key:
- Add the Yarn repository to your system’s package sources by running the command:
- Update the package manager’s cache by running:
curl -sS https://dl.yarnpkg.com/debian/pubkey.gpg | sudo apt-key add -echo "deb https://dl.yarnpkg.com/debian/ stable main" | sudo tee /etc/apt/sources.list.d/yarn.listsudo apt-get updateOnce you have added the Yarn repository, you can proceed to install Yarn on your Ubuntu system.