Windows 11 is the latest operating system from Microsoft, packed with new features and a sleek design. If you’re wondering how to get into the BIOS on your Windows 11 computer, you’ve come to the right place. Accessing the BIOS is essential for making changes to your computer’s hardware settings, such as boot order and overclocking. In this step-by-step guide, we’ll show you exactly how to access the BIOS in Windows 11.
Step 1: Restart your computer. To access the BIOS, you’ll need to restart your Windows 11 computer. Make sure to save any open files and close all applications before proceeding.
Step 2: Press the appropriate key. As your computer restarts, pay close attention to the screen. Look for a message that says “Press [key] to enter BIOS” or something similar. The key you need to press may vary depending on your computer’s manufacturer, but common keys include F2, F10, and Delete. Press the specified key as soon as you see the message.
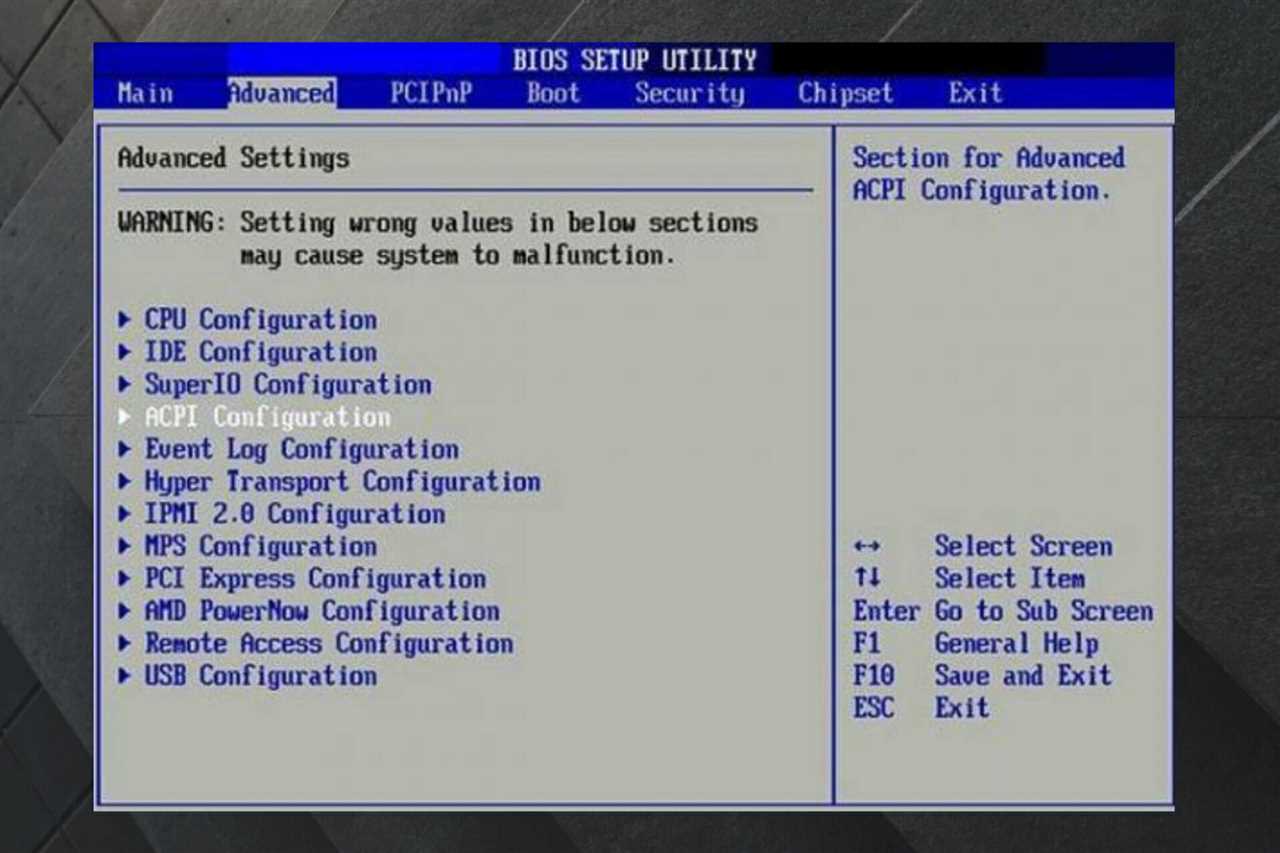
Step 3: Navigate the BIOS menu. Once you’ve successfully entered the BIOS, you’ll be greeted with a menu. Use the arrow keys on your keyboard to navigate through the different options. The BIOS menu can be a bit overwhelming at first, but don’t worry – we’ll guide you through the essential settings.
Step 4: Make changes and save. Depending on what you want to do in the BIOS, you may need to make changes to certain settings. For example, if you want to change the boot order, look for an option that says “Boot” or “Boot Order” and follow the on-screen instructions to rearrange the order. Once you’ve made your changes, be sure to save them before exiting the BIOS.
Accessing the BIOS in Windows 11 may seem daunting at first, but with this step-by-step guide, you’ll be able to navigate through the settings with ease. Remember to be cautious when making changes in the BIOS, as incorrect settings can cause issues with your computer. Now that you know how to access the BIOS in Windows 11, you can take full control of your computer’s hardware configuration.
Why Accessing BIOS is Important
Accessing the BIOS is an essential step for any Windows 11 user who wants to get the most out of their computer. The BIOS, or Basic Input/Output System, is a firmware that is built into the computer’s motherboard. It is responsible for initializing and testing hardware components during the boot process.
By accessing the BIOS, users can make important changes to their computer’s settings. This includes adjusting the boot order, enabling or disabling certain hardware components, and configuring system preferences. These changes can have a significant impact on the overall performance and functionality of the computer.
One of the main reasons why accessing the BIOS is important is for troubleshooting purposes. If you are experiencing issues with your computer, such as hardware conflicts or boot problems, accessing the BIOS can help you diagnose and resolve these issues. It allows you to view detailed information about your hardware and make necessary adjustments to ensure compatibility and stability.
Additionally, accessing the BIOS is crucial for installing or upgrading the operating system. Some operating systems, including Windows 11, may require specific BIOS settings to be enabled or disabled in order to function properly. By accessing the BIOS, you can ensure that your computer meets the necessary requirements for installing or upgrading the operating system.
Overall, knowing how to access the BIOS in Windows 11 is an important skill for any computer user. It provides you with the ability to customize and optimize your computer’s settings, troubleshoot issues, and ensure compatibility with the latest operating systems. By taking the time to learn how to access the BIOS, you can unlock the full potential of your computer and enhance your overall computing experience.
Understanding the Role of BIOS
The BIOS (Basic Input/Output System) is a crucial component of any computer system, including Windows 11. It plays a vital role in the startup process and ensures that the hardware and software work together seamlessly.
When you turn on your computer, the BIOS is the first software that runs. It performs a series of checks and initializations to ensure that all the hardware components, such as the processor, memory, and storage devices, are functioning correctly.
The BIOS also provides a platform for configuring various settings of your computer, such as boot order, system time, and date. It allows you to customize the behavior of your computer and optimize its performance.
In Windows 11, accessing the BIOS can be done in several ways, depending on your computer’s manufacturer and model. It typically involves pressing a specific key or combination of keys during the startup process.
Getting into the BIOS is essential for tasks such as updating the firmware, changing hardware settings, or troubleshooting issues. It provides access to advanced options that are not available in the regular Windows interface.
It’s important to note that accessing the BIOS requires caution and knowledge, as making incorrect changes can lead to system instability or even damage. It’s recommended to consult your computer’s documentation or manufacturer’s website for specific instructions on accessing and using the BIOS.
In conclusion, the BIOS is a critical component of the Windows 11 operating system, responsible for initializing hardware and providing access to advanced settings. Understanding how to access and navigate the BIOS is essential for maintaining and optimizing your computer’s performance.
Need for BIOS Access

In order to get the most out of your Windows 11 operating system, it is important to have access to the BIOS. The BIOS, or Basic Input/Output System, is a firmware that is built into your computer’s motherboard. It is responsible for initializing hardware components and loading the operating system. Being able to access the BIOS allows you to make important changes to your computer’s settings, such as adjusting the boot order, enabling or disabling hardware components, and overclocking your CPU.
Accessing the BIOS in Windows 11 is essential for troubleshooting hardware issues, installing a new operating system, or optimizing your computer’s performance. Without access to the BIOS, you may not be able to take full advantage of the features and capabilities of your computer. Therefore, knowing how to access the BIOS in Windows 11 is crucial for any computer user.
Methods to Access BIOS in Windows 11

Accessing the BIOS (Basic Input/Output System) is essential for making changes to your computer’s hardware settings. In Windows 11, there are several methods you can use to access the BIOS. Here are a few ways to get to the BIOS in Windows 11:
Method 1: Restart and Use Function Keys
To access the BIOS, you can start by restarting your computer. As the computer restarts, look for a message on the screen that indicates which key you need to press to enter the BIOS setup. Commonly used keys include F2, F8, F10, or Del. Once you see the message, press the corresponding key to enter the BIOS.
Method 2: Use the Windows Settings
In Windows 11, you can also access the BIOS through the Windows Settings. Here’s how:
- Click on the Start button and select the Settings icon.
- In the Settings window, click on the “System” category.
- Scroll down and click on the “Advanced” option.
- Under the “Advanced” section, click on the “Restart now” button under the “Startup” section.
- Your computer will restart and take you to the BIOS setup.
Method 3: Use the Shift + Restart Option
If you’re unable to access the BIOS using the previous methods, you can try using the Shift + Restart option. Here’s how:
- Click on the Start button and select the Power icon.
- Hold down the Shift key on your keyboard and click on the “Restart” option.
- Your computer will restart and present you with a menu.
- Select the “Troubleshoot” option from the menu.
- In the Troubleshoot menu, select “Advanced options”.
- Finally, click on the “UEFI Firmware Settings” option to access the BIOS.
These are some of the methods you can use to access the BIOS in Windows 11. Remember, accessing the BIOS allows you to make important changes to your computer’s hardware settings, so be cautious and make sure you know what you’re doing before making any modifications.
Using the Advanced Startup Options

If you are unable to access the BIOS using the traditional methods, you can try using the Advanced Startup Options in Windows 11. This feature allows you to restart your computer and access the BIOS directly from the Windows operating system.
Here’s how to get to the BIOS using the Advanced Startup Options:
- Click on the “Start” button in the bottom left corner of the screen.
- Select the “Settings” option from the menu.
- In the Settings window, click on “System” and then choose “Recovery” from the left-hand menu.
- Under the “Advanced startup” section, click on the “Restart now” button.
- Your computer will now restart and display the Advanced Startup Options menu.
- From the Advanced Startup Options menu, select “Troubleshoot”.
- Next, click on “Advanced options”.
- Finally, choose “UEFI Firmware Settings” and click on the “Restart” button.
Once your computer restarts, it will automatically boot into the BIOS. From here, you can make any necessary changes to your system settings.
Using the Advanced Startup Options is a convenient way to access the BIOS in Windows 11 if you are having trouble with the traditional methods. It provides a straightforward process to get to the BIOS and make any necessary adjustments to your computer’s settings.
Accessing BIOS through Settings
If you are wondering how to get into the BIOS on Windows 11, you can do it through the Settings menu. Here is a step-by-step guide on how to access the BIOS:
Step 1: Click on the “Start” button in the bottom left corner of the screen.
Step 2: Click on the “Settings” icon, which looks like a gear.
Step 3: In the Settings menu, click on the “Update & Security” option.
Step 4: In the left sidebar, click on the “Recovery” option.
Step 5: Under the “Advanced startup” section, click on the “Restart now” button.
Step 6: Your computer will restart and a blue screen will appear with several options. Click on the “Troubleshoot” option.
Step 7: In the Troubleshoot menu, click on the “Advanced options” option.
Step 8: In the Advanced options menu, click on the “UEFI Firmware Settings” option.
Step 9: Finally, click on the “Restart” button to access the BIOS.
By following these steps, you can easily access the BIOS on Windows 11 and make any necessary changes to your system settings.
Step-by-Step Guide to Access BIOS in Windows 11

Accessing the BIOS in Windows 11 is essential for making changes to your computer’s hardware settings. Whether you need to change the boot order, enable or disable certain features, or troubleshoot issues, accessing the BIOS is the first step. Here is a step-by-step guide on how to access the BIOS in Windows 11:
Step 1: Start your Windows 11 computer and click on the “Start” button located at the bottom left corner of the screen.
Step 2: From the Start menu, click on the “Settings” icon, which looks like a gear.
Step 3: In the Settings window, click on the “System” category.
Step 4: In the System settings, click on the “Power & Sleep” tab located on the left side of the window.
Step 5: Scroll down and click on the “Additional power settings” link.
Step 6: In the Power Options window, click on the “Choose what the power buttons do” link located on the left side of the window.
Step 7: In the System Settings window, click on the “Change settings that are currently unavailable” link.
Step 8: Scroll down to the “Shutdown settings” section and uncheck the “Turn on fast startup (recommended)” option.
Step 9: Click on the “Save changes” button to apply the changes and restart your computer.
Step 10: While your computer is restarting, press the designated key to access the BIOS. The key varies depending on the manufacturer, but common keys include F2, F10, Del, or Esc. Look for a message on the screen during startup that indicates the key to press.
Step 11: Once you enter the BIOS, you can navigate through the different settings using the arrow keys on your keyboard. Make the necessary changes and save your settings before exiting the BIOS.
By following these step-by-step instructions, you can easily access the BIOS in Windows 11 and make any necessary changes to optimize your computer’s performance.
Step 1: Restarting Your Computer
In order to access the BIOS in Windows 11, you will need to restart your computer. Here’s how to do it:
- Click on the “Start” button in the bottom left corner of your screen.
- Click on the “Power” button.
- Hold down the “Shift” key on your keyboard and click on the “Restart” option.
- Your computer will now restart and a blue screen will appear.
- On the blue screen, click on the “Troubleshoot” option.
- Next, click on the “Advanced options” button.
- From the advanced options menu, click on the “UEFI Firmware Settings” option.
- Finally, click on the “Restart” button to access the BIOS.
Once your computer restarts, it will automatically take you to the BIOS settings where you can make any necessary changes. This is the first step in accessing the BIOS in Windows 11.
Step 2: Accessing the Advanced Startup Options

Windows 11 provides a straightforward method to access the BIOS settings and make necessary changes. To get started, you need to access the Advanced Startup Options.
Here’s how you can do it:
- Click on the “Start” button located in the bottom left corner of the screen.
- Next, click on the “Settings” icon, which resembles a gear.
- In the Settings menu, select “System” and then click on “Recovery” from the left-hand side panel.
- Under the “Advanced startup” section, click on the “Restart now” button.
- Your computer will now restart and display the “Choose an option” screen.
- From the options provided, select “Troubleshoot”.
- In the Troubleshoot menu, click on “Advanced options”.
- Finally, click on “UEFI Firmware Settings” to access the BIOS.
By following these steps, you will be able to access the Advanced Startup Options in Windows 11 and get to the BIOS settings easily.