If you are an active user of GitHub, you may have encountered the term “forked repository” before. Forking a repository means creating a copy of someone else’s project on your own GitHub account. This allows you to make changes to the project without affecting the original repository. However, there may come a time when you no longer need the forked repository and want to delete it. In this step-by-step guide, we will show you how to delete a forked repository in GitHub.
Deleting a forked repository in GitHub is a straightforward process that can be done in just a few simple steps. First, you need to navigate to the forked repository’s page on GitHub. Once you are on the repository’s page, look for the “Settings” tab located near the top-right corner of the page. Click on the “Settings” tab to access the repository’s settings.
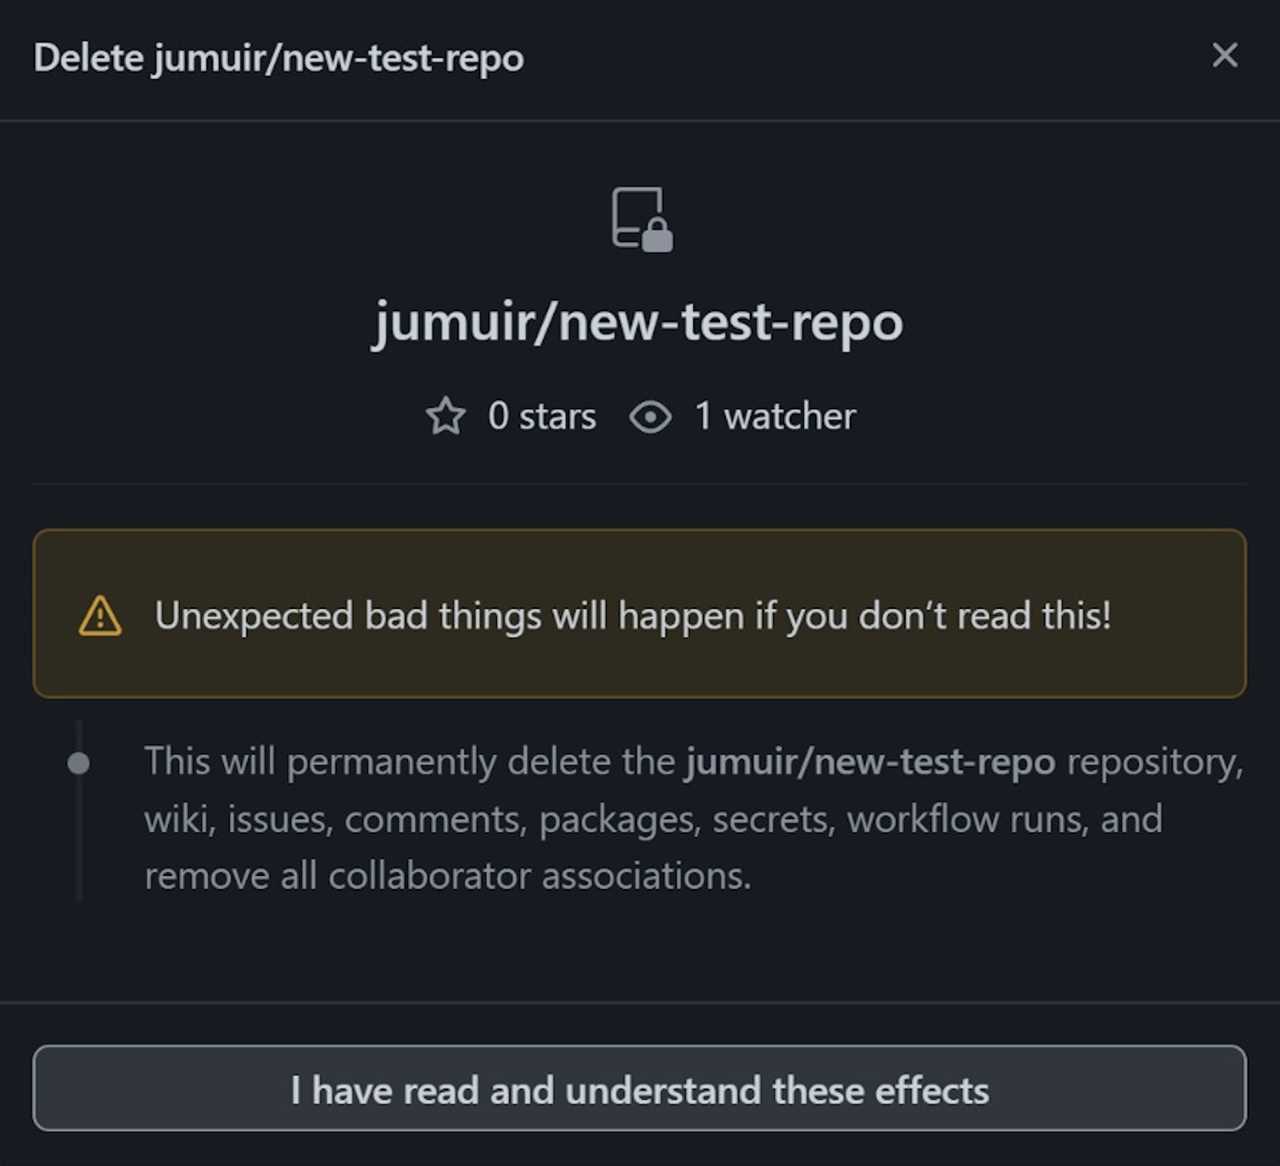
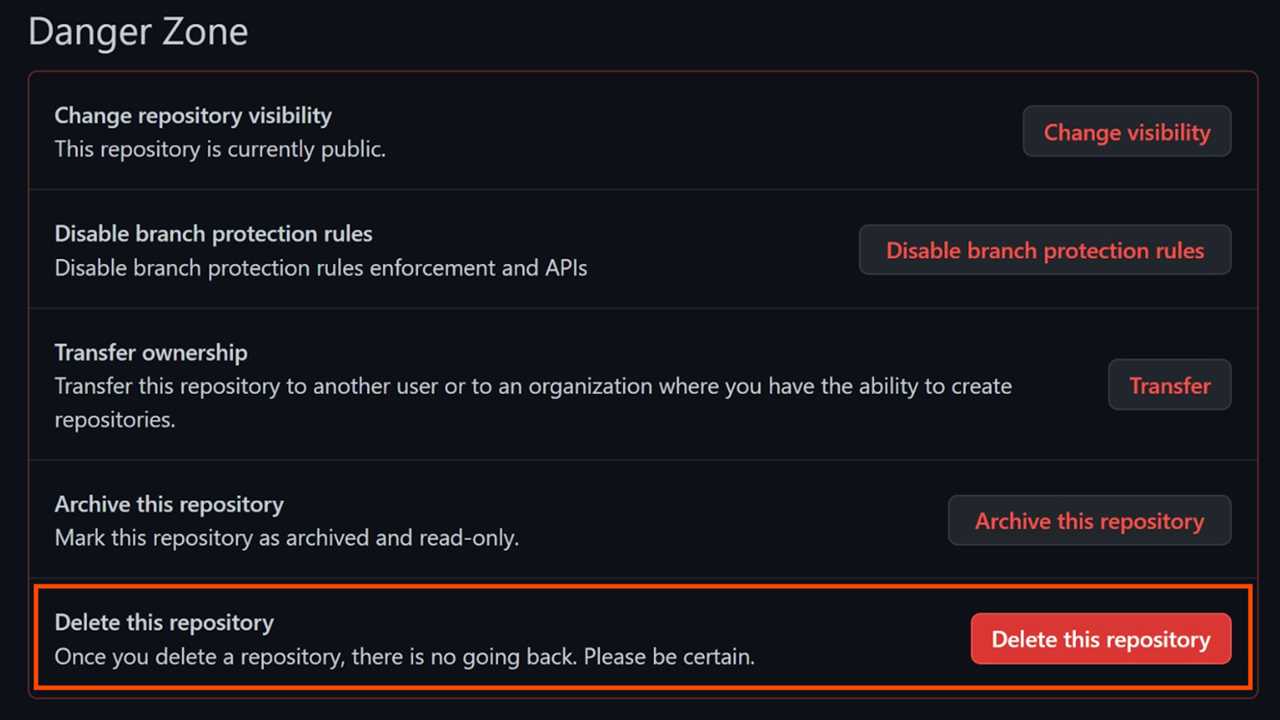
Within the repository’s settings, scroll down until you find the “Danger Zone” section. In this section, you will see an option to delete the repository. Before you proceed with deleting the repository, GitHub will ask you to confirm your decision. Make sure to read the warning message carefully, as deleting a repository is irreversible. Once you are certain that you want to delete the forked repository, click on the “Delete this repository” button to initiate the deletion process.
After clicking on the “Delete this repository” button, GitHub will prompt you to enter the name of the repository to confirm the deletion. This is a security measure to ensure that you are deleting the correct repository. Once you have entered the repository’s name, click on the “I understand the consequences, delete this repository” button to finalize the deletion process. GitHub will then delete the forked repository, and you will no longer have access to it.
Why Delete a Forked Repository?

Deleting a forked repository in GitHub is a common task that many users may need to perform. There are several reasons why you might want to delete a forked repository:
| Reason | Description |
| 1. Clean up your GitHub account | If you have forked multiple repositories and no longer need them, deleting the forked repositories can help keep your GitHub account organized and clutter-free. |
| 2. Remove unused forks | If you have forked a repository but never made any changes or contributions to it, deleting the forked repository can help remove unnecessary clutter from your GitHub profile. |
| 3. Avoid confusion | If you have forked a repository for testing or experimentation purposes and no longer need it, deleting the forked repository can help avoid confusion and ensure that you are working with the correct repositories. |
| 4. Privacy concerns | If you have forked a repository that contains sensitive information or personal data, deleting the forked repository can help protect your privacy and prevent unauthorized access to the data. |
Regardless of the reason, deleting a forked repository in GitHub is a straightforward process that can be done in just a few steps.
No Longer Needed
If you have a forked repository in GitHub that you no longer need, it’s important to delete it to keep your account organized and clutter-free. Deleting a forked repository is a simple process that can be done in just a few steps.
To delete a forked repository in GitHub, follow these steps:
- First, navigate to the original repository that you forked.
- Click on the “Settings” tab located at the top of the repository page.
- Scroll down to the “Danger Zone” section.
- Click on the “Delete this repository” button.
- Confirm the deletion by typing the name of the repository in the provided field.
- Click on the “I understand the consequences, delete this repository” button.
Once you have completed these steps, the forked repository will be permanently deleted from your GitHub account. It’s important to note that this action cannot be undone, so make sure you no longer need the repository before proceeding with the deletion.
Deleting a forked repository is a straightforward process that can help you keep your GitHub account organized and free from unnecessary clutter. By following these steps, you can easily delete any forked repository that you no longer need.
Forked Repository is Outdated

When you fork a repository in GitHub, you create a copy of the original repository in your own GitHub account. This allows you to make changes to the code without affecting the original repository. However, over time, the original repository may receive updates and improvements, making your forked repository outdated.
If your forked repository is outdated and you no longer need it, you can delete it to keep your GitHub account clean and organized. Deleting a forked repository is a simple process that can be done in a few steps.
Here is how you can delete a forked repository in GitHub:
| Step 1: | Go to the GitHub website and log in to your account. |
| Step 2: | Click on your profile icon in the top-right corner of the page and select “Your repositories” from the dropdown menu. |
| Step 3: | Locate the forked repository you want to delete and click on its name to open it. |
| Step 4: | Click on the “Settings” tab in the menu bar of the repository. |
| Step 5: | Scroll down to the “Danger Zone” section at the bottom of the page. |
| Step 6: | Click on the “Delete this repository” button. |
| Step 7: | Confirm the deletion by typing the name of the repository in the text field. |
| Step 8: | Click on the “I understand the consequences, delete this repository” button. |
After completing these steps, your forked repository will be permanently deleted from your GitHub account. Keep in mind that this action cannot be undone, so make sure you have a backup of any important code or files before deleting the repository.
Deleting outdated forked repositories is a good practice to keep your GitHub account organized and up to date. It allows you to focus on the repositories that are actively maintained and relevant to your work or projects.
Cleanup and Organization
When working with multiple repositories in GitHub, it’s important to keep your account clean and organized. This includes deleting any unnecessary or forked repositories that you no longer need. Deleting a forked repository in GitHub is a simple process that can help declutter your account and improve overall organization.
To delete a forked repository in GitHub, follow these steps:
- Go to the main page of the repository you want to delete.
- Click on the “Settings” tab located near the top-right corner of the page.
- Scroll down to the “Danger Zone” section.
- Click on the “Delete this repository” button.
- Enter the name of the repository to confirm the deletion.
- Click on the “I understand the consequences, delete this repository” button.
By following these steps, you can easily delete a forked repository in GitHub and keep your account clean and organized. It’s important to note that once a repository is deleted, all of its data, including issues, pull requests, and commits, will be permanently removed. Therefore, it’s crucial to double-check and make sure you no longer need the repository before proceeding with the deletion.
Step-by-Step Guide to Delete a Forked Repository in GitHub
If you have forked a repository in GitHub and no longer need it, you can easily delete it. Deleting a forked repository will remove all the files and history associated with it. Follow these steps to delete a forked repository in GitHub:
1. Open the GitHub website and sign in to your account.
2. Navigate to the main page of the forked repository you want to delete.
3. Click on the “Settings” tab located near the top-right corner of the repository page.
4. Scroll down to the “Danger Zone” section at the bottom of the page.
5. Click on the “Delete this repository” button.
6. A confirmation dialog box will appear. Enter the name of the repository to confirm the deletion.
7. Click on the “I understand the consequences, delete this repository” button.
8. The forked repository will be permanently deleted from your GitHub account.
By following these simple steps, you can easily delete a forked repository in GitHub. Make sure to double-check before deleting a repository, as this action cannot be undone.
Navigate to the Forked Repository
Once you have forked a repository in GitHub, you will need to navigate to the forked repository in order to delete it. To do this, follow the steps below:
- Go to the GitHub website and log in to your account.
- Click on your profile picture in the top right corner of the page.
- In the dropdown menu, click on “Your repositories”.
- You will be taken to a page that lists all of your repositories. Look for the forked repository that you want to delete.
- Click on the name of the forked repository to open it.
By following these steps, you will be able to navigate to the forked repository that you want to delete.