If you’re looking to disable or turn off Cortana, Microsoft’s virtual assistant, you’ve come to the right place. Whether you find Cortana intrusive or simply don’t use its features, removing it from your Windows device can help streamline your experience and free up system resources.
To remove Cortana, you have a few options. One method involves using the Windows Registry Editor to disable Cortana’s functionality. This involves making changes to your computer’s registry, so it’s important to proceed with caution and follow the steps carefully.
Another option is to use PowerShell, a powerful command-line tool, to remove Cortana. This method allows you to delete Cortana from your system entirely, ensuring that it won’t run in the background or take up any resources. However, it’s worth noting that removing Cortana using PowerShell is a more advanced method and should only be attempted if you’re comfortable with command-line tools.
Regardless of the method you choose, it’s important to back up your data before making any changes to your system. This ensures that you can restore your computer to its previous state if anything goes wrong during the removal process.
By following this step-by-step guide, you’ll be able to remove Cortana from your Windows device and enjoy a more streamlined and personalized computing experience. Whether you choose to disable, turn off, or delete Cortana entirely, this guide will walk you through the process and help you regain control over your device.
Section 1: Disabling Cortana
If you want to delete or remove Cortana from your Windows 10 computer, you can follow these steps to uninstall it:
| Step 1: | Click on the Start menu and open the Settings app. |
| Step 2: | Click on “Privacy” in the Settings app. |
| Step 3: | Scroll down and click on “Speech, inking, & typing” in the left-hand menu. |
| Step 4: | Click on “Stop getting to know me” to turn off Cortana’s personalized features. |
| Step 5: | Scroll down and click on “Manage cloud info” to remove your personal information from Cortana’s cloud storage. |
| Step 6: | Click on “Turn off” to disable Cortana completely. |
By following these steps, you can effectively remove Cortana from your Windows 10 computer and turn off its features. Keep in mind that disabling Cortana may limit some of the search and personalization features on your computer.
Turning Off Cortana in Windows Settings
If you want to remove Cortana from your Windows system, you can do so by following these steps:
- Open the Windows Settings by clicking on the Start menu and selecting the gear icon.
- In the Settings window, click on “Privacy”.
- On the left-hand side, click on “Speech, inking, & typing”.
- Under the “Speech” section, click on “Stop getting to know me”.
- A pop-up window will appear asking if you want to turn off Cortana. Click on “Turn off”.
- Next, go back to the Settings window and click on “Cortana”.
- Under the “Cortana across my devices” section, toggle off the switch for “Let Cortana respond to “Hey Cortana””.
- Scroll down and toggle off the switch for “Use Cortana even when my device is locked”.
- Finally, scroll to the top and click on the “Permissions & History” section.
- Click on “Manage the information Cortana can access from this device”.
- In the next window, click on “Clear” to delete all the data Cortana has collected.
By following these steps, you can successfully remove, uninstall, disable, or delete Cortana from your Windows system.
Disabling Cortana via Group Policy Editor
If you want to completely remove Cortana from your Windows system, you can do so by using the Group Policy Editor. This method is only available for Windows 10 Pro, Enterprise, and Education editions.
Here are the steps to disable Cortana via Group Policy Editor:
| Step 1: | Press Windows + R to open the Run dialog box. Type gpedit.msc and press Enter. |
| Step 2: | In the Group Policy Editor, navigate to Computer Configuration > Administrative Templates > Windows Components > Search. |
| Step 3: | Double-click on the Allow Cortana policy setting. |
| Step 4: | Select the Disabled option and click OK. |
| Step 5: | Restart your computer for the changes to take effect. |
By following these steps, you can delete, remove, turn off, disable, or uninstall Cortana from your Windows system using the Group Policy Editor. This method provides a more permanent solution compared to other methods.
Removing Cortana from the Taskbar
If you find Cortana to be unnecessary or simply want to remove it from your taskbar, you can easily do so by following these steps:
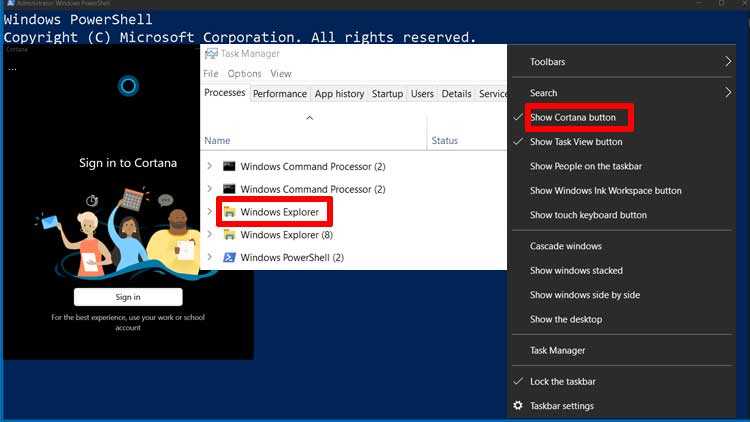
- Right-click on an empty space on your taskbar.
- From the context menu, hover over the “Cortana” option.
- Click on the “Cortana” option to open a sub-menu.
- In the sub-menu, click on the “Hidden” option to remove Cortana from the taskbar.
By following these steps, you will effectively remove Cortana from the taskbar. However, please note that this will only hide Cortana and not uninstall it from your system. If you wish to completely remove Cortana, you will need to disable or uninstall it through other means.
Section 2: Uninstalling Cortana
To completely remove Cortana from your Windows device, you have several options. Here are the steps to uninstall Cortana:
Option 1: Using PowerShell
1. Press the Windows key + X on your keyboard to open the Power User Menu.
2. Click on “Windows PowerShell (Admin)” to open PowerShell with administrative privileges.
3. In the PowerShell window, type the following command and press Enter:
Get-AppxPackage Microsoft.549981C3F5F10 | Remove-AppxPackage
This command will remove the Cortana app package from your system.
Option 2: Using the Settings App
1. Press the Windows key + I on your keyboard to open the Settings app.
2. Click on “Apps” to open the Apps & Features section.
3. In the Apps & Features section, scroll down and click on “Cortana”.
4. Click on the “Uninstall” button and follow the on-screen instructions to remove Cortana from your device.
Option 3: Using a Third-Party Uninstaller
If you prefer a more automated approach, you can use a third-party uninstaller tool to remove Cortana. These tools are designed to thoroughly delete unwanted programs from your system.
Some popular third-party uninstaller tools include Revo Uninstaller, IObit Uninstaller, and Geek Uninstaller. Simply download and install one of these tools, search for Cortana in the list of installed programs, and choose the uninstall option.
Note: Disabling or turning off Cortana through the Windows settings will only disable its features but not completely remove it from your system. To fully remove Cortana, it is recommended to use one of the above methods.
By following these steps, you can successfully remove Cortana from your Windows device and regain control over your system’s resources.
Using PowerShell to Uninstall Cortana
If you want to completely remove Cortana from your Windows 10 computer, you can use PowerShell to disable and delete it. Here’s how:
Step 1: Open PowerShell as an administrator. You can do this by right-clicking on the Start button and selecting “Windows PowerShell (Admin)”.
Step 2: In the PowerShell window, type the following command and press Enter:
Get-AppxPackage Microsoft.549981C3F5F10 | Remove-AppxPackage
This command will remove the Cortana app package from your computer.
Step 3: Next, type the following command and press Enter:
Get-AppxPackage -AllUsers Microsoft.Windows.Cortana | Remove-AppxPackage
This command will remove the Cortana app package for all users on your computer.
Step 4: Finally, type the following command and press Enter:
Get-AppxPackage -AllUsers Microsoft.Windows.Search | Foreach {Add-AppxPackage -DisableDevelopmentMode -Register "$($_.InstallLocation)\AppXManifest.xml"}
This command will re-register the Windows Search app, which is necessary for the proper functioning of the Start menu and search functionality.
After following these steps, Cortana should be completely disabled and removed from your Windows 10 computer. If you ever want to turn Cortana back on, you can do so by following the same steps and replacing the “Remove” commands with “Add” commands.
Note: Modifying system files and settings can have unintended consequences. Make sure to create a backup of your important files before making any changes.