If you’re using Windows 11, you may have noticed that over time, your computer’s storage space can become cluttered with old update files. These files take up valuable space and can slow down your system. Fortunately, there are steps you can take to delete these old Windows update files and free up storage on your computer.
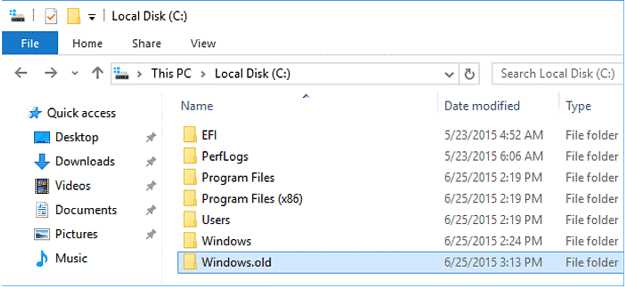
Windows updates are important for keeping your computer secure and up to date with the latest features and improvements. However, after installing updates, Windows keeps a copy of the old update files on your system. These files are stored in a folder called “Windows.old” and can take up a significant amount of space on your hard drive.
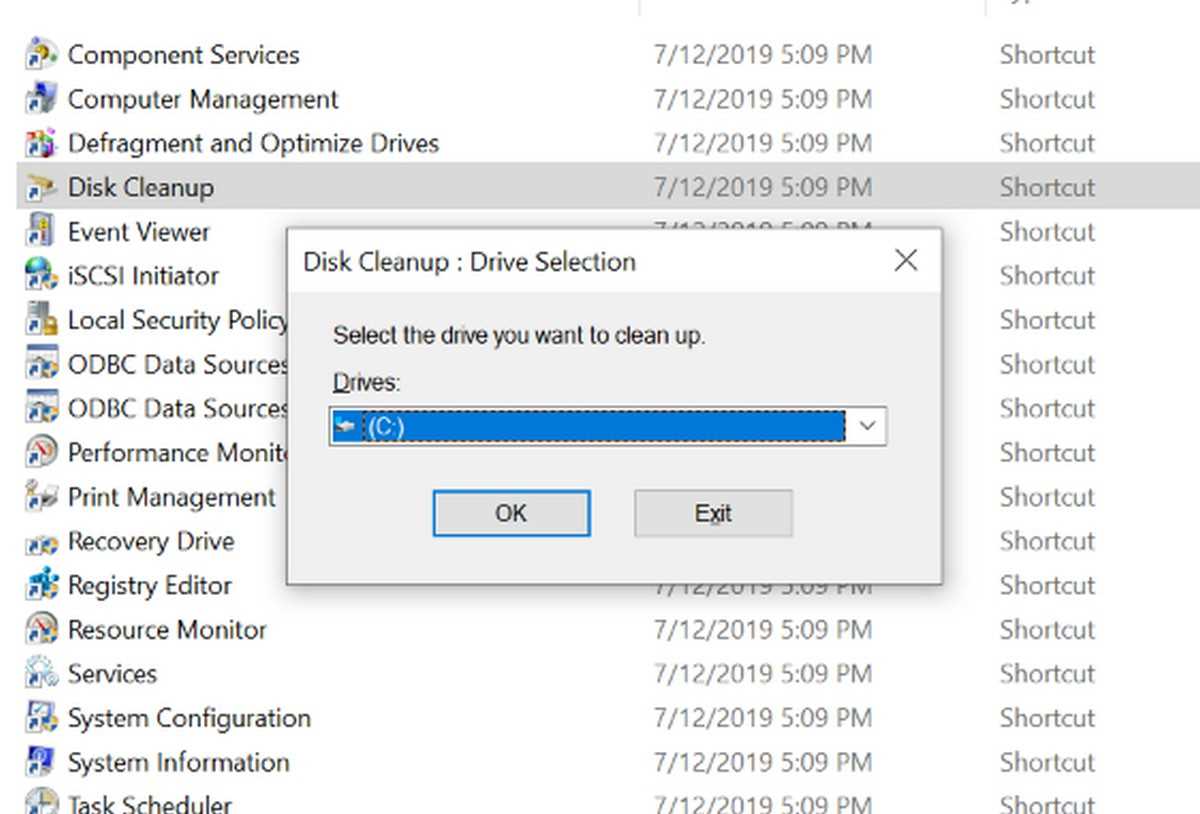
To delete these old Windows update files on Windows 11, you can use the built-in Disk Cleanup utility. This tool allows you to remove unnecessary files from your system, including the old update files. To access Disk Cleanup, simply search for it in the Start menu and open the application.
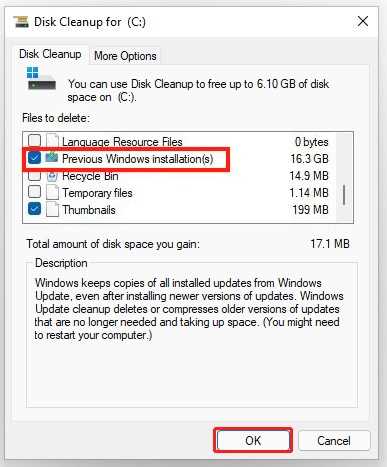
Once Disk Cleanup is open, select the drive where Windows is installed (usually the C: drive) and click on the “Clean up system files” button. This will scan your system for additional files that can be safely removed. Look for the “Previous Windows installation(s)” option in the list and make sure it is checked. Then, click on the “OK” button to start the cleanup process.
It’s important to note that deleting old Windows update files is a one-time process and cannot be undone. Therefore, before proceeding, make sure you have backed up any important files or data that you want to keep. Once the cleanup process is complete, you will have freed up valuable storage space on your Windows 11 computer and improved its overall performance.
Why Delete Old Windows Update Files
When using Windows 11, regular updates are essential for keeping your system secure and up to date with the latest features and improvements. However, over time, these updates can accumulate and take up a significant amount of storage space on your computer.
Deleting old Windows update files is important for several reasons:
1. Free up storage space:
Old update files can consume a considerable amount of disk space, especially if you have been using Windows 11 for a while. By deleting these files, you can reclaim valuable storage space and ensure that your computer runs smoothly.
2. Improve system performance:
Having a large number of old update files can slow down your computer’s performance. By removing these files, you can help improve the overall speed and responsiveness of your system.
3. Prevent potential issues:
Outdated update files may conflict with newer updates, leading to compatibility issues or system errors. By deleting old update files, you can minimize the risk of encountering such problems and ensure that your system remains stable.
4. Maintain system security:
Regularly updating your Windows 11 operating system is crucial for maintaining security. However, old update files may contain vulnerabilities that can be exploited by malicious actors. Deleting these files helps ensure that your system is protected against potential security threats.
In conclusion, deleting old Windows update files is necessary to free up storage space, improve system performance, prevent potential issues, and maintain system security. It is a simple yet effective way to optimize your Windows 11 experience.
Save Disk Space
One of the main reasons to delete old Windows update files on Windows 11 is to save disk space. Over time, these files can accumulate and take up a significant amount of storage on your computer. By removing them, you can free up space for other important files and applications.
Deleting old update files is especially important if you have a small SSD or limited storage capacity. Windows updates can be quite large, and if you have multiple updates installed, they can quickly consume a significant portion of your available disk space.
By regularly deleting old update files, you can ensure that your Windows 11 system runs smoothly and efficiently. It can also help prevent your computer from running out of disk space, which can lead to performance issues and slow down your overall system.
There are several ways to delete old update files on Windows 11, including using the built-in Disk Cleanup utility or manually deleting the files from the Windows Update folder. Whichever method you choose, it’s important to exercise caution and only delete files that you are sure are no longer needed.
Overall, deleting old Windows update files is a simple and effective way to save disk space on your Windows 11 computer. It can help improve system performance and ensure that you have enough storage for your important files and applications.
Improve System Performance
Regularly deleting old Windows update files can help improve the overall performance of your system. These files can take up a significant amount of storage space, causing your computer to run slower. By removing these unnecessary files, you can free up space and optimize your system’s performance.
One way to delete old Windows update files is through the Disk Cleanup utility. This built-in tool allows you to remove temporary files, system files, and other unnecessary data from your computer. To access Disk Cleanup, follow these steps:
| 1. | Open the Start menu and search for “Disk Cleanup”. |
| 2. | Click on the Disk Cleanup app from the search results. |
| 3. | Select the drive where Windows is installed (usually C:). |
| 4. | Click on the “Clean up system files” button. |
| 5. | Check the “Windows Update Cleanup” option. |
| 6. | Click on the “OK” button to start the cleanup process. |
Once the cleanup process is complete, the old Windows update files will be deleted, freeing up valuable storage space on your computer. This can help improve system performance and ensure that your computer runs smoothly.
It is recommended to perform this cleanup process regularly to prevent the accumulation of unnecessary files. By keeping your system clean and optimized, you can enjoy a faster and more efficient computing experience.
Prevent Update Issues
Regularly deleting old Windows update files can help prevent update issues and ensure the smooth functioning of your Windows system. These files can accumulate over time and take up valuable disk space, potentially causing performance issues and slowing down your computer.
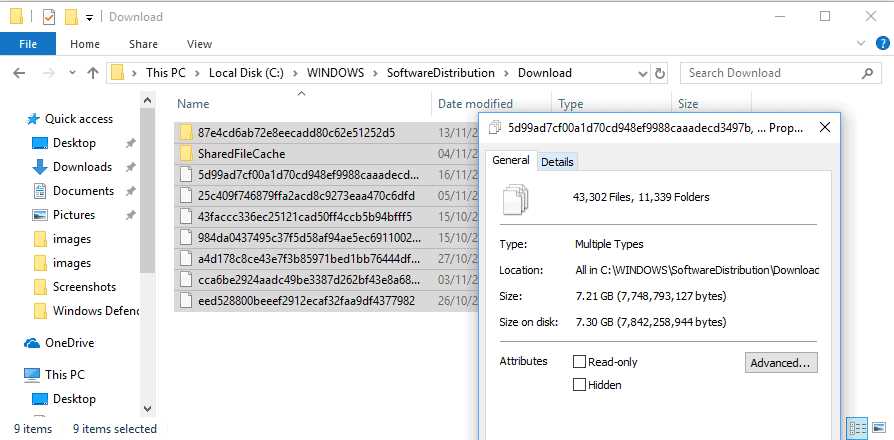
By deleting old Windows update files, you can free up space on your hard drive and reduce the risk of encountering update-related problems. These files are typically stored in the “SoftwareDistribution” folder, and removing them can help resolve issues such as update failures, installation errors, and system crashes.
However, it is important to note that deleting these files should be done with caution. Before deleting any files, it is recommended to create a backup or restore point to ensure that you can revert any changes if necessary.
To delete old Windows update files, you can follow these steps:
| 1. | Open File Explorer by pressing Win + E on your keyboard. |
| 2. | Navigate to the C:\Windows\SoftwareDistribution folder. |
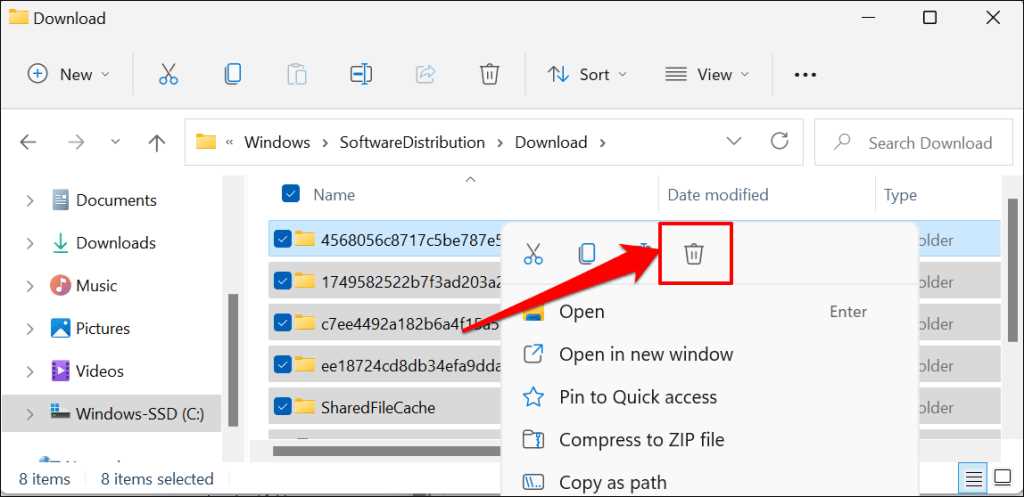
| 3. | Open the Download folder. |
| 4. | Select all the files and folders within the Download folder. |
| 5. | Press the Delete key on your keyboard or right-click and select Delete. |
| 6. | Confirm the deletion when prompted. |
Once you have deleted the old Windows update files, you may need to restart your computer for the changes to take effect. After restarting, your system will create new update files as needed.
By regularly deleting old Windows update files, you can prevent update issues and maintain the optimal performance of your Windows system.
Methods to Delete Old Windows Update Files
If you are using Windows 11 and want to free up some space on your computer, deleting old Windows update files can be a good option. These files can take up a significant amount of space on your hard drive, and removing them can help improve your computer’s performance.
There are several methods you can use to delete old Windows update files:
1. Disk Cleanup: The Disk Cleanup utility is a built-in tool in Windows 11 that allows you to delete unnecessary files from your computer. To use this tool, simply search for “Disk Cleanup” in the Start menu, select the drive where your Windows operating system is installed, and check the “Windows Update Cleanup” option. Click “OK” to delete the old update files.
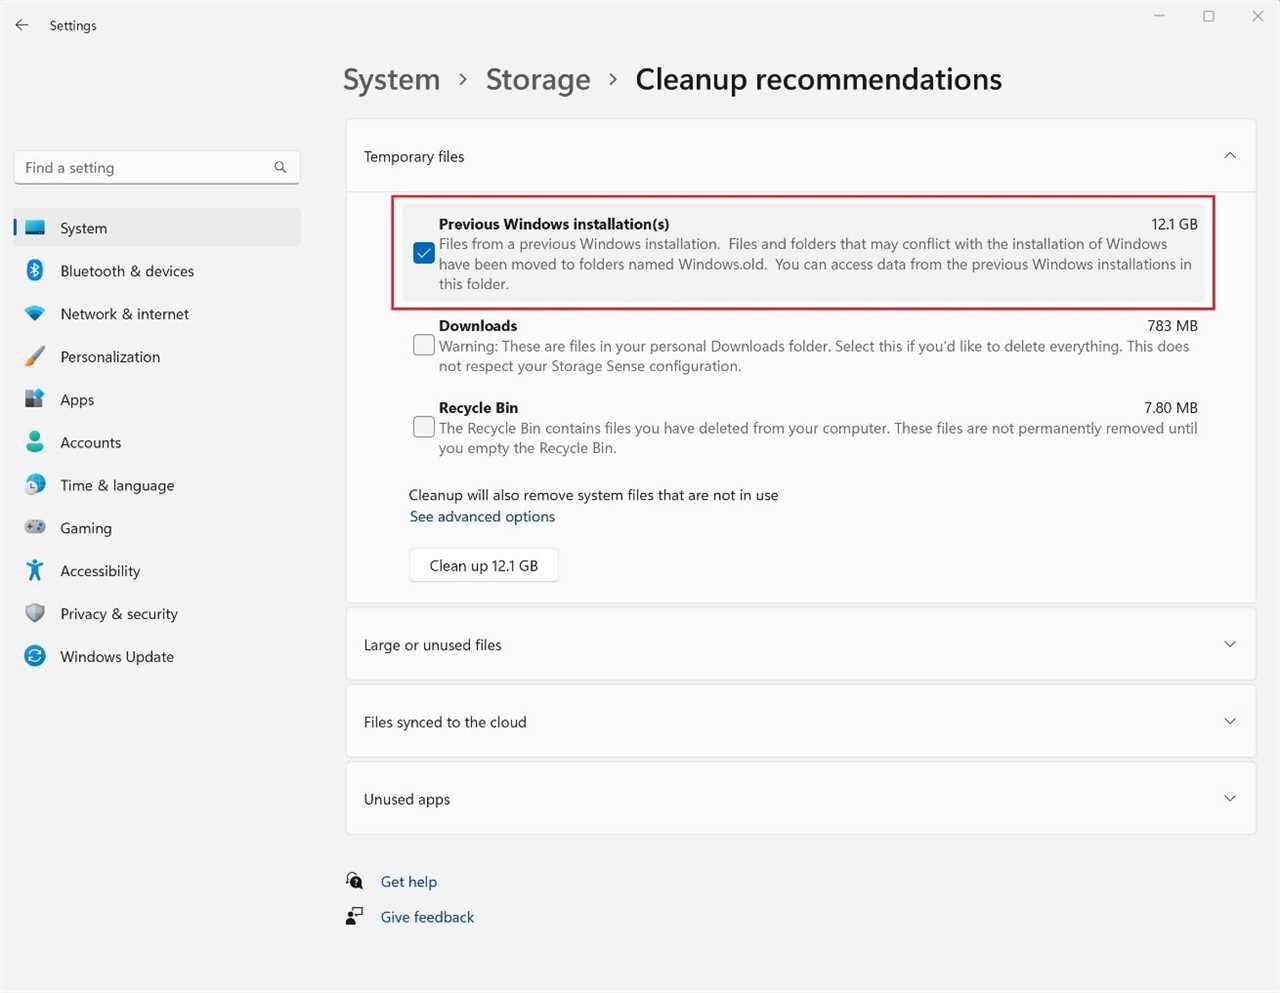
2. Windows Settings: Another way to delete old Windows update files is through the Windows Settings app. Go to “Settings” > “System” > “Storage” and click on the drive where your Windows operating system is installed. Then, click on “Temporary files” and check the “Previous Windows installation(s)” option. Click “Remove files” to delete the old update files.
3. Command Prompt: If you prefer using the Command Prompt, you can also delete old Windows update files using a few commands. Open the Command Prompt as an administrator and type the following command: DISM.exe /Online /Cleanup-Image /StartComponentCleanup. Press Enter to execute the command and wait for it to complete. This will clean up old update files and free up space on your computer.
4. Third-Party Software: There are also third-party software programs available that can help you delete old Windows update files. These programs often have additional features and can provide a more comprehensive cleaning of your computer. Some popular options include CCleaner, Wise Disk Cleaner, and BleachBit.
By using one of these methods, you can easily delete old Windows update files and reclaim valuable storage space on your computer. Just make sure to double-check the files you are deleting to avoid removing any important system files.
Using Disk Cleanup Tool
If you want to delete old Windows update files on your Windows 11 computer, you can use the built-in Disk Cleanup tool. This tool helps you free up space on your hard drive by removing unnecessary files, including old Windows update files.
To access the Disk Cleanup tool, follow these steps:
- Click on the Start menu and search for “Disk Cleanup”.
- Click on the “Disk Cleanup” app from the search results.
- Once the Disk Cleanup window opens, select the drive where your Windows operating system is installed (usually the C: drive).
- Click on the “OK” button to start the scanning process.
- After the scanning is complete, you will see a list of files that can be deleted.
- Scroll down the list and check the box next to “Windows Update Cleanup”.
- Click on the “OK” button to delete the selected files.
By using the Disk Cleanup tool, you can easily delete old Windows update files and free up valuable disk space on your Windows 11 computer.
Manually Deleting Files
If you want to free up some space on your Windows 11 device, you can manually delete old update files. Here’s how:
Step 1: Open File Explorer by pressing the Windows key + E on your keyboard.
Step 2: In the File Explorer window, navigate to the C: drive.
Step 3: Open the “Windows” folder.
Step 4: Scroll down and locate the “SoftwareDistribution” folder.
Step 5: Open the “SoftwareDistribution” folder.
Step 6: Inside the “SoftwareDistribution” folder, you will find several subfolders. Look for the “Download” folder.
Step 7: Open the “Download” folder.
Step 8: In the “Download” folder, you will see a list of files. These are the old update files that you can delete.
Step 9: Select the files you want to delete by holding down the Ctrl key and clicking on each file.
Step 10: Once you have selected the files, right-click on one of the selected files and choose “Delete” from the context menu.
Step 11: A confirmation dialog will appear asking if you want to permanently delete the files. Click “Yes” to proceed.
Note: Deleting these old update files will not affect the functionality of your Windows 11 system. However, it is recommended to only delete files that you are sure are no longer needed.
By following these steps, you can manually delete old update files on your Windows 11 device and free up valuable storage space.
Using Storage Sense
If you are running Windows 11 and want to delete old update files, one convenient way to do so is by using Storage Sense. Storage Sense is a built-in feature in Windows 11 that helps you manage and free up storage space on your device.
To use Storage Sense to delete old Windows update files, follow these steps:
- Open the Settings app by clicking on the Start button and selecting “Settings” from the menu.
- In the Settings app, click on the “System” category.
- On the left sidebar, click on “Storage”.
- Under the “Storage” section, you will see a toggle switch for Storage Sense. Turn it on if it is not already enabled.
- Click on “Configure Storage Sense or run it now”.
- In the Storage Sense settings, you can choose how often you want Windows to run Storage Sense and delete old files. You can also select the types of files you want to delete, including temporary files, recycle bin files, and old Windows update files.
- Make sure the “Delete previous versions of Windows” option is checked.
- Click on the “Clean now” button to run Storage Sense and delete the selected files.
By using Storage Sense, you can easily delete old Windows update files and free up valuable storage space on your Windows 11 device. This can help improve the performance and efficiency of your system.
Precautions Before Deleting Old Windows Update Files

Before you proceed to delete old Windows update files on your Windows 11 operating system, it is important to take certain precautions to ensure a smooth and error-free process. Here are some precautions you should consider:
- Backup important files: Before deleting any files, it is always recommended to create a backup of your important files and data. This will ensure that you have a copy of your files in case anything goes wrong during the deletion process.
- Verify the files: Double-check the files you are planning to delete to ensure that they are indeed old Windows update files. Deleting the wrong files can cause system instability or even lead to data loss.
- Check for system requirements: Make sure that your system meets the requirements for deleting old Windows update files. Some files may be necessary for the proper functioning of certain applications or features, so it is important to verify if deleting them will not cause any issues.
- Update your system: Before deleting old Windows update files, it is recommended to ensure that your system is up to date with the latest updates. This will help prevent any compatibility issues that may arise after deleting the files.
- Use a reliable method: When deleting old Windows update files, it is advisable to use a reliable method or tool provided by Microsoft or trusted third-party software. This will help ensure that the deletion process is carried out correctly and without any unintended consequences.
By following these precautions, you can minimize the risk of encountering any problems while deleting old Windows update files on your Windows 11 system. Remember to proceed with caution and always have a backup of your important files.