Printing a word document is a simple process that allows you to have a physical copy of your work. Whether you need a hard copy for reference or prefer reading on paper, knowing how to print a word document is an essential skill. In this step-by-step guide, we will walk you through the process of printing a word document, from formatting your page to saving and opening the document.
Before you print your word document, it’s important to ensure that the formatting is correct. This includes adjusting the margins, selecting the appropriate font and size, and checking for any spelling or grammar errors. By taking the time to format your document properly, you can ensure that the printed version looks professional and is easy to read.
Once you have formatted your word document, it’s time to save and open it. Saving your document ensures that you don’t lose any changes or edits you have made. To save your document, simply click on the “Save” button in the top left corner of the screen. Then, choose a location on your computer where you want to save the document, and give it a name. When you want to print the document, you can easily open it by double-clicking on the file.
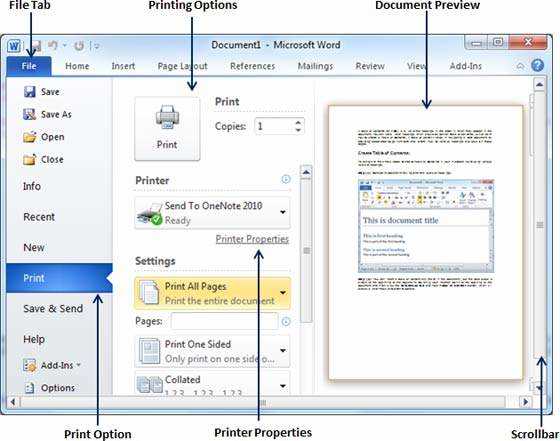
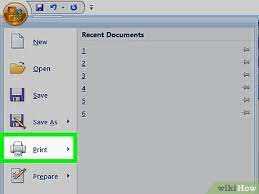
Now that your word document is ready to be printed, it’s time to proceed with the printing process. Connect your printer to your computer and make sure it is turned on. Then, go to the “File” tab in the top left corner of the screen and click on “Print”. A print preview will appear, allowing you to see how your document will look when printed. If everything looks good, click on the “Print” button to start printing your word document.
Preparing Your Document for Printing
Before you print your Word document, it’s important to make sure it is properly formatted and ready to be printed. Follow these steps to prepare your document for printing:
- Save your document: Before you begin formatting your document, it’s always a good idea to save it. Click on the “File” tab, then select “Save” to save your document.
- Open your document: Once your document is saved, you can open it by clicking on the “File” tab and selecting “Open”. Browse for your document and click “Open” to open it in Word.
- Edit your document: Review your document and make any necessary changes or edits. You can add or delete text, adjust formatting, or make any other modifications to ensure your document looks the way you want it to.
- Check page layout: Go to the “Page Layout” tab and check the page size, margins, and orientation. Adjust these settings if needed to ensure your document fits properly on the printed page.
- Proofread your document: It’s always a good idea to proofread your document before printing to catch any spelling or grammar errors. Use the spell check feature in Word to identify and correct any mistakes.
- Save your document again: After making any necessary changes or edits, save your document again to ensure you have the most up-to-date version.
- Preview your document: Before printing, use the print preview feature in Word to see how your document will look when printed. This allows you to make any final adjustments or corrections before printing.
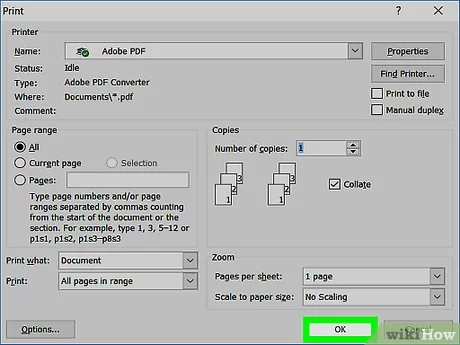
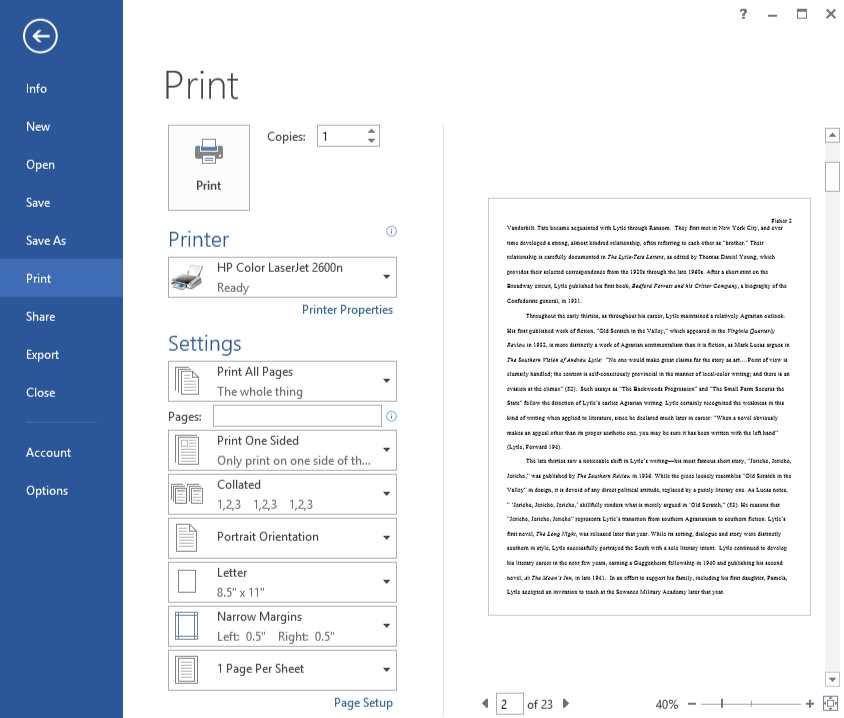
- Choose your print settings: Click on the “File” tab, then select “Print” to open the print settings. Here, you can choose the printer, number of copies, and other print options.
- Print your document: Once you have selected your print settings, click on the “Print” button to print your document. Make sure your printer is properly connected and loaded with paper.
By following these steps, you can ensure that your Word document is properly prepared and ready to be printed.
Adjusting Margins and Page Layout
When printing a Word document, it’s important to ensure that the margins and page layout are set correctly. This ensures that the content is properly aligned and fits within the printable area of the page.
To adjust the margins and page layout, follow these steps:
- Open the Word document that you want to print.
- Click on the “File” tab at the top left corner of the screen.
- Select the “Page Setup” option from the drop-down menu.
- In the Page Setup dialog box, you can adjust the margins by entering specific values in the “Top,” “Bottom,” “Left,” and “Right” fields. Alternatively, you can use the up and down arrows to increase or decrease the margin size.
- You can also change the page orientation from portrait to landscape by selecting the desired option under the “Orientation” section.
- Under the “Paper Size” section, you can select a specific paper size for your document. If you’re unsure, you can leave it as the default “Letter” size.
- Once you have made the necessary adjustments, click on the “OK” button to save the changes.
By adjusting the margins and page layout, you can ensure that your Word document prints exactly as you want it to. This is especially useful when printing documents that require specific formatting, such as resumes, business letters, or academic papers.
Checking Page Orientation and Size
Before printing a Word document, it is important to check the page orientation and size to ensure that the document will be printed correctly. Here are the steps to check and edit the page orientation and size:
Step 1: Open the Word document that you want to print.
Step 2: Click on the “File” tab in the top left corner of the screen.
Step 3: From the drop-down menu, select “Print” to open the print settings.
Step 4: In the print settings window, click on the “Page Setup” link.
Step 5: In the “Page Setup” dialog box, you will see options to edit the page orientation and size.
Step 6: To change the page orientation, click on the “Orientation” drop-down menu and select either “Portrait” or “Landscape”.
Step 7: To change the page size, click on the “Size” drop-down menu and select the desired size.
Step 8: Once you have made the necessary changes, click on the “OK” button to save the settings.
Step 9: Now, you can proceed to print the document by clicking on the “Print” button in the print settings window.
By following these steps, you can easily check and edit the page orientation and size of your Word document before printing it.
Formatting Text and Images
When you open a Word document, you may need to format the text and images to make them more visually appealing or to emphasize certain information. Here is a step-by-step guide on how to format text and images in a Word document:
| Step 1: | Open the Word document that you want to format. |
| Step 2: | Select the text or image that you want to format. To select text, simply click and drag your cursor over the desired text. To select an image, click on it once. |
| Step 3: | Go to the “Format” tab in the Word toolbar. Here, you will find various options for formatting your selected text or image. |
| Step 4: | For text formatting, you can change the font, size, color, and style. You can also apply effects such as bold, italic, underline, and strikethrough. Additionally, you can adjust the alignment and indentation of the text. |
| Step 5: | For image formatting, you can resize, crop, and rotate the image. You can also apply various artistic effects and adjust the brightness, contrast, and color settings. |
| Step 6: | Once you have finished formatting the text or image, you can preview how it will look on the printed page. To do this, go to the “Print” tab and click on the “Print Preview” button. This will show you a preview of the entire page. |
| Step 7: | If you are satisfied with the formatting, you can proceed to print the document. Go to the “File” tab and click on the “Print” option. Adjust any printing settings as needed, such as the number of copies or the page range, and then click on the “Print” button. |
By following these steps, you can easily format text and images in a Word document to create professional-looking and well-organized pages.
Printing Your Document
Once you have finished editing and formatting your document in Microsoft Word, you may want to print it out for various purposes. Printing a Word document is a straightforward process that can be done in just a few simple steps.
- First, make sure you have a printer connected to your computer and turned on.
- Next, open the Word document you want to print. You can do this by clicking on the “File” tab in the top left corner of the screen and selecting “Open”.
- In the “Open” dialog box, navigate to the location where your document is saved and select it. Then click on the “Open” button.
- Once your document is open, go to the “File” tab again and this time select “Print”.
- In the print settings window, you can choose the printer you want to use from the drop-down menu if you have multiple printers connected to your computer.
- You can also specify the number of copies you want to print in the “Copies” field.
- If you want to print only specific pages of your document, you can enter the page range in the “Pages” field.
- Finally, click on the “Print” button to start printing your document.
Once you click on the “Print” button, your document will be sent to the printer and it will start printing. Make sure you have enough paper and ink or toner in your printer before you start printing.
Printing your Word document is a simple process that allows you to have a physical copy of your file. Whether you need to print a document for reference, sharing, or any other purpose, following these steps will help you achieve it easily.