
npm, short for Node Package Manager, is a widely used package manager for JavaScript. It allows developers to easily install and manage packages and dependencies for their projects. But have you ever wondered where exactly npm installs these packages?
When you run the npm install command, npm looks for the package in the npm registry, which is a large collection of packages hosted on the internet. If the package is found in the registry, npm downloads the package and installs it in a specific location on your computer.
The location where npm installs packages depends on the type of project you are working on. For global installations, npm installs packages in a global directory, which is typically located in a system-wide location. This allows you to use the installed packages across multiple projects.
On the other hand, for local installations, npm installs packages in a local directory within your project. This ensures that the installed packages are only available for that specific project, keeping the dependencies isolated and preventing conflicts between different projects.
Understanding where npm installs packages is important for managing your project’s dependencies and ensuring that your code runs smoothly. By knowing the installation location, you can easily access and update the installed packages as needed.
Understanding npm installation process
When it comes to installing packages, npm is the go-to tool for many developers. But where does npm actually install these packages?
npm stands for Node Package Manager, and it is a command-line tool that allows developers to easily install and manage packages for their Node.js projects. When you run the command “npm install”, npm looks for the package in its registry and downloads it to a specific location on your computer.
The location where npm installs packages depends on the type of project you are working on. For global installations, npm installs packages in a directory that is specified in your system’s PATH environment variable. This allows you to use the installed packages from anywhere on your computer.
For local installations, npm creates a “node_modules” directory in the root of your project. It then installs the package and its dependencies into this directory. This ensures that the installed packages are only available within the scope of your project.
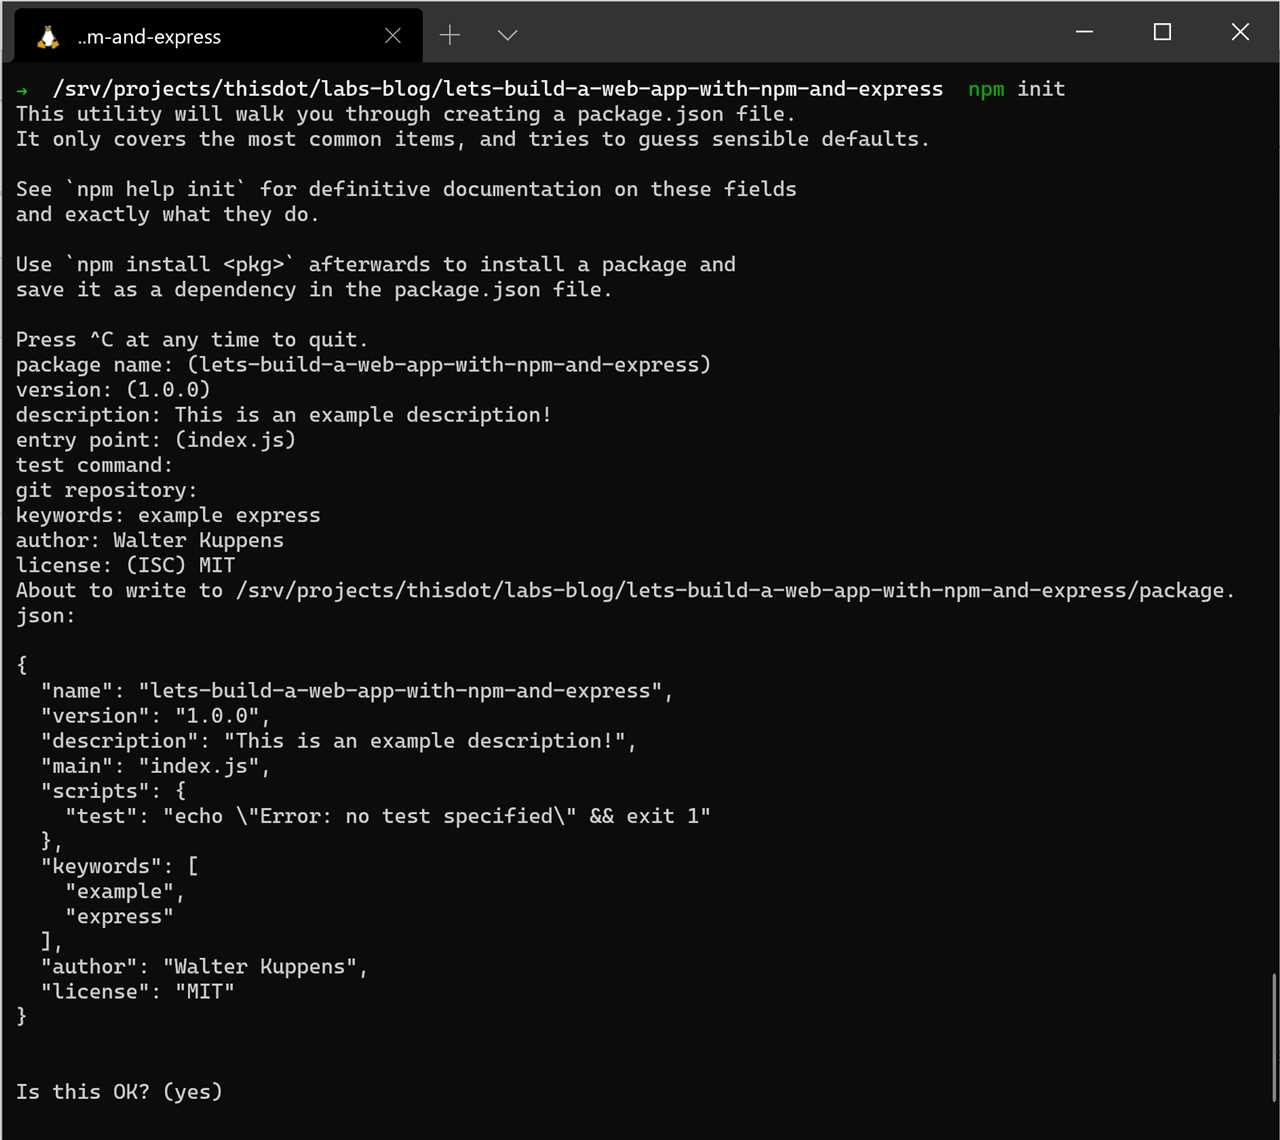
When you install a package using npm, it also creates a “package.json” file in your project’s root directory. This file contains metadata about your project and the packages that it depends on. It also includes information about the installed packages, such as their versions and dependencies.
In conclusion, npm installs packages in different locations depending on whether you are doing a global or local installation. Understanding this installation process is crucial for managing dependencies and ensuring that your project runs smoothly.
Dependency resolution

When npm installs packages, it needs to resolve their dependencies. Dependency resolution is the process of determining which versions of packages should be installed based on the requirements specified in the package.json file.
npm uses a dependency tree to track and manage dependencies. The tree starts with the main package and includes all of its direct and indirect dependencies. Each package has a version number associated with it, and npm uses semantic versioning to determine compatibility between packages.
When npm installs a package, it checks its dependencies and looks for the latest compatible version that satisfies the requirements specified in the package.json file. If a compatible version is found, npm installs it. If not, npm may try to install a different version or show an error if no compatible version is available.
In some cases, there may be conflicts between different packages’ dependencies. npm tries to resolve these conflicts by finding a version that satisfies the requirements of all packages. If a conflict cannot be resolved, npm may show an error or prompt the user to manually resolve the conflict.
Dependency resolution is an important part of the package installation process. It ensures that the correct versions of packages are installed and that there are no conflicts between dependencies. By managing dependencies effectively, npm helps developers build reliable and stable applications.
| Command | Description |
|---|---|
| npm install | Installs the dependencies specified in the package.json file |
| npm install package-name | Installs a specific package and its dependencies |
| npm install –save package-name | Installs a package and saves it as a dependency in the package.json file |
Package download
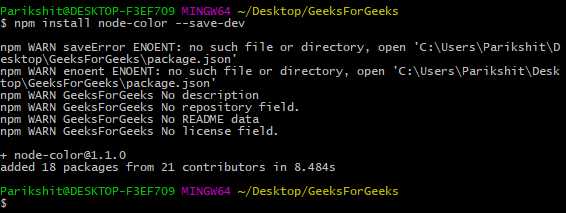
When using npm, you can easily download and install packages from the npm registry. The npm command install is used to download and install packages.
To install a package, you need to specify the package name as an argument to the install command. For example, to install a package named “example-package”, you would run the following command:
npm install example-package
npm will then download the package from the npm registry and install it in your project’s node_modules directory. It will also add the package as a dependency in your project’s package.json file.
If you want to install a specific version of a package, you can specify the version number as part of the package name. For example, to install version 1.0.0 of “example-package”, you would run the following command:
npm install example-package@1.0.0
npm will then download and install the specified version of the package.
In addition to installing packages from the npm registry, you can also install packages from other sources, such as a Git repository or a local directory. To install a package from a Git repository, you can specify the Git URL as the package name. To install a package from a local directory, you can specify the path to the directory as the package name.
Overall, npm provides a simple and convenient way to download and install packages for your projects. Whether you need to install packages from the npm registry or from other sources, npm has got you covered.
Package installation
When using npm, the install command is used to install packages. This command allows you to easily add dependencies to your project and manage them efficiently. But where does npm install packages?
By default, npm installs packages in a folder called node_modules in the root directory of your project. This folder is created automatically when you run the npm install command. Inside the node_modules folder, each package is installed in its own subfolder, with the package name as the folder name.
When you install a package, npm looks for the package in the npm registry, which is a public repository of packages. If the package is found, npm downloads the package and its dependencies from the registry and installs them in the node_modules folder.
If you specify a specific version of a package in your package.json file, npm will install that version. If you don’t specify a version, npm will install the latest version of the package.
It’s important to note that the node_modules folder should not be committed to version control, as it can be easily regenerated by running npm install on a new machine or after deleting the folder.
| Command | Description |
|---|---|
npm install |
Installs all dependencies listed in package.json |
npm install <package> |
Installs a specific package |
npm install <package>@<version> |
Installs a specific version of a package |
By understanding how npm installs packages and how to use the install command, you can easily manage your project’s dependencies and ensure that your code is always up to date.
Default installation directory

When you use npm to install packages, it automatically installs them in a default directory on your computer. The specific location of this directory depends on your operating system.
On Windows, the default installation directory for npm packages is:
C:\Users\{your-username}\AppData\Roaming

pm

ode_modules
On macOS and Linux, the default installation directory for npm packages is:
/usr/local/lib/node_modules
It’s important to note that these are the default installation directories, but you can change them if needed. You can specify a different directory using the --prefix flag when running the npm install command.
Understanding the default installation directory can be helpful when you need to locate installed packages or when troubleshooting installation issues.
Global installation

When you install packages using npm, by default they are installed locally in the current directory. However, there may be cases where you want to install a package globally, so that it is accessible from any directory on your system.
To install a package globally, you can use the npm install -g command followed by the package name. For example:
npm install -g package-name
This will install the package globally, making it available for use in any project or directory on your system. Global installation is useful for packages that provide command-line tools or utilities that you want to use across multiple projects.
It’s important to note that global installation requires administrative privileges, so you may need to run the command with sudo or as an administrator, depending on your operating system.
To uninstall a globally installed package, you can use the npm uninstall -g command followed by the package name. For example:
npm uninstall -g package-name
This will remove the package from your system, making it no longer accessible globally.
Global installation can be a convenient way to manage packages that you use frequently and want to have available across all your projects. However, it’s generally recommended to install packages locally whenever possible, as global installations can sometimes lead to version conflicts or other issues.
When using npm, it’s important to understand the difference between local and global installations and choose the appropriate method based on your specific needs.
Local installation

When you install packages using npm, you have the option to install them locally. This means that the packages will be installed in the current directory, typically within a “node_modules” folder.
To install a package locally, you can use the following command:
npm install package-name
Where “package-name” is the name of the package you want to install. This command will download the package from the npm registry and save it in the “node_modules” folder.
Local installation is useful when you want to use a package in a specific project without affecting other projects or the global installation of npm packages on your system.
Once a package is installed locally, you can require it in your code using the require() function. This allows you to use the functionality provided by the package in your project.
It’s important to note that when you install a package locally, it will only be available within the directory where it was installed. If you want to use the package in other projects, you will need to install it in each project separately.
Local installation also allows you to specify the version of the package you want to install. You can do this by appending the version number to the package name, like this:
npm install package-name@version
Where “version” is the desired version of the package. This allows you to install a specific version of a package or specify a version range.
Overall, local installation with npm provides a convenient way to manage packages within a specific project, allowing you to easily install and use packages without affecting other projects or the global installation of npm packages on your system.


