
If you’re looking for a way to remove McAfee from your computer, you’ve come to the right place. McAfee is a popular antivirus software that many people use to protect their devices from malware and other threats. However, there may be times when you want to uninstall it for various reasons. Whether you’re switching to a different antivirus program or simply no longer need McAfee, this step-by-step guide will show you how to delete it from your system.
Before we dive into the process, it’s important to note that uninstalling McAfee can be a bit tricky. The software is designed to be difficult to remove completely, as it wants to ensure that your device stays protected. However, with the right steps and a little patience, you can successfully uninstall McAfee from your computer.
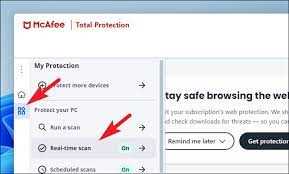
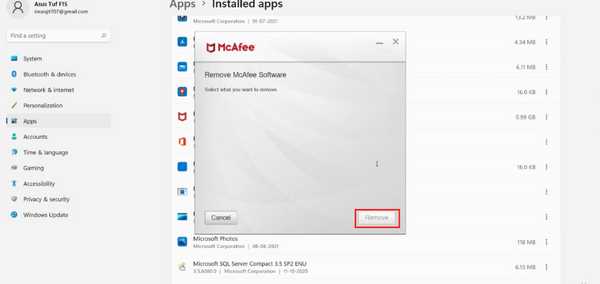
To begin the uninstallation process, you’ll need to open the Control Panel on your computer. You can do this by clicking on the Start menu and searching for “Control Panel.” Once you have the Control Panel open, navigate to the “Programs” or “Programs and Features” section. Here, you’ll find a list of all the programs installed on your computer.
Scroll through the list until you find McAfee, then click on it to select it. Next, click on the “Uninstall” or “Remove” button at the top of the list. This will initiate the uninstallation process. Follow the on-screen prompts to complete the uninstallation, making sure to select any additional options that may be presented to you.
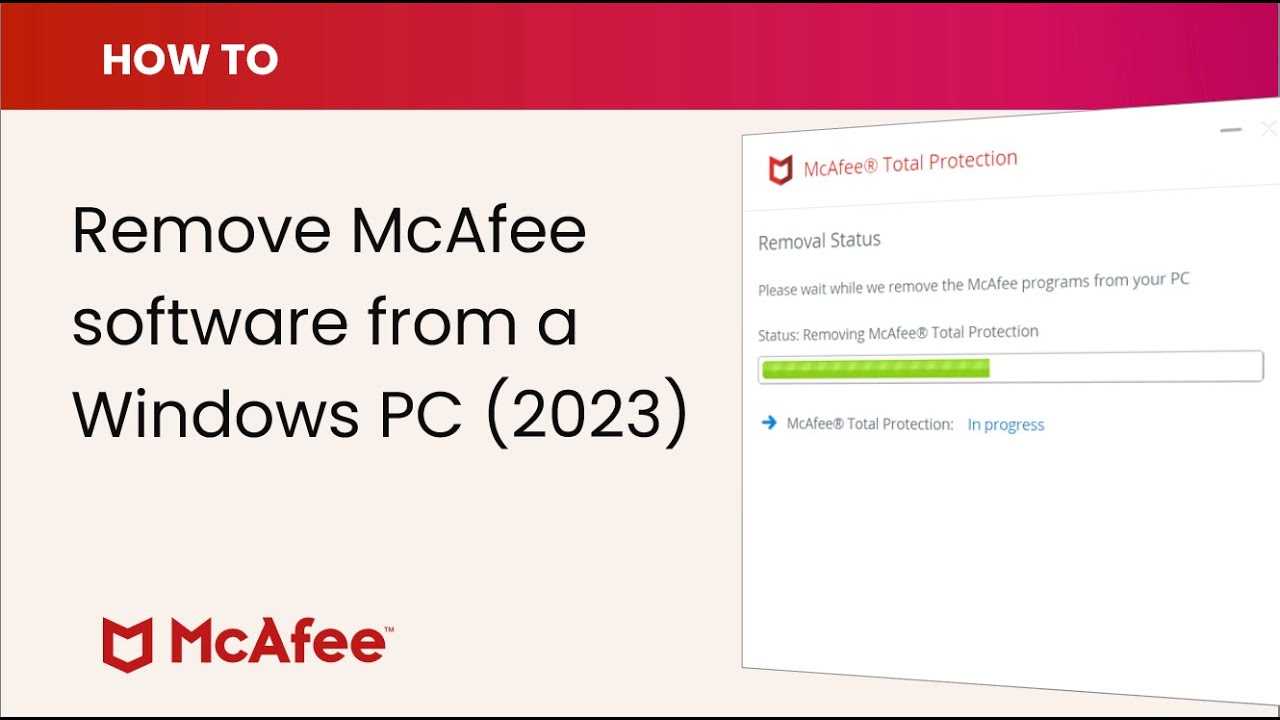
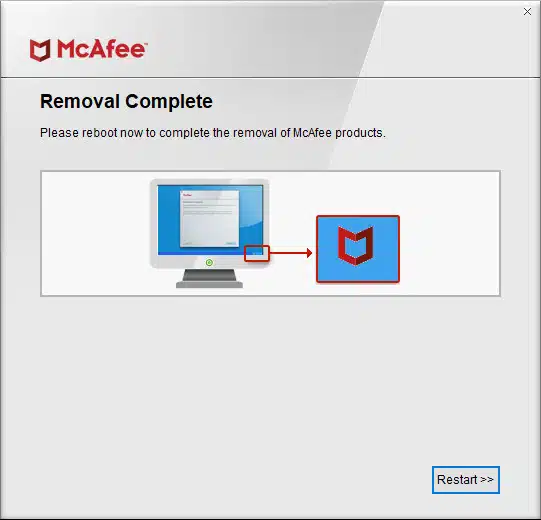
Once the uninstallation process is complete, you’ll need to restart your computer to fully remove McAfee. After your computer has restarted, it’s a good idea to run a scan with a different antivirus program to ensure that your device is still protected. You can choose from a variety of free and paid antivirus software options available online.
In conclusion, removing McAfee from your computer can be a bit challenging, but by following these step-by-step instructions, you can successfully delete it from your system. Remember to restart your computer after the uninstallation process is complete and consider installing a different antivirus program to keep your device protected. With a little patience and the right tools, you’ll have McAfee removed from your computer in no time.
Uninstalling McAfee from Windows
If you’re wondering how to delete McAfee from your Windows computer, follow these step-by-step instructions:
- Click on the “Start” button in the bottom left corner of your screen.
- Go to the “Control Panel” and open it.
- Click on “Programs” or “Programs and Features” depending on your Windows version.
- Scroll through the list of installed programs and locate “McAfee” or any McAfee-related software.
- Right-click on the McAfee program and select “Uninstall” or “Remove”.
- Follow the on-screen prompts to complete the uninstallation process.
- Restart your computer to ensure that McAfee is completely removed.
By following these steps, you can easily delete McAfee from your Windows computer and free up space on your hard drive.
Access the Control Panel
To delete McAfee from your computer, you will need to access the Control Panel. The Control Panel is a centralized location where you can manage and uninstall programs on your computer.
Here is how to access the Control Panel:
- Click on the “Start” button located at the bottom left corner of your screen.
- In the search bar, type “Control Panel” and press Enter.
- The Control Panel window will open, displaying various options and settings.
- Look for the “Programs” or “Programs and Features” option and click on it.
- A list of installed programs will appear.
- Scroll through the list and locate McAfee.
- Click on McAfee to select it.
- Click on the “Uninstall” or “Remove” button at the top of the list.
- Follow the on-screen prompts to complete the uninstallation process.
By following these steps, you will be able to access the Control Panel and uninstall McAfee from your computer.
Locate McAfee in the Programs List

If you want to delete McAfee from your computer, you first need to locate it in the programs list. Follow these steps:
| Step | Action |
|---|---|
| 1 | Click on the “Start” button located at the bottom left corner of your screen. |
| 2 | Open the “Control Panel” by clicking on it in the Start menu. |
| 3 | In the Control Panel, select “Programs” or “Programs and Features” depending on your operating system. |
| 4 | Look for McAfee in the list of installed programs. |
| 5 | If you have trouble finding it, you can use the search bar at the top right corner of the Programs list and type “McAfee” to filter the results. |
| 6 | Once you have located McAfee, click on it to select it. |
Now that you have located McAfee in the programs list, you can proceed with the next steps to delete it from your computer.
Uninstall McAfee

If you no longer need McAfee antivirus software on your computer and want to uninstall it, follow these steps:
Step 1: Open the Start menu and click on “Control Panel”.
Step 2: In the Control Panel window, click on “Programs” or “Programs and Features”.
Step 3: Look for McAfee in the list of installed programs and click on it.
Step 4: Click on the “Uninstall” or “Remove” button.
Step 5: Follow the on-screen instructions to complete the uninstallation process.
Step 6: Restart your computer to fully remove McAfee from your system.
Note: It is recommended to restart your computer after uninstalling McAfee to ensure all components are removed.
By following these steps, you will be able to uninstall McAfee from your computer and free up space on your hard drive.
Removing McAfee from Mac

If you want to delete McAfee from your Mac, follow these step-by-step instructions:
- Open the McAfee application on your Mac.
- Click on the McAfee menu in the top-left corner of the screen.
- Select “Preferences” from the drop-down menu.
- In the Preferences window, click on the “General” tab.
- Scroll down and click on the “Uninstall” button.
- A pop-up window will appear asking if you want to uninstall McAfee. Click “Uninstall” to confirm.
- Enter your administrator password when prompted.
- Wait for the uninstallation process to complete.
- Once McAfee is successfully uninstalled, restart your Mac.
After following these steps, McAfee should be completely removed from your Mac.
Open the Applications Folder
To delete McAfee from your computer, you will need to navigate to the Applications folder. Here is a step-by-step guide on how to do it:
| Step 1: | Click on the “Finder” icon in your dock to open a Finder window. |
| Step 2: | In the menu bar at the top of the screen, click on “Go” and then select “Applications” from the drop-down menu. |
| Step 3: | A new Finder window will open, displaying all the applications installed on your computer. Scroll through the list and locate the McAfee application. |
| Step 4: | Once you have found the McAfee application, right-click on it and select “Move to Trash” from the context menu. Alternatively, you can drag the McAfee application to the Trash icon in your dock. |
| Step 5: | After moving McAfee to the Trash, you will need to empty the Trash to permanently delete the application. Right-click on the Trash icon in your dock and select “Empty Trash” from the context menu. |
By following these steps, you will be able to delete McAfee from your computer and ensure that all associated files are removed as well.
Find McAfee in the Applications List
To delete McAfee from your computer, you first need to locate it in the applications list. Follow these steps to find McAfee:
- Open the Applications folder: Go to the Finder and click on “Applications” in the sidebar.
- Scroll through the list: Look for the McAfee folder or any McAfee-related applications.
- Identify McAfee: McAfee applications usually have “McAfee” in their names or icons.
- Drag to Trash: Once you find McAfee, click and drag the application or folder to the Trash icon in the Dock.
- Empty Trash: Right-click on the Trash icon and select “Empty Trash” to permanently delete McAfee from your computer.
Note: If you cannot find McAfee in the Applications folder, it may be located in a different directory. In that case, you can use the search function in Finder to locate the files associated with McAfee and delete them manually.
Move McAfee to Trash
To delete McAfee from your computer, you will need to move it to the trash. Here is how you can do it:
Step 1: Open the McAfee application on your computer.
Step 2: Locate the McAfee icon in your system tray or taskbar.
Step 3: Right-click on the McAfee icon and select “Exit” or “Close” to shut down the program.
Step 4: Open the “Applications” folder on your computer.
Step 5: Find the McAfee application in the list of installed programs.
Step 6: Click and drag the McAfee application to the trash bin icon on your desktop.
Step 7: Empty the trash bin to permanently delete McAfee from your computer.
By following these steps, you can successfully move McAfee to the trash and remove it from your computer.


