
Yarn is a package manager that allows you to manage dependencies and install packages for your project. It is a popular choice among developers due to its speed and reliability. If you are new to Yarn and wondering how to install it for your project, this step-by-step guide will walk you through the process.
Step 1: Check if Node.js is installed on your system. Yarn requires Node.js to be installed in order to work properly. You can check if Node.js is installed by opening your terminal or command prompt and running the command node -v. If Node.js is not installed, you can download and install it from the official Node.js website.
Step 2: Once Node.js is installed, you can proceed to install Yarn. Open your terminal or command prompt and run the following command: npm install -g yarn. This command will install Yarn globally on your system, making it accessible from any directory.
Step 3: After the installation is complete, you can verify that Yarn is installed by running the command yarn -v in your terminal or command prompt. If Yarn is installed correctly, it will display the version number.
Step 4: Congratulations! You have successfully installed Yarn for your project. Now you can start using Yarn to manage your project’s dependencies and install packages. To get started, navigate to your project directory in the terminal or command prompt and run the command yarn init to initialize a new Yarn project.
By following these simple steps, you can easily install Yarn for your project and take advantage of its powerful features. Happy coding!
Section 1: Download and Install Node.js
To use Yarn, you first need to have Node.js installed on your computer. Node.js is a JavaScript runtime that allows you to run JavaScript code outside of a web browser. Yarn is built on top of Node.js, so you’ll need to install it before you can install Yarn.
Here’s how to download and install Node.js:
- Go to the official Node.js website at https://nodejs.org.
- On the homepage, you’ll see two versions available for download: LTS (Long-Term Support) and Current. It’s recommended to download the LTS version for stability and compatibility.
- Click on the LTS download button to start the download.
- Once the download is complete, open the installer file.
- Follow the installation wizard instructions to install Node.js on your computer.
- After the installation is complete, open a new terminal or command prompt window.
- To verify that Node.js is installed correctly, type
node -vin the terminal and press Enter. You should see the version number of Node.js displayed.
Now that you have Node.js installed, you’re ready to install Yarn and start using it for your projects.
Step 1: Go to the official Node.js website
To install Yarn, you first need to have Node.js installed on your computer. Node.js is a JavaScript runtime that allows you to run JavaScript on the server-side. Yarn is a package manager for JavaScript that helps you manage your project’s dependencies.
To install Node.js, you need to go to the official Node.js website. You can do this by opening your web browser and typing in the URL: https://nodejs.org.
Once you are on the Node.js website, you will see a big green button that says “Download”. Click on this button to start the download process. The website will automatically detect your operating system and provide you with the appropriate installer.
After the download is complete, locate the installer file on your computer and double-click on it to start the installation process. Follow the on-screen instructions to complete the installation.
Once Node.js is installed, you can move on to the next step and install Yarn for your project.
Step 2: Download the latest version of Node.js
In order to install Yarn, you will first need to have Node.js installed on your computer. Node.js is a JavaScript runtime that allows you to run JavaScript code outside of a web browser. Yarn relies on Node.js to function properly, so it is important to have the latest version installed.
To download the latest version of Node.js, follow these steps:
- Go to the official Node.js website at https://nodejs.org.
- Click on the “Downloads” tab.
- Choose the version of Node.js that is appropriate for your operating system. If you are unsure, you can usually select the LTS (Long Term Support) version, which is recommended for most users.
- Once you have selected the version, click on the corresponding download link.
- The download should start automatically. If it doesn’t, click on the provided link to initiate the download.
- Once the download is complete, locate the installer file in your downloads folder and double-click on it to run the installer.
- Follow the on-screen instructions to complete the installation process.
After the installation is complete, you can verify that Node.js is installed correctly by opening a command prompt or terminal window and typing node -v. If Node.js is installed properly, it will display the version number.
Now that you have Node.js installed, you are ready to proceed to the next step and install Yarn.
Step 3: Run the installer and follow the installation instructions
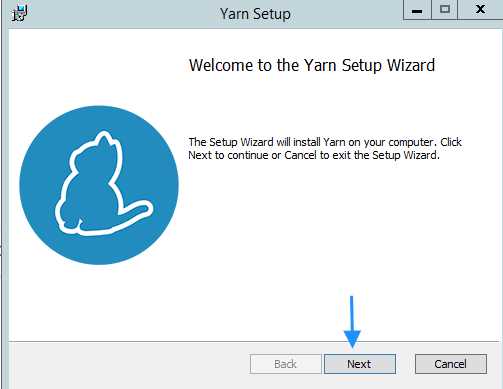
Once you have downloaded the Yarn package, locate the installer file and double-click on it to run the installation process. The installer will guide you through the necessary steps to install Yarn on your system.
Here’s a step-by-step guide on how to install Yarn:
- Locate the downloaded installer file, usually named “yarn-[version].msi”.
- Double-click on the installer file to start the installation process.
- Follow the on-screen instructions provided by the installer.
- Choose the installation directory for Yarn. The default directory is usually fine, but you can choose a different location if desired.
- Click “Next” to proceed with the installation.
- Review the installation settings and make any necessary changes.
- Click “Install” to begin the installation process.
- Wait for the installation to complete. This may take a few moments.
- Once the installation is finished, click “Finish” to exit the installer.
After completing these steps, Yarn should be successfully installed on your system. You can now proceed to the next step in setting up Yarn for your project.
Section 2: Install Yarn using npm
To install Yarn using npm, follow the steps below:
- Open your terminal or command prompt.
- Ensure that you have Node.js installed on your system. You can check this by running the command
node -vin your terminal. If Node.js is not installed, you can download and install it from the official Node.js website. - Once you have Node.js installed, you can install Yarn by running the following command in your terminal:
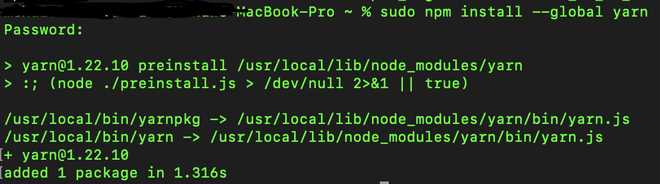
npm install -g yarnThis command will install Yarn globally on your system, making it available for use in any project.
After the installation is complete, you can verify that Yarn is installed by running the command yarn -v in your terminal. If Yarn is installed correctly, it will display the version number.
Now you have successfully installed Yarn using npm and you are ready to start using it for your projects.
Step 1: Open the command prompt or terminal
To install Yarn for your project, you first need to open the command prompt or terminal on your computer. The command prompt or terminal is a text-based interface where you can enter commands to interact with your computer’s operating system.
On Windows, you can open the command prompt by pressing the Windows key + R, typing “cmd” in the Run dialog box, and pressing Enter. On macOS or Linux, you can open the terminal by searching for “terminal” in the applications menu.
Once the command prompt or terminal is open, you’re ready to move on to the next step and start installing Yarn for your project.
Step 2: Run the command “npm install -g yarn”
To install Yarn for your project, you need to run the command “npm install -g yarn” in your command line interface. This command will install Yarn globally on your system, making it available for use in any project.
The “npm install” command is used to install packages or dependencies for your project. The “-g” flag stands for “global” and it tells npm to install the package globally, rather than locally within the project directory.
By running this command, you are instructing npm to download and install the latest version of Yarn from the official npm registry. This process may take a few moments, depending on your internet connection speed.
Once the installation is complete, you can verify that Yarn has been installed successfully by running the command “yarn –version”. This will display the version number of Yarn installed on your system.
Now that Yarn is installed, you can proceed to the next step and start using it for your project.


