
GitLab is a popular web-based Git repository manager that provides a platform for version control and collaboration on code projects. When working with GitLab, it is common to make commits that include multiple files. However, there may be situations where you need to remove a file from a commit. In this article, we will explore the steps to remove a file from a GitLab commit.
To remove a file from a GitLab commit, you will need to use Git commands in your local repository. First, navigate to the repository directory using the command line or terminal. Then, use the git rm command followed by the file name to remove the file from the repository. This command will delete the file from the working directory and stage the deletion for the next commit.
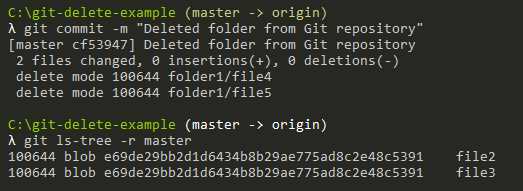
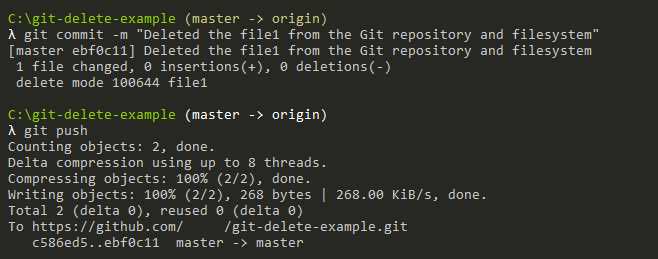
After removing the file from the repository, you will need to create a new commit to apply the changes. Use the git commit command followed by a commit message to create a new commit. This commit will not include the file that you have removed. Finally, push the changes to the GitLab repository using the git push command to update the remote repository with the new commit.
It is important to note that removing a file from a GitLab commit will permanently delete the file from the repository’s history. If the file is needed in the future, it will need to be re-added and committed separately. Additionally, removing a file from a commit will not affect any previous commits that included the file. Those commits will still contain the file in their history.
In conclusion, removing a file from a GitLab commit is a straightforward process that involves using Git commands in your local repository. By following the steps outlined in this article, you can easily remove a file from a commit and update the GitLab repository with the changes.
Understanding GitLab Commits
A commit in GitLab is a snapshot of the changes made to a project at a specific point in time. It is a way to track and manage the history of a project’s codebase. Each commit has a unique identifier, known as a commit hash, which is used to reference and identify the commit.
GitLab provides a version control system that allows multiple developers to collaborate on a project. When changes are made to a project’s codebase, developers create commits to record those changes. Each commit includes a message that describes the changes made and the purpose of the commit.
Commits in GitLab are organized into branches. A branch is a separate line of development that allows developers to work on different features or bug fixes without affecting the main codebase. Commits can be created on a specific branch, and they can be merged into other branches to incorporate the changes into the main codebase.
To remove a file from a GitLab commit, you can use the Git command line interface or a Git client. By using the appropriate Git command, you can remove the file from the commit history and update the project’s codebase accordingly.
Understanding how GitLab commits work is essential for effective collaboration and version control in software development projects. It allows developers to track changes, revert to previous versions, and manage the project’s codebase effectively.
Importance of Removing Files from Commits
When working with GitLab, it is important to understand the significance of removing files from commits. Commits are snapshots of your project’s state at a specific point in time, and they are an essential part of version control. However, including unnecessary or sensitive files in your commits can lead to various issues.
One of the main reasons to remove files from commits is to ensure the security of your project. If you accidentally include sensitive information, such as passwords or API keys, in a commit, it can pose a significant risk. By removing these files from your commits, you can prevent unauthorized access to your project’s sensitive data.
Another reason to remove files from commits is to keep your repository clean and organized. Including unnecessary files in your commits can make it difficult for other developers to understand and navigate your project. By removing these files, you can improve the overall readability and maintainability of your codebase.
Furthermore, removing files from commits can help optimize the performance of your repository. Large files or binary files that are not needed can increase the size of your repository, leading to slower cloning and fetching times. By removing these files, you can reduce the repository size and improve the overall efficiency of your GitLab workflow.
In conclusion, removing files from commits is crucial for maintaining the security, organization, and performance of your GitLab projects. By being mindful of the files you include in your commits and regularly removing unnecessary or sensitive files, you can ensure a smooth and efficient development process.
Methods to Remove a File
When working with GitLab, there are several methods you can use to remove a file from a commit. Here are some common approaches:
- Using the Git command line: You can use the
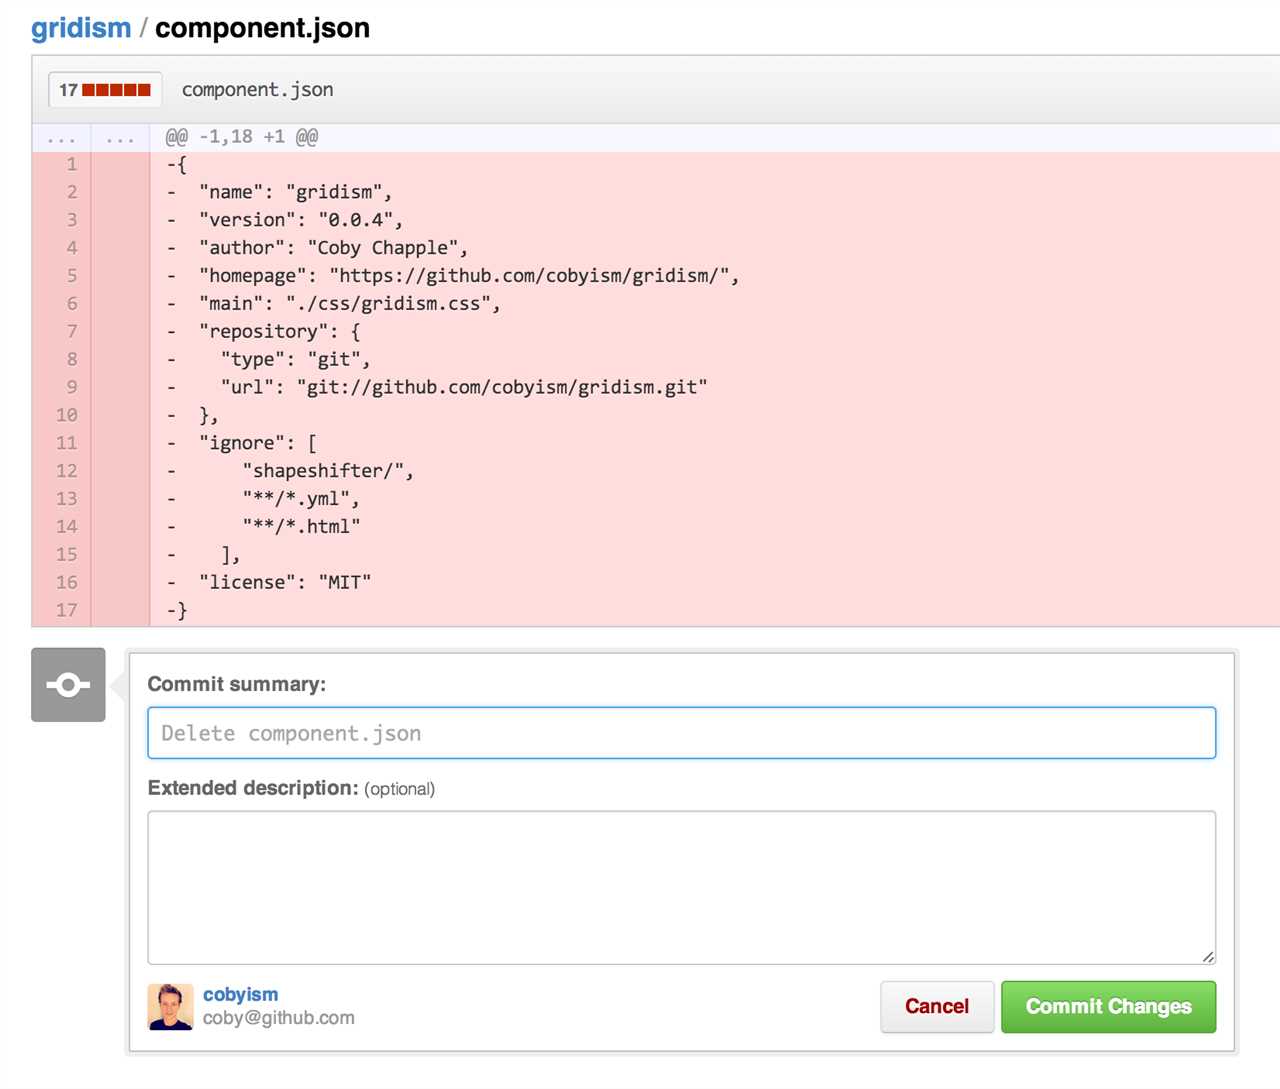
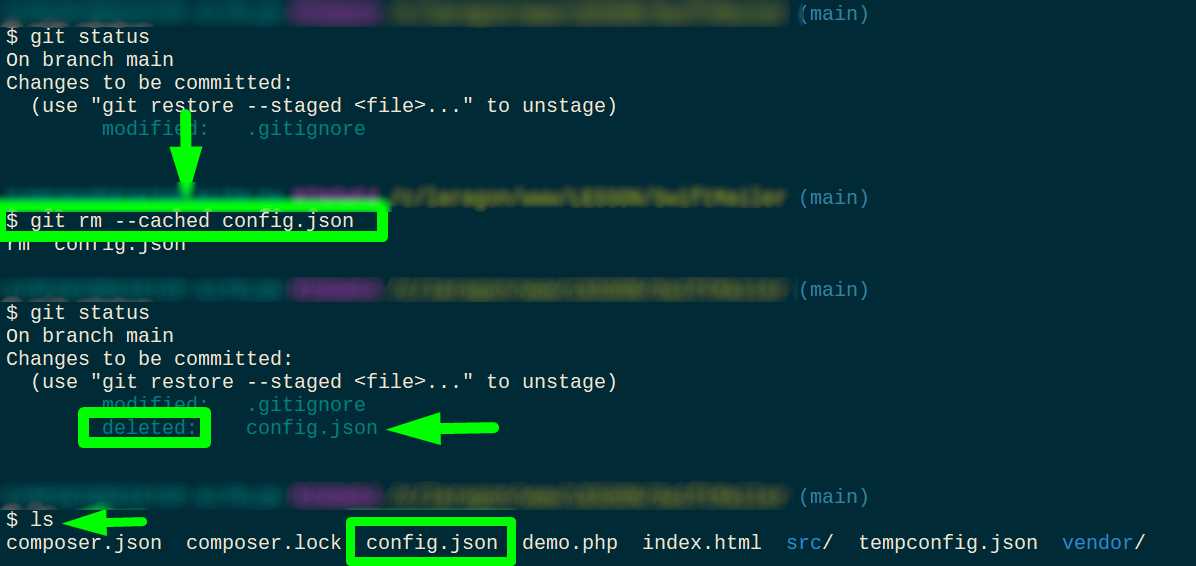
git rmcommand followed by the file name to remove a file from the commit. This will also delete the file from your local repository. - Using the GitLab web interface: If you prefer a graphical interface, you can navigate to the file in the GitLab web interface, click on the file, and then click the “Delete” button. This will remove the file from the commit and the repository.
- Using a Git client: If you are using a Git client, such as GitKraken or Sourcetree, you can simply right-click on the file and select the “Delete” option. This will remove the file from the commit and the repository.
Regardless of the method you choose, it’s important to note that removing a file from a commit will permanently delete the file from the repository’s history. Make sure you have a backup or a copy of the file if you need it in the future.
Using Git Command Line
Git is a powerful version control system that allows you to track changes to your files and collaborate with others. When working with GitLab, you can use the Git command line to remove a file from a commit.
To remove a file from a GitLab commit using the command line, follow these steps:
- Open your terminal or command prompt.
- Navigate to the directory where your Git repository is located.
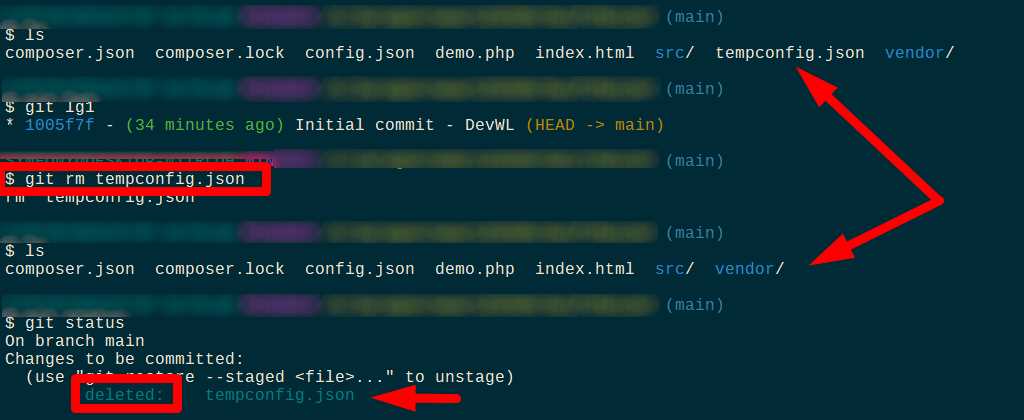
- Use the
git rmcommand followed by the path to the file you want to remove. For example, if you want to remove a file namedexample.txt, you would run the commandgit rm example.txt. - Commit your changes using the
git commitcommand. You can add a message to describe the changes by using the-mflag followed by your message. For example,git commit -m "Remove example.txt". - Push your changes to GitLab using the
git pushcommand.
By following these steps, you can easily remove a file from a GitLab commit using the Git command line. This allows you to keep your repository clean and organized, ensuring that only relevant files are included in your commits.
Remember to use caution when removing files from a commit, as this action cannot be undone. Make sure to double-check your changes before committing and pushing them to GitLab.
Using GitLab Web Interface
If you want to remove a file from a GitLab commit, you can do it easily using the GitLab web interface. Here are the steps to follow:
1. Open your project in GitLab and navigate to the repository where the file is located.
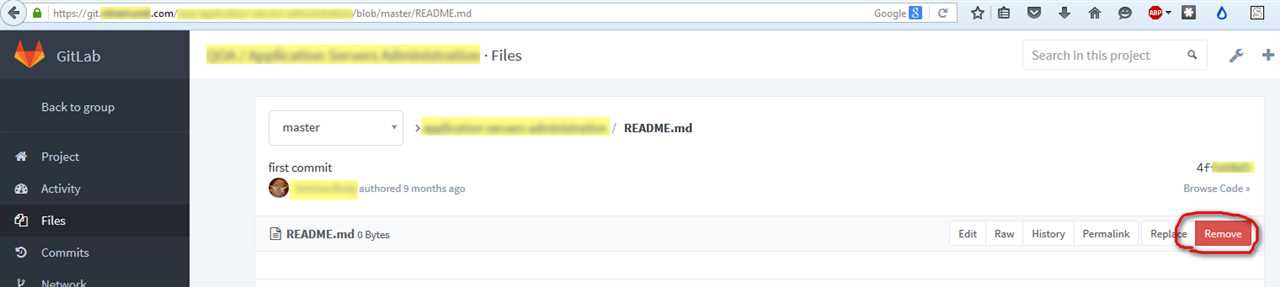
2. Click on the “Files” tab to view the list of files in the repository.
3. Locate the file you want to remove and click on it to open it.
4. Once the file is open, you will see a trash can icon at the top right corner of the page. Click on it.
5. A confirmation dialog will appear asking if you are sure you want to remove the file. Click on “Remove” to confirm.
6. GitLab will then remove the file from the repository and create a new commit with the file removed.
That’s it! You have successfully removed a file from a GitLab commit using the GitLab web interface.
Considerations and Best Practices
When removing a file from a GitLab commit, there are a few considerations and best practices to keep in mind:
- Make sure to double-check the file you want to remove before making any changes to the commit. Removing a file from a commit is a permanent action and cannot be undone.
- It is recommended to create a new branch before removing a file from a commit. This allows you to keep the original commit intact and easily revert back to it if needed.
- Before removing a file, consider if it is necessary to completely remove it or if it can be modified or moved to a different location within the repository.
- Communicate with your team members before removing a file from a commit, especially if it is a file that others are actively working on. It is important to ensure that everyone is aware of the changes being made.
- After removing a file from a commit, it is a good practice to review and test the changes before pushing them to the remote repository. This helps to avoid any potential issues or conflicts with other files or branches.
By following these considerations and best practices, you can effectively remove a file from a GitLab commit without causing any unnecessary disruptions or conflicts within your project.
Double-checking File Removal
When you remove a file from a GitLab commit, it’s important to double-check that the file has been successfully removed. This is especially crucial if the file contains sensitive or confidential information that you don’t want to be accidentally shared.
To ensure that the file has been removed, you can follow these steps:
- Open the commit where you removed the file in GitLab.
- Review the changes made in the commit and look for the file that you removed.
- Verify that the file is no longer present in the list of changes.
- If the file is still listed, it means that the removal was not successful. In this case, you can try removing the file again or seek assistance from your team members or GitLab support.
It’s important to be thorough when double-checking file removals to avoid any potential issues or security breaches. By following these steps, you can ensure that the file has been successfully removed from the commit and is no longer accessible to others.
Remember, GitLab provides version control for your codebase, allowing you to track changes and collaborate with your team. By properly managing file removals, you can maintain a clean and secure codebase.
Communicating Changes to Team Members
When you remove a file from a GitLab commit, it’s important to communicate this change to your team members. This ensures that everyone is aware of the removal and can adjust their work accordingly.
One way to communicate this change is by sending a message or email to your team. In this message, you can explain why the file was removed and provide any necessary instructions or updates. This helps to keep everyone on the same page and prevents any confusion or misunderstandings.
Another effective way to communicate the removal of a file is by updating the project’s documentation or README file. You can add a section that highlights the removal and explains the reasons behind it. This way, anyone who accesses the project’s documentation will be informed about the change.
Additionally, you can use GitLab’s built-in features to communicate changes. For example, you can leave a comment on the commit where the file was removed, explaining the reasons and providing any relevant information. This comment will be visible to all team members who have access to the repository.
Overall, effective communication is key when removing a file from a GitLab commit. By keeping your team members informed, you ensure that everyone is aware of the change and can adapt their work accordingly.
Creating a Backup of the Removed File
When you remove a file from a GitLab commit, it’s always a good idea to create a backup of that file before making any changes. This ensures that you have a copy of the file in case you need to revert any changes or retrieve any important information.
To create a backup of the removed file, you can simply make a copy of it and store it in a separate location. This can be done using the command line or a file explorer.
If you’re using the command line, navigate to the directory where the file is located and use the following command:
cp filename.ext backup/filename.extThis command will create a copy of the file with the same name in the “backup” directory.
If you prefer to use a file explorer, simply navigate to the directory where the file is located, right-click on the file, and select “Copy”. Then, navigate to the desired backup location, right-click, and select “Paste”. This will create a copy of the file in the backup location.
By creating a backup of the removed file, you can ensure that you have a safety net in case anything goes wrong during the removal process. It’s always better to be safe than sorry when it comes to managing your GitLab commits.


