
If you’re looking to test out new software or run potentially harmful programs in a safe environment, installing Windows Sandbox is the perfect solution. Windows Sandbox is a lightweight virtual machine that allows you to run applications in an isolated environment, ensuring that your main operating system remains untouched and protected.
To install Windows Sandbox, follow these simple steps:
- Check System Requirements: Before proceeding, make sure your computer meets the necessary requirements. Windows Sandbox is available on Windows 10 Pro and Enterprise editions, version 1903 or later.
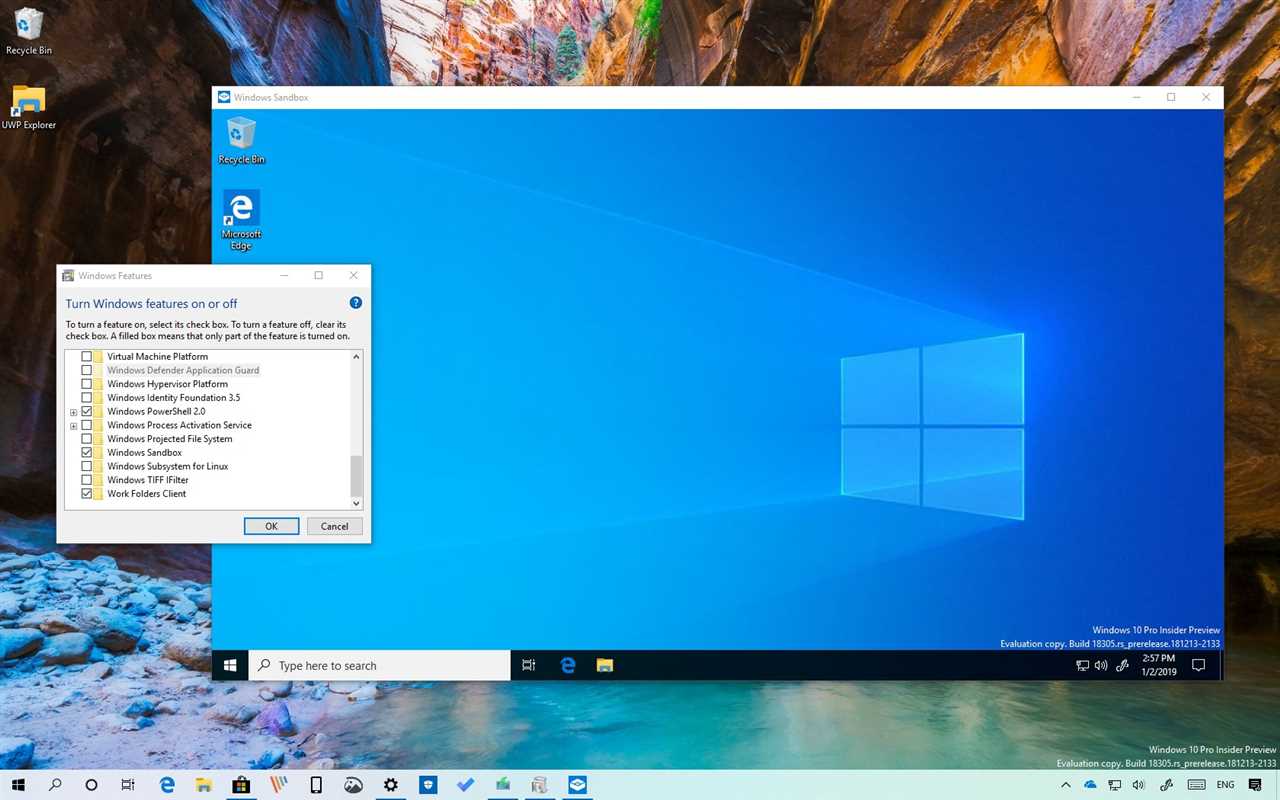
- Enable Windows Sandbox: Open the Control Panel and navigate to “Programs” > “Turn Windows features on or off”. Scroll down and check the box next to “Windows Sandbox”. Click “OK” and wait for the installation process to complete.
- Restart Your Computer: Once the installation is finished, restart your computer to apply the changes.
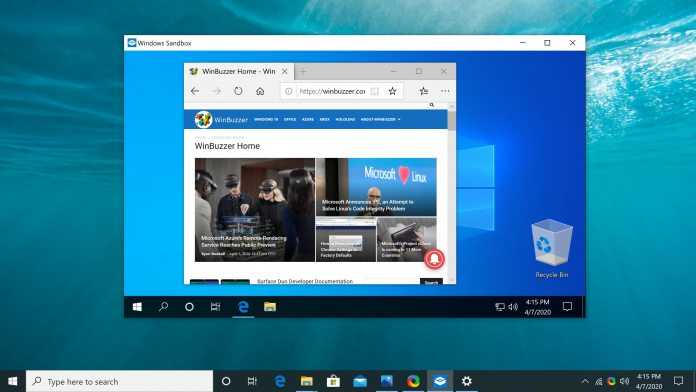
- Launch Windows Sandbox: After your computer has restarted, click on the Start menu and search for “Windows Sandbox”. Click on the “Windows Sandbox” app to launch it.
- Start Testing: Now that Windows Sandbox is up and running, you can start testing software or running potentially harmful programs without worrying about any negative impact on your main operating system.
By following these steps, you can easily install Windows Sandbox and enjoy a secure testing environment for your applications. Remember to always exercise caution when running unknown software, even within Windows Sandbox.
Disclaimer: Windows Sandbox is a feature available on specific editions of Windows 10 and may not be available on all systems. Please check the official Microsoft documentation for more information.
Section 1: Preparing Your System
Before you can install Windows Sandbox, you need to make sure your system meets the necessary requirements. Follow these steps to prepare your system:
- Check your Windows version: Windows Sandbox is available on Windows 10 Pro, Enterprise, and Education editions. Make sure you have one of these versions installed on your system.
- Ensure virtualization is enabled: Windows Sandbox relies on virtualization technology, so you need to ensure that virtualization is enabled in your system’s BIOS settings. Consult your computer’s documentation or manufacturer’s website for instructions on how to enable virtualization.
- Update Windows: It’s always a good idea to have the latest updates installed on your system. Make sure your Windows operating system is up to date by checking for and installing any available updates.
- Check system requirements: Windows Sandbox has certain hardware requirements. Ensure that your system meets these requirements, including having at least 4GB of RAM and 1GB of free disk space.
Once you have completed these steps, your system will be ready for the installation of Windows Sandbox.
Checking System Requirements

Before you can install Windows Sandbox, it’s important to ensure that your system meets the necessary requirements. Here’s how to check:
- Make sure you have a compatible version of Windows. Windows Sandbox is only available on Windows 10 Pro or Enterprise editions.
- Verify that your system has virtualization capabilities. Windows Sandbox relies on virtualization technology, so your CPU must support virtualization and it must be enabled in the BIOS settings.
- Check your system’s RAM and storage. Windows Sandbox requires at least 4GB of RAM and 1GB of free disk space.
- Ensure that your system is up to date. Install the latest Windows updates to ensure compatibility and security.
By following these steps, you can ensure that your system is ready to install and use Windows Sandbox.
Enabling Virtualization in BIOS
In order to install and use Windows Sandbox, you need to ensure that virtualization is enabled in your computer’s BIOS settings. Virtualization allows your computer to run multiple operating systems or virtual machines simultaneously.
To enable virtualization in BIOS, follow these steps:
- Restart your computer and enter the BIOS settings by pressing the designated key (usually F2 or Del) during startup.
- Navigate to the “Advanced” or “CPU Configuration” section in the BIOS menu.
- Look for an option called “Virtualization Technology” or “Intel Virtualization Technology” (the name may vary depending on your computer’s manufacturer).
- Enable the virtualization option by selecting it and pressing Enter.
- Save the changes and exit the BIOS settings.
Once virtualization is enabled in your BIOS, you can proceed with the installation of Windows Sandbox. It is important to note that not all computers support virtualization, so make sure to check your computer’s specifications or consult the manufacturer’s documentation if you are unsure.
Updating Windows to the Latest Version
Before you can install Windows Sandbox, it is important to ensure that your Windows operating system is up to date. Updating Windows to the latest version is crucial to ensure compatibility and to take advantage of the latest features and security patches.
To update Windows, follow these steps:
| 1. | Click on the “Start” button in the bottom left corner of the screen. |
| 2. | Select “Settings” from the menu that appears. |
| 3. | In the Settings window, click on “Update & Security”. |
| 4. | Click on “Windows Update” in the left sidebar. |
| 5. | Click on the “Check for updates” button. |
| 6. | If there are any updates available, click on the “Install” button to start the update process. |
| 7. | Wait for the updates to download and install. This may take some time depending on the size of the updates and the speed of your internet connection. |
| 8. | Once the updates are installed, restart your computer if prompted. |
After updating Windows to the latest version, you can proceed with the installation of Windows Sandbox. It is recommended to always keep your Windows operating system up to date to ensure the best performance and security.
Section 2: Installing Windows Sandbox

To install Windows Sandbox, follow the step-by-step guide below:
| Step 1: | Open the Start menu and search for “Windows Features”. |
| Step 2: | Click on “Turn Windows features on or off” from the search results. |
| Step 3: | In the Windows Features window, scroll down and locate “Windows Sandbox”. |
| Step 4: | Check the box next to “Windows Sandbox” to enable it. |
| Step 5: | Click on “OK” to apply the changes and start the installation process. |
| Step 6: | Wait for Windows to install the necessary files and features for Windows Sandbox. |
| Step 7: | Once the installation is complete, click on “Restart now” to restart your computer and finalize the installation. |
After your computer restarts, Windows Sandbox will be installed and ready to use. You can access it by searching for “Windows Sandbox” in the Start menu.


