Microsoft Office is a powerful suite of productivity tools that includes popular applications like Word, Excel, and PowerPoint. Whether you’re a student, professional, or small business owner, having Microsoft Office installed on your computer is essential for creating and editing documents, spreadsheets, and presentations.
In this step-by-step guide, we will walk you through the process of installing Microsoft Office on your computer. Whether you’re using a Windows PC or a Mac, the installation process is straightforward and can be completed in just a few minutes.
Before we begin, it’s important to note that Microsoft Office is not a free software. You will need to purchase a license or subscribe to Microsoft Office 365 to access all the features and benefits of the suite. However, Microsoft does offer a free trial period for new users, so you can try out the software before making a commitment.
Now, let’s get started with the installation process. Follow the steps below to install Microsoft Office on your computer and start taking advantage of its powerful features.
Preparing for Installation

Before you begin the installation process for Microsoft Office, it is important to make sure that your computer meets the necessary requirements. This will ensure a smooth and successful installation.
Firstly, check the system requirements for the version of Office you are installing. These requirements typically include the minimum operating system version, processor speed, and amount of RAM needed. Make sure your computer meets or exceeds these requirements to avoid any compatibility issues.
Next, it is recommended to close any open programs or applications before starting the installation. This will prevent any conflicts or interruptions during the installation process.
Additionally, it is a good idea to temporarily disable any antivirus software or firewall programs on your computer. These security measures can sometimes interfere with the installation process, so disabling them temporarily can help ensure a smooth installation.
Before you begin the installation, it is also important to have your product key or activation code ready. This is typically a 25-character code that is required to activate your copy of Microsoft Office. You can find this code on the packaging or in the confirmation email if you purchased Office online.
Finally, make sure you have a stable internet connection. Some versions of Office may require an internet connection for activation or to download additional files during the installation process. Having a reliable internet connection will help prevent any interruptions or delays.
By following these steps and preparing your computer for installation, you can ensure a smooth and successful installation of Microsoft Office.
Check System Requirements
Before you install Microsoft Office, it is important to check if your system meets the minimum requirements. This will ensure that the installation process goes smoothly and that you can use all the features of the software.
Here are the system requirements for installing Microsoft Office:
- Operating System: Windows 10, Windows 8.1, Windows 7 Service Pack 1, or the two most recent versions of macOS
- Processor: 1.6 GHz or faster, 2-core for Windows and Intel processor for macOS
- Memory: 4 GB RAM for Windows, 4 GB RAM for macOS
- Hard Disk Space: 4 GB for Windows, 10 GB for macOS
- Display: 1280 x 768 screen resolution for Windows, 1280 x 800 screen resolution for macOS
- Graphics: DirectX 9 or later with WDDM 2.0 or higher driver for Windows, No graphics requirements for macOS
- Internet Connection: Internet functionality requires an internet connection for Windows, Internet functionality requires an internet connection for macOS
It is important to note that these are the minimum requirements. If your system does not meet these requirements, you may still be able to install Microsoft Office, but some features may not work properly or may be limited.
Once you have checked that your system meets the requirements, you can proceed with the installation process.
Ensure Sufficient Disk Space
Before you begin the installation process for Microsoft Office, it is important to ensure that you have sufficient disk space on your computer. Microsoft Office requires a certain amount of disk space to be available in order to install and run properly.
To check the available disk space on your computer, follow these steps:
- Open File Explorer by clicking on the folder icon in the taskbar or by pressing the Windows key + E on your keyboard.
- In File Explorer, select “This PC” or “My Computer” from the left-hand navigation pane.
- Under the “Devices and drives” section, you will see a list of your disk drives. Look for the drive where you want to install Microsoft Office.
- Right-click on the drive and select “Properties” from the context menu.
- In the Properties window, you will see a pie chart that shows the used and free space on the drive. Make sure that you have enough free space to accommodate the installation of Microsoft Office.
If you do not have enough free disk space, you may need to free up some space by deleting unnecessary files or programs. You can also consider adding an external hard drive or upgrading your computer’s internal storage.
Once you have ensured that you have sufficient disk space, you can proceed with the installation of Microsoft Office.
Uninstall Previous Versions
Before you install Microsoft Office, it is important to uninstall any previous versions of the software that may be on your computer. This will ensure a clean installation and prevent any conflicts or compatibility issues.
To uninstall previous versions of Microsoft Office, follow these steps:
- Open the Control Panel on your computer.
- Click on “Programs” or “Programs and Features”.
- Scroll through the list of installed programs and locate any versions of Microsoft Office.
- Click on the version of Microsoft Office you want to uninstall.
- Click on the “Uninstall” button.
- Follow the on-screen prompts to complete the uninstallation process.
- Repeat these steps for any other versions of Microsoft Office that are installed on your computer.
Once you have uninstalled all previous versions of Microsoft Office, you can proceed with the installation of the latest version. It is recommended to restart your computer after uninstalling the software to ensure any remaining files are removed.
Downloading Microsoft Office
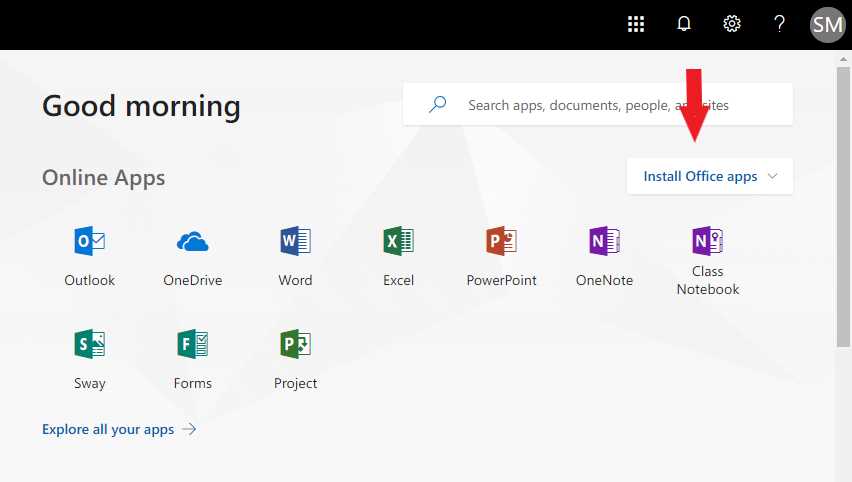
Before you can install Microsoft Office, you need to download the installation files. Follow the steps below to download Microsoft Office:
- Go to the official Microsoft website.
- Navigate to the Office product page.
- Click on the “Download” button.
- Choose the version of Microsoft Office you want to download (e.g., Office 365, Office 2019, etc.).
- Select the language and bit version (32-bit or 64-bit) that is compatible with your computer.
- Click on the “Download” button again to start the download.
Once the download is complete, you will have the installation files for Microsoft Office on your computer. You can then proceed to the next step of the installation process.
Create a Microsoft Account
In order to install Microsoft Office, you will need to have a Microsoft account. A Microsoft account allows you to access and use various Microsoft services, including Office applications.
To create a Microsoft account, follow these steps:
- Go to the Microsoft account creation page.
- Click on the “Create account” button.
- Fill in the required information, such as your name, email address, and password.
- Choose a unique username for your account.
- Verify your identity by providing a phone number or an alternate email address.
- Agree to the terms of service and privacy policy.
- Complete the security verification process, such as entering a verification code.
- Once your account is created, you can use it to sign in to Microsoft Office and install the software.
Having a Microsoft account not only allows you to install Microsoft Office, but also gives you access to other Microsoft services like OneDrive, Outlook, and Skype. It is recommended to create a Microsoft account to fully utilize the features and benefits of Microsoft Office.
Choose the Right Office Version

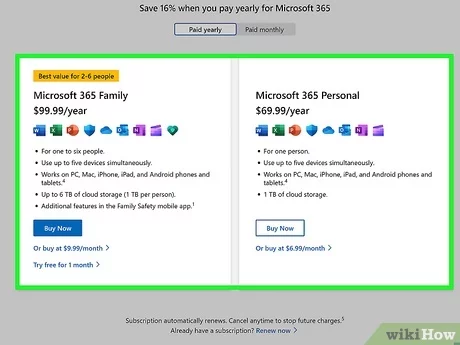
Before you begin the installation process, it’s important to choose the right version of Microsoft Office for your needs. Microsoft offers several different versions of Office, each with its own set of features and pricing options.
First, consider whether you need the full suite of Office applications or if you only require specific programs like Word, Excel, or PowerPoint. If you only need a few programs, you may want to consider the Office Home & Student version, which includes Word, Excel, and PowerPoint.
If you need access to additional programs like Outlook, Access, or Publisher, you may want to consider the Office Home & Business or Office Professional versions. These versions include all the programs in the Home & Student version, as well as additional applications for business and professional use.
Another factor to consider is whether you prefer a one-time purchase or a subscription-based model. With a one-time purchase, you pay a flat fee upfront and own the software indefinitely. With a subscription-based model, you pay a monthly or annual fee and receive regular updates and new features.
Finally, consider your budget and the pricing options available. Microsoft offers different pricing tiers for each version of Office, so be sure to compare the features and pricing to find the best fit for your needs.
By carefully considering your needs, desired features, and budget, you can choose the right version of Microsoft Office to install on your computer.
Download Office Installer
To install Microsoft Office on your computer, you first need to download the Office installer. Follow the steps below to download the installer:
| Step 1: | Go to the official Microsoft Office website. |
| Step 2: | Click on the “Products” tab. |
| Step 3: | Select the version of Office you want to install (e.g., Office 365, Office 2019). |
| Step 4: | Choose the subscription plan that suits your needs. |
| Step 5: | Click on the “Download” button. |
| Step 6: | Read and accept the terms and conditions. |
| Step 7: | Wait for the download to complete. |
Once the download is finished, you can proceed to the installation process. Make sure to have a stable internet connection during the download to avoid any interruptions.

