If you’re looking to install a powerful and versatile operating system on your Chromebook, Arch Linux is a great choice. Arch Linux offers a lightweight and customizable Linux experience, perfect for those who want full control over their system. In this step-by-step guide, we’ll walk you through the process of installing Arch Linux on your Chromebook.
Step 1: Prepare Your Chromebook
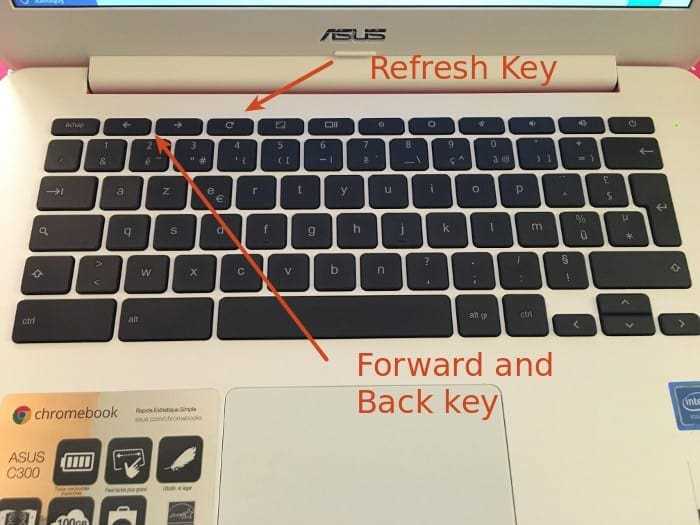
Before you begin, it’s important to back up any important data on your Chromebook, as the installation process will erase everything on your device. Once you’ve done that, you’ll need to enable Developer Mode on your Chromebook. This will allow you to access the Chromebook’s BIOS and install a new operating system. To enable Developer Mode, press the Esc, Refresh, and Power buttons simultaneously. Follow the on-screen instructions to enable Developer Mode.
Step 2: Create a Bootable USB Drive
Next, you’ll need to create a bootable USB drive with the Arch Linux installation files. You can do this on another computer running Linux or Windows. Download the Arch Linux ISO file from the official website and use a tool like Rufus or Etcher to create a bootable USB drive. Make sure to select the correct USB drive and follow the instructions provided by the tool.
Step 3: Install Arch Linux
Once you have your bootable USB drive ready, insert it into your Chromebook and restart the device. As the Chromebook boots up, press the appropriate key (usually Esc or F2) to access the BIOS settings. In the BIOS settings, change the boot order to prioritize the USB drive. Save the changes and exit the BIOS.
Now, your Chromebook should boot from the USB drive and display the Arch Linux installation menu. Follow the on-screen instructions to partition your hard drive, format the partitions, and install Arch Linux. Make sure to select the appropriate options for your system.
Step 4: Configure Arch Linux
Once the installation is complete, you’ll need to configure Arch Linux to work properly on your Chromebook. This includes setting up the network connection, installing necessary drivers, and configuring the display settings. You can find detailed instructions for these steps in the Arch Linux documentation.
With these steps, you’ll be able to install Arch Linux on your Chromebook and enjoy a powerful and customizable Linux experience. Remember to always back up your data and proceed with caution when installing a new operating system.
Preparation
Before you can install Arch Linux on your Chromebook, you need to make sure you have the necessary tools and resources. Here’s a step-by-step guide on how to prepare:
1. Make sure your Chromebook is compatible with running Linux. Check the manufacturer’s website or do a quick Google search to find out if your specific model supports Linux installation.
2. Enable Developer Mode on your Chromebook. This will allow you to access the Chrome OS shell and install Linux. To do this, turn off your Chromebook, then press and hold the Esc key and the Refresh key (the key with the circular arrow) simultaneously. While holding these keys, press the Power button to turn on your Chromebook. Release the keys when you see a screen that says “Chrome OS is missing or damaged”.
3. Install Crouton. Crouton is a set of scripts that allows you to easily install Linux alongside Chrome OS. To install Crouton, open the Chrome OS shell by pressing Ctrl+Alt+T. In the shell, type the following command: sudo sh -e ~/Downloads/crouton -t xfce. This will install the XFCE desktop environment, which is recommended for Chromebooks.
4. Download the Arch Linux ISO. Go to the Arch Linux website and download the latest ISO image. Make sure to choose the correct architecture (32-bit or 64-bit) for your Chromebook.
5. Create a bootable USB drive. Use a tool like Etcher or Rufus to create a bootable USB drive with the Arch Linux ISO. This will allow you to boot into the Arch Linux installer and begin the installation process.
Once you have completed these steps, you are ready to proceed with the installation of Arch Linux on your Chromebook. The next section will guide you through the installation process step by step.
Backup Your Data
Before you begin the installation process of Arch Linux on your Chromebook, it is crucial to back up all your important data. This step ensures that you do not lose any valuable files or documents during the installation process.
To back up your data, you can use various methods. One option is to transfer your files to an external storage device such as a USB drive or an external hard drive. Simply copy and paste all your important files onto the external device.
Another option is to use cloud storage services such as Google Drive or Dropbox. Upload all your important files to the cloud, ensuring that they are safely stored and accessible from any device.
Additionally, you can create a backup image of your entire Chromebook using tools like Clonezilla or Timeshift. This method allows you to restore your Chromebook to its previous state if anything goes wrong during the installation process.
Remember to double-check and verify that all your important files are successfully backed up before proceeding with the Arch Linux installation. It is better to be safe than sorry.
Note: It is essential to have a backup of your data in case of any unforeseen circumstances during the installation process. The installation of Arch Linux on a Chromebook involves partitioning and formatting the storage, which can potentially lead to data loss if not done correctly.
By following this crucial step of backing up your data, you can proceed with the installation process of Arch Linux on your Chromebook with peace of mind, knowing that your important files are safe and secure.
Enable Developer Mode

To install Arch Linux on your Chromebook, you need to enable Developer Mode. This mode allows you to access the Chromebook’s developer features and install a different operating system, such as Linux.
Enabling Developer Mode will erase all the data on your Chromebook, so make sure to back up any important files before proceeding. Here’s how to enable Developer Mode:
- Turn off your Chromebook.
- Press and hold the Esc and Refresh keys simultaneously.
- While holding these keys, press the Power button.
- Release all the keys when you see a screen that says “Chrome OS is missing or damaged.”
- Press Ctrl + D to enable Developer Mode.
- Press Enter to confirm and wait for the Chromebook to reboot.
Once Developer Mode is enabled, you can proceed with the installation of Arch Linux on your Chromebook.
Install Crouton
To install Crouton on your Chromebook, follow these steps:
- Enable Developer Mode on your Chromebook by pressing Esc + Refresh + Power simultaneously.
- Press Ctrl + D to bypass the warning screen.
- Press Enter to confirm and enable Developer Mode.
- Wait for your Chromebook to reboot.
- Press Ctrl + Alt + T to open the Crosh shell.
- Type shell and press Enter to open the Linux shell.
- Download the latest version of Crouton by running the following command: sudo sh -e ~/Downloads/crouton -t xfce (replace xfce with your preferred desktop environment).
- Wait for the installation to complete.
- Once the installation is finished, you can start using Linux on your Chromebook by running the command sudo startxfce4 (replace xfce4 with your preferred desktop environment).
Now you have successfully installed Crouton on your Chromebook and can enjoy the benefits of having Linux on your device!
Installation Process
To install Arch Linux on a Chromebook, follow these step-by-step instructions:
Step 1: Enable Developer Mode on your Chromebook. This will allow you to access the Chrome OS shell and install Linux.
Step 2: Download the Arch Linux ISO file from the official website.
Step 3: Create a bootable USB drive with the Arch Linux ISO using a tool like Etcher.
Step 4: Insert the bootable USB drive into your Chromebook and reboot it.
Step 5: Press the appropriate key (usually Esc or F2) to access the Chromebook’s boot menu.
Step 6: Select the USB drive as the boot device and press Enter.
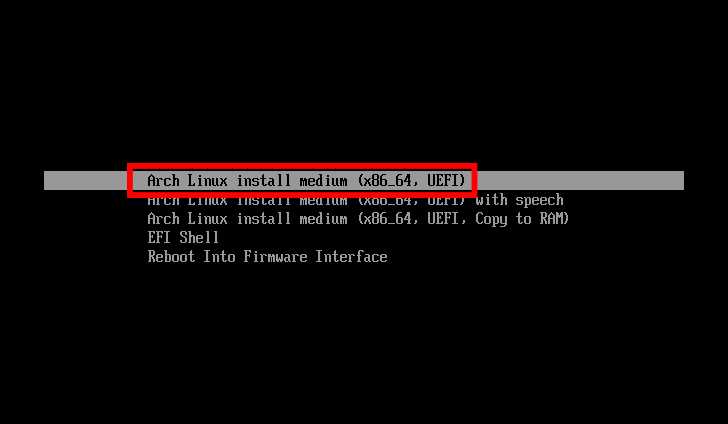
Step 7: The Arch Linux installation menu will appear. Select “Install Arch Linux” to begin the installation process.
Step 8: Follow the on-screen instructions to partition your Chromebook’s storage and set up the Arch Linux installation.
Step 9: Once the installation is complete, reboot your Chromebook.
Step 10: Log in to your new Arch Linux installation and start customizing it to your preferences.
Note: The installation process may vary slightly depending on your specific Chromebook model. It’s always a good idea to consult the official Arch Linux documentation for detailed instructions.
Download Arch Linux ISO
To install Arch Linux on your Chromebook, you will first need to download the Arch Linux ISO file. The ISO file contains the complete installation package for Arch Linux.
To download the Arch Linux ISO, follow these steps:
- Open your web browser and go to the Arch Linux website.
- Navigate to the Downloads section of the website.
- Look for the latest stable release of Arch Linux and click on the corresponding download link.
- Choose a mirror site from the list provided. It is recommended to choose a mirror site that is geographically close to your location for faster download speeds.
- Once you have selected a mirror site, click on the download link to start the download.
Depending on your internet connection speed, the download may take some time. Make sure to have a stable internet connection and enough disk space available on your Chromebook.
After the download is complete, you will have the Arch Linux ISO file ready for the installation process.
Create a Bootable USB Drive
To install Arch Linux on your Chromebook, you will need to create a bootable USB drive. Here is a step-by-step guide on how to do it:
- First, you will need to download the Arch Linux ISO file from the official website.
- Insert your USB drive into your Chromebook.
- Open the terminal on your Chromebook and run the command “lsblk” to list all the available drives.
- Identify your USB drive from the list. It will usually be labeled as “/dev/sdb” or something similar.
- Unmount the USB drive by running the command “sudo umount /dev/sdb” (replace “/dev/sdb” with the correct label if necessary).
- Next, use the “dd” command to write the Arch Linux ISO file to the USB drive. Run the command “sudo dd bs=4M if=/path/to/archlinux.iso of=/dev/sdb status=progress” (replace “/path/to/archlinux.iso” with the actual path to the ISO file and “/dev/sdb” with the correct label if necessary).
- Wait for the process to complete. It may take some time depending on the size of the ISO file.
- Once the process is finished, you will have a bootable USB drive with Arch Linux.
Now you are ready to proceed with the installation of Arch Linux on your Chromebook. Make sure to follow the next steps carefully to ensure a successful installation.