If you’re a Mac user with the latest M1 chip, you might be wondering how to get started with installing Brew. Brew, short for Homebrew, is a package manager that allows you to easily install and manage software packages on your Mac. In this step-by-step guide, we’ll walk you through the process of installing Brew on your Mac M1.
Before we begin, it’s important to note that the installation process for Brew on Mac M1 is slightly different from previous versions of Mac. Due to the new architecture of the M1 chip, some adjustments need to be made. But don’t worry, we’ll guide you through each step to ensure a smooth installation.
To start, open Terminal on your Mac. You can find Terminal by going to Applications > Utilities > Terminal. Once Terminal is open, we can begin the installation process. First, we need to install Rosetta 2, a translation layer that allows Intel-based software to run on Mac M1. This is necessary because Brew currently doesn’t have native support for M1.
To install Rosetta 2, simply enter the following command in Terminal:
softwareupdate –install-rosetta
After the installation of Rosetta 2 is complete, we can proceed with installing Brew. Enter the following command in Terminal:
/bin/bash -c “$(curl -fsSL https://raw.githubusercontent.com/Homebrew/install/HEAD/install.sh)”
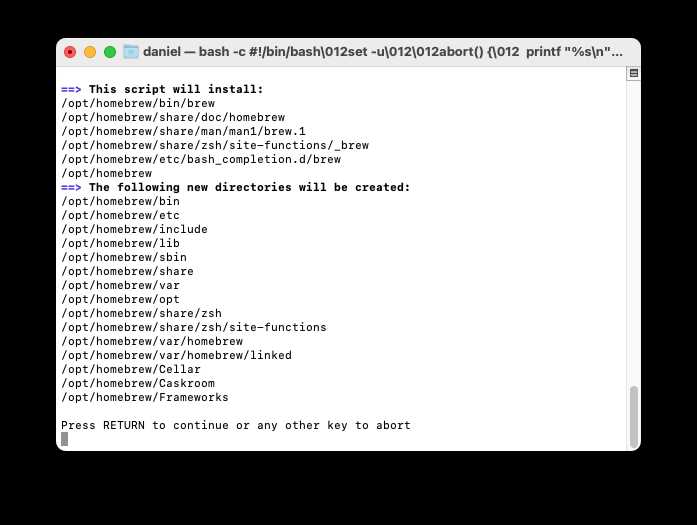
This command will download and install Brew on your Mac M1. Follow the on-screen prompts and enter your password when prompted. Once the installation is complete, you can verify the installation by entering the following command:
brew doctor
If Brew is installed correctly, you should see a message indicating that your system is ready to brew. Congratulations, you have successfully installed Brew on your Mac M1!
Now that you have Brew installed, you can start using it to install and manage software packages on your Mac M1. Brew provides a vast library of packages that you can easily install with a simple command. Enjoy exploring the world of software packages with Brew on your Mac M1!
Prerequisites for Installing Brew on Mac M1

Before you can install Brew on your Mac M1, there are a few prerequisites that you need to have in place:
1. Mac M1: Make sure you have a Mac M1 computer. Brew is specifically designed for macOS, so it won’t work on other operating systems.
2. Xcode Command Line Tools: Install Xcode Command Line Tools on your Mac M1. This will provide the necessary development tools and libraries required for Brew to work properly.
3. Terminal: You will need to use the Terminal application on your Mac M1 to install and manage Brew. The Terminal is a command-line interface that allows you to interact with your computer using text commands.
4. Internet Connection: Ensure that you have a stable internet connection. Brew requires an internet connection to download and install packages.
5. Admin Access: You will need administrative access to your Mac M1 in order to install Brew. This means you need to have the necessary permissions to install software on your computer.
Once you have these prerequisites in place, you can proceed with the installation of Brew on your Mac M1.
Check macOS Version

Before installing Brew on your M1 Mac, it’s important to check your macOS version to ensure compatibility. To do this, follow these steps:
- Click on the Apple menu in the top-left corner of your screen.
- Select “About This Mac” from the drop-down menu.
- In the window that appears, you will see the version of macOS you are currently running.
Make sure you are running macOS Big Sur or later, as Brew is officially supported on these versions. If you are running an older version of macOS, you may need to update your operating system before installing Brew.
Note: Updating your macOS version can be a time-consuming process, so make sure to back up your important files before proceeding.
Update Xcode Command Line Tools

In order to install brew on your Mac, you need to update the Xcode Command Line Tools. These tools are essential for compiling and running software on your Mac. Here’s how you can update them:
1. Open the Terminal app on your Mac.
2. Type the following command and press Enter:
xcode-select --install
This command will prompt a dialog box asking if you want to install the Xcode Command Line Tools. Click on the “Install” button to proceed.
3. Wait for the installation to complete. It may take a few minutes.
4. Once the installation is finished, you can verify that the Xcode Command Line Tools are updated by typing the following command in the Terminal:
xcode-select -p
If the command returns a path, it means that the Xcode Command Line Tools are successfully installed and updated on your Mac.
Now you are ready to proceed with installing brew on your Mac using the updated Xcode Command Line Tools.
Disable System Integrity Protection (SIP)
To install Brew on your Mac M1, you need to disable System Integrity Protection (SIP). SIP is a security feature that protects critical system files and restricts the installation of certain software.
Here’s how you can disable SIP:
- Restart your Mac and hold down the power button until the startup options appear.
- Click on the “Options” button, then select “Continue” to boot into the recovery environment.
- In the recovery environment, open the “Utilities” menu and select “Terminal”.
- Type the command
csrutil disableand press Enter. - Restart your Mac to apply the changes.
After disabling SIP, you can proceed with the installation of Brew on your Mac M1. Keep in mind that disabling SIP removes an important security feature, so make sure to enable it again once you have finished installing Brew.
Note: Disabling SIP should be done with caution, as it can potentially expose your system to security risks. Only disable SIP if you fully understand the implications and trust the software you are installing.
Installing Homebrew on Mac M1

Homebrew is a package manager that allows you to easily install and manage software packages on your Mac. If you have a Mac M1, you can follow these steps to install Homebrew:
- Open Terminal on your Mac M1.
- Copy and paste the following command into Terminal and press Enter:
- Wait for the installation process to complete. This may take a few minutes.
- Once the installation is finished, you can verify that Homebrew is installed correctly by typing the following command in Terminal:
- If Homebrew is installed correctly, you should see the version number displayed in the Terminal.
/bin/bash -c “$(curl -fsSL https://raw.githubusercontent.com/Homebrew/install/HEAD/install.sh)”
brew –version
Now that you have Homebrew installed on your Mac M1, you can use it to install various software packages and utilities. Homebrew makes it easy to manage dependencies and keep your software up to date.
Open Terminal
To install Brew on your Mac M1, you need to open the Terminal application. The Terminal is a command-line interface that allows you to interact with your computer using text-based commands. It is a powerful tool for developers and advanced users.
To open the Terminal on your Mac M1, follow these steps:
| 1. | Click on the magnifying glass icon in the top-right corner of your screen. |
| 2. | Type “Terminal” in the search bar. |
| 3. | Click on the Terminal application when it appears in the search results. |
Alternatively, you can also open the Terminal by navigating to the “Applications” folder in Finder, then opening the “Utilities” folder, and finally double-clicking on the “Terminal” application.
Once you have opened the Terminal, you are ready to proceed with the installation of Brew on your Mac M1.
Install Rosetta 2

If you are using an M1 Mac, you will need to install Rosetta 2 before installing Brew. Rosetta 2 is a translation layer that allows you to run software built for Intel-based Macs on your M1 Mac.
To install Rosetta 2, follow these steps:
- Open a Terminal window on your M1 Mac.
- Enter the following command and press Enter:
softwareupdate --install-rosetta - Wait for the installation to complete. This may take a few minutes.
- Once the installation is finished, you can proceed with installing Brew on your M1 Mac.
By installing Rosetta 2, you ensure that your M1 Mac is capable of running software that has not yet been optimized for the new architecture. This will allow you to use Brew and other applications that are not yet available in native M1 versions.
Install Homebrew

To install Homebrew on your Mac, follow these steps:
Step 1: Open Terminal on your Mac. You can find it by searching for “Terminal” in Spotlight or by navigating to Applications -> Utilities -> Terminal.
Step 2: In the Terminal window, paste the following command and press Enter:
/bin/bash -c "$(curl -fsSL https://raw.githubusercontent.com/Homebrew/install/HEAD/install.sh)"
This command will download and install Homebrew on your Mac.
Step 3: After the installation is complete, you can verify that Homebrew is installed correctly by running the following command in Terminal:
brew --version
If Homebrew is installed properly, you will see the version number of Homebrew displayed in the Terminal.
Step 4: Congratulations! You have successfully installed Homebrew on your Mac. You can now use Homebrew for installing various packages and software on your Mac.
Note: Homebrew is a package manager for macOS that allows you to easily install and manage software packages on your Mac. It simplifies the process of installing command-line tools, libraries, and other software.

