Are you wondering how to delete a folder on your computer? Deleting a folder may seem like a simple task, but it’s important to do it correctly to avoid any unintended consequences. Whether you want to free up some space on your hard drive or remove unnecessary files, this step-by-step guide will walk you through the process.
Step 1: Locate the folder you want to delete. Before you can delete a folder, you need to find its location on your computer. This can be done by navigating through your file explorer or using the search function. Take a moment to double-check that you have selected the correct folder to delete.
Step 2: Right-click on the folder. Once you have located the folder, right-click on it to open a context menu. This menu will provide you with various options, including the option to delete the folder. Click on the “Delete” option to proceed.
Step 3: Confirm the deletion. After clicking on the “Delete” option, a confirmation prompt will appear asking if you are sure you want to delete the folder. Take a moment to review the prompt and ensure that you have selected the correct folder. If you are certain, click on the “Yes” or “OK” button to confirm the deletion.
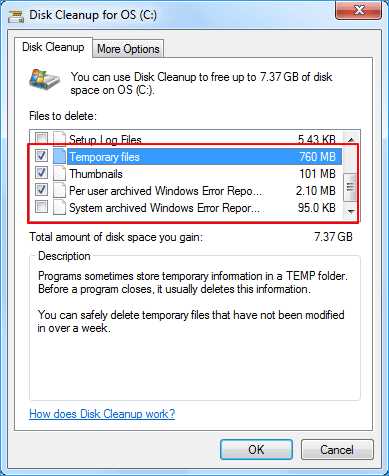
Step 4: Empty the Recycle Bin (optional). When you delete a folder, it is typically moved to the Recycle Bin or Trash on your computer. If you want to permanently remove the folder and free up space on your hard drive, you will need to empty the Recycle Bin. Right-click on the Recycle Bin icon on your desktop and select the “Empty Recycle Bin” option.
Congratulations! You have successfully deleted a folder from your computer. Remember to double-check the folder you are deleting and be cautious when deleting important files. Following these steps will help you safely and efficiently delete folders on your computer.
Understanding the Importance of Deleting Unwanted Folders
When it comes to managing your computer’s storage space, it is crucial to know how to delete unwanted folders. These folders can take up valuable space on your hard drive and slow down your system’s performance. By learning how to properly delete these folders, you can optimize your computer’s storage and improve its overall efficiency.
Unwanted folders can accumulate over time for various reasons. They may be leftovers from uninstalled programs, duplicates of existing folders, or simply unnecessary files that you no longer need. Regardless of their origin, these folders can clutter your computer and make it difficult to find the files you actually need.
Deleting unwanted folders is a straightforward process that can be done in a few simple steps. First, you need to locate the folder you want to delete. This can be done by navigating through your computer’s file explorer or using the search function to find the folder’s name. Once you have found the folder, right-click on it and select the “Delete” option from the context menu.
Before deleting a folder, it is important to double-check its contents to ensure that you are not deleting any important files. You can do this by opening the folder and reviewing its contents. If you are certain that the folder contains only unwanted files, proceed with the deletion process.
Deleting unwanted folders not only frees up storage space but also helps to keep your computer organized. By regularly removing unnecessary folders, you can maintain a clean and efficient file system. This makes it easier to locate and manage your important files, improving your overall productivity.
In conclusion, understanding how to delete unwanted folders is essential for optimizing your computer’s storage space and improving its performance. By following a few simple steps, you can easily remove these folders and keep your computer organized. Remember to always double-check the folder’s contents before deleting it to avoid accidentally deleting important files. Start decluttering your computer today and enjoy a more efficient computing experience!
Step 1: Locate the Folder
Before you can delete a folder, you need to know where it is located on your computer. This step will guide you on how to locate the folder you want to delete.
1. Open the File Explorer by clicking on the folder icon in the taskbar or by pressing the Windows key + E on your keyboard.
2. Navigate to the location where the folder is stored. This could be on your desktop, in your documents folder, or in another location on your computer.
3. If you are not sure where the folder is located, you can use the search bar at the top right corner of the File Explorer window to search for the folder by name.
4. Once you have located the folder, right-click on it to open the context menu.
5. From the context menu, select “Delete” or “Move to Recycle Bin” to delete the folder. If you choose to move it to the recycle bin, you can restore it later if needed.
Now that you have located the folder and know how to delete it, you can proceed to the next step in the guide.
Using File Explorer to Find the Folder
If you want to delete a folder, you first need to locate it using File Explorer. Follow these steps to find the folder you want to delete:
- Open File Explorer by clicking on the folder icon in the taskbar or by pressing the Windows key + E on your keyboard.
- In the File Explorer window, navigate to the location where the folder is stored. This could be on your desktop, in your Documents folder, or in another location on your computer.
- Once you are in the correct location, look for the folder you want to delete. You can scroll through the list of files and folders, or use the search bar at the top right corner of the window to search for the folder by name.
- If you are having trouble finding the folder, you can also sort the files and folders by name, date modified, or other criteria by clicking on the corresponding column header.
- Once you have located the folder you want to delete, right-click on it and select “Delete” from the context menu. Alternatively, you can also press the Delete key on your keyboard.
- A confirmation dialog box will appear asking if you are sure you want to delete the folder. Click “Yes” to confirm and permanently delete the folder.
By following these steps, you can easily find and delete the folder you no longer need using File Explorer.
Searching for the Folder Using the Command Prompt

If you’re not sure where the folder is located on your computer, you can use the Command Prompt to search for it. The Command Prompt is a powerful tool that allows you to execute commands and perform various tasks on your computer.
To search for the folder using the Command Prompt, follow these steps:
- Open the Command Prompt by pressing the Windows key + R, typing “cmd” in the Run dialog box, and pressing Enter.
- In the Command Prompt window, navigate to the drive where you want to search for the folder. For example, if you want to search for the folder on the C: drive, type “C:” and press Enter.
- Once you’re in the correct drive, use the “dir” command to list all the files and folders in the current directory. Type “dir” and press Enter.
- Scroll through the list of files and folders to find the folder you’re looking for. If there are too many items in the list, you can use the “dir /p” command to display the list one page at a time. Type “dir /p” and press Enter.
- If you still can’t find the folder, you can use the “dir /s” command to search for the folder in all subdirectories of the current directory. Type “dir /s” and press Enter.
Once you’ve found the folder, you can proceed with deleting it by following the steps mentioned in the previous sections.
Note: Using the Command Prompt requires some basic knowledge of commands and navigating through directories. Make sure to double-check the folder you’re deleting to avoid accidentally deleting important files or folders.