If you are a Java developer looking to build rich and interactive user interfaces, JavaFX is the perfect choice for you. With its powerful features and extensive library, JavaFX allows you to create stunning desktop applications that run seamlessly on multiple platforms. In this step-by-step guide, we will show you how to set up JavaFX in Eclipse, one of the most popular integrated development environments (IDEs) for Java programming.
Setting up JavaFX in Eclipse is a straightforward process that requires a few simple steps. First, you need to ensure that you have the latest version of Eclipse installed on your system. Once you have Eclipse up and running, you can proceed to install the JavaFX plugin. This plugin provides all the necessary tools and libraries to develop JavaFX applications within the Eclipse environment.
After installing the JavaFX plugin, you will need to configure your Eclipse project to use JavaFX. This involves adding the JavaFX library to your project’s build path and setting the JavaFX runtime as the default JRE for your project. Once these configurations are in place, you can start building JavaFX applications in Eclipse with ease.
In this guide, we will walk you through each step of the setup process, providing detailed instructions and screenshots to help you along the way. Whether you are a beginner or an experienced Java developer, this guide will help you get started with JavaFX in Eclipse and unleash the full potential of this powerful framework.
Section 1: Installing JavaFX Plugin

In order to setup JavaFX in Eclipse, you need to install the JavaFX plugin. This plugin allows you to develop and run JavaFX applications directly in Eclipse.
Here are the steps to install the JavaFX plugin:
| Step 1 | Open Eclipse and go to the “Help” menu. |
| Step 2 | Select “Eclipse Marketplace” from the dropdown menu. |
| Step 3 | In the search bar, type “JavaFX” and press Enter. |
| Step 4 | You will see the “e(fx)clipse” plugin in the search results. Click on the “Go to the Marketplace” button next to it. |
| Step 5 | On the plugin’s page, click the “Install” button. |
| Step 6 | Follow the instructions to complete the installation process. |
| Step 7 | Once the installation is complete, restart Eclipse. |
After following these steps, you will have successfully installed the JavaFX plugin in Eclipse. You can now start developing JavaFX applications using Eclipse.
Step 1: Downloading Eclipse
Before you can start setting up JavaFX in Eclipse, you need to have Eclipse installed on your computer. Eclipse is a popular integrated development environment (IDE) for Java programming, and it provides a convenient platform for developing Java applications, including JavaFX.
To download Eclipse, follow these steps:
| 1. | Go to the Eclipse website at https://www.eclipse.org/. |
| 2. | Click on the “Download” button on the homepage. |
| 3. | On the download page, you will see different versions of Eclipse available for download. Choose the version that is compatible with your operating system (Windows, macOS, or Linux). |
| 4. | Once you have selected the appropriate version, click on the download link to start the download. |
| 5. | After the download is complete, locate the downloaded file on your computer and run the installer. |
| 6. | Follow the on-screen instructions to install Eclipse on your computer. |
| 7. | Once the installation is complete, you can launch Eclipse by double-clicking on the Eclipse icon on your desktop or from the Start menu. |
Now that you have Eclipse installed, you are ready to proceed to the next step and set up JavaFX in Eclipse.
Step 2: Installing Java Development Kit (JDK)

In order to setup JavaFX in Eclipse, you need to have the Java Development Kit (JDK) installed on your computer. The JDK is a software development environment that provides the necessary tools and libraries for developing Java applications.
Here’s how you can install the JDK:
| Step 1: | Go to the official Oracle website (https://www.oracle.com/java/technologies/javase-jdk11-downloads.html) and download the latest version of the JDK. |
| Step 2: | Once the download is complete, run the installer and follow the on-screen instructions to install the JDK. |
| Step 3: | After the installation is complete, open Eclipse and go to the “Window” menu. From the dropdown, select “Preferences”. |
| Step 4: | In the Preferences window, expand the “Java” category and select “Installed JREs”. |
| Step 5: | Click on the “Add” button to add a new JRE. |
| Step 6: | In the JRE Definition window, select “Standard VM” and click “Next”. |
| Step 7: | Click on the “Directory” button and navigate to the location where you installed the JDK. Select the JDK folder and click “Finish”. |
| Step 8: | Back in the Preferences window, select the newly added JRE and click “OK”. |
Once you have successfully installed the JDK and added it to Eclipse, you are ready to proceed to the next step: setting up the JavaFX libraries in Eclipse.
Step 3: Adding JavaFX Plugin to Eclipse

In order to use JavaFX in Eclipse, you need to add the JavaFX plugin to your Eclipse installation. Here’s how you can do it:
- Open Eclipse and go to the “Help” menu.
- Select “Eclipse Marketplace” from the dropdown menu.
- In the search bar, type “e(fx)clipse” and press Enter.
- Click on the “Go” button next to the search bar.
- From the search results, find the “e(fx)clipse” plugin and click on the “Go” button next to it.
- On the plugin’s page, click on the “Install” button.
- Follow the instructions in the installation wizard to complete the installation.
- Once the installation is complete, restart Eclipse.
After restarting Eclipse, you should now have the JavaFX plugin installed and ready to use. You can now proceed to the next step and start creating JavaFX projects in Eclipse.
Section 2: Configuring JavaFX in Eclipse

In this section, we will guide you on how to set up JavaFX in Eclipse. JavaFX is a powerful framework for building rich desktop applications with a modern user interface. Eclipse is a popular integrated development environment (IDE) for Java programming.
To configure JavaFX in Eclipse, follow these steps:
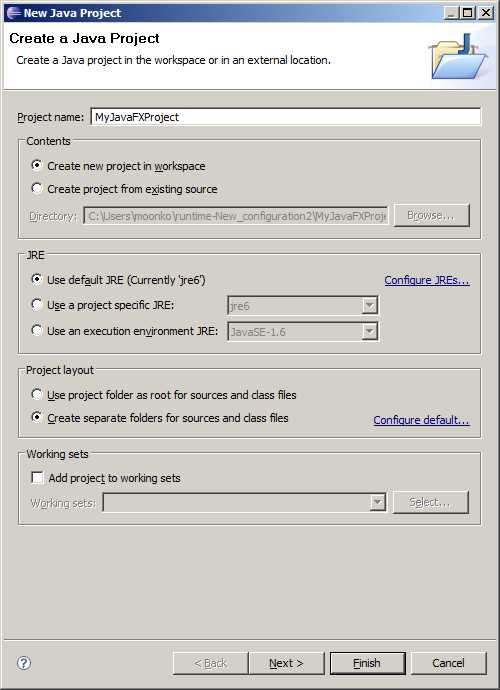
- Open Eclipse and create a new Java project.
- Right-click on the project and select “Properties” from the context menu.
- In the properties dialog, navigate to the “Java Build Path” section.
- Click on the “Libraries” tab and then click on the “Add Library” button.
- Select “JavaFX SDK” from the list and click “Next”.
- Specify the path to your JavaFX installation directory and click “Finish”.
- Click “Apply and Close” to save the changes.
Once you have configured JavaFX in Eclipse, you can start developing JavaFX applications. Eclipse provides a rich set of tools and features for JavaFX development, including code completion, debugging, and visual layout design.
In the next section, we will show you how to create a simple JavaFX application in Eclipse.