Are you still using Windows 7 and wondering how to upgrade to the latest version of Windows? Look no further! In this step-by-step guide, we will walk you through the process of updating your Windows 7 operating system to the all-new Windows 11.
Windows 11 is the latest version of the popular operating system, offering a range of exciting new features and improvements over its predecessor. However, before you dive into the installation process, it’s important to ensure that your current Windows 7 system is compatible with the upgrade.
To check compatibility, Microsoft provides a handy tool called the “PC Health Check” that scans your system and provides a detailed report on whether your hardware and software meet the requirements for Windows 11. It’s crucial to run this tool to avoid any potential compatibility issues during the upgrade process.
Once you’ve confirmed that your system is compatible, it’s time to proceed with the update. Microsoft offers two main methods for upgrading from Windows 7 to Windows 11: the “Windows Update” method and the “Media Creation Tool” method. The Windows Update method is the simplest and most straightforward, as it allows you to update your system directly from the Windows 7 interface.
However, if you prefer a more hands-on approach or encounter any issues with the Windows Update method, the Media Creation Tool method is a great alternative. This method involves creating a bootable USB drive or DVD with the Windows 11 installation files and performing a clean installation of the operating system.
Whether you choose the Windows Update method or the Media Creation Tool method, it’s important to back up all your important files and data before proceeding with the upgrade. This will ensure that you don’t lose any valuable information in case of any unforeseen issues during the installation process.
With this step-by-step guide, you’ll be well-equipped to update your Windows 7 system to the latest and greatest Windows 11. So, let’s get started and enjoy all the new features and improvements that Windows 11 has to offer!
Preparing for the Update
Before upgrading from Windows 7 to Windows 11, it is important to ensure that your system meets the necessary requirements for a successful installation. Here are the key steps to prepare for the upgrade:
- Check the compatibility of your current Windows 7 system with Windows 11. Microsoft provides a PC Health Check tool that can be downloaded and run to determine if your device meets the minimum requirements.
- Make sure your Windows 7 is up to date with the latest updates and patches. This will help ensure a smooth transition to Windows 11.
- Back up your important files and data. Although the upgrade process is designed to preserve your files, it is always a good idea to have a backup in case of any unforeseen issues.
- Review the system requirements for Windows 11. Check if your device meets the minimum hardware specifications, such as processor, RAM, and storage capacity.
- Consider upgrading any outdated hardware components, such as the processor or RAM, if necessary. Upgrading these components can improve the performance and compatibility of your system with Windows 11.
- Ensure that you have a stable internet connection during the upgrade process. This will help prevent any interruptions or errors during the installation.
By following these steps, you can ensure that your Windows 7 system is ready for the upgrade to Windows 11. Taking the time to prepare beforehand will help ensure a smooth and successful installation process.
Check System Requirements
Before proceeding with the installation or upgrade to Windows 11, it is important to check if your current Windows 7 system meets the minimum system requirements for compatibility. This will ensure a smooth and successful update process.
Here are the minimum system requirements for Windows 11:
- Processor: 1 gigahertz (GHz) or faster with 2 or more cores on a compatible 64-bit processor
- RAM: 4 gigabytes (GB) or more
- Storage: 64 GB or more available storage
- Graphics Card: DirectX 12 compatible graphics / WDDM 2.x
- Display: A display with at least 720p resolution
- Internet Connection: Internet connectivity is necessary to perform updates and to download and install Windows 11 apps
It is important to note that these are the minimum requirements, and for the best experience, it is recommended to have a more powerful system. If your current system does not meet these requirements, it may not be compatible with Windows 11.
Once you have confirmed that your system meets the requirements, you can proceed with the update or upgrade process to Windows 11.
Backup Your Data
Before proceeding with the installation or upgrade to Windows 11, it is crucial to backup your data to ensure its safety and compatibility. This step is essential as it will protect your files and settings in case anything goes wrong during the installation process.
To backup your data, follow these steps:
| 1. | Connect an external storage device, such as a USB drive or an external hard drive, to your Windows 7 computer. |
| 2. | Open the File Explorer by clicking on the folder icon in the taskbar or pressing the Windows key + E. |
| 3. | Navigate to the files and folders that you want to backup. |
| 4. | Select the files and folders by holding down the Ctrl key and clicking on each item. |
| 5. | Right-click on the selected items and choose “Copy” from the context menu. |
| 6. | Navigate to the external storage device in the File Explorer. |
| 7. | Right-click on an empty space and choose “Paste” from the context menu to copy the files and folders to the external storage device. |
| 8. | Wait for the copying process to complete. The time required will depend on the size of the data being backed up. |
| 9. | Once the backup is finished, safely eject the external storage device from your computer. |
By following these steps, you can ensure that your important files and settings are safely backed up before proceeding with the Windows 11 installation or upgrade. This will give you peace of mind and allow you to restore your data if needed.
Update Your Drivers
Before upgrading your Windows 7 to Windows 11, it is crucial to update your drivers to ensure compatibility and a smooth upgrade process. Drivers are software programs that allow your computer’s operating system to communicate with hardware devices such as printers, graphics cards, and network adapters.
Outdated drivers can cause compatibility issues and may prevent your system from meeting the requirements for Windows 11. To avoid any potential problems, follow these steps to update your drivers:
- Identify the drivers that need updating: Go to the Device Manager by right-clicking on the Start button and selecting “Device Manager.” Look for any devices with a yellow exclamation mark, as this indicates that the driver needs updating.
- Visit the manufacturer’s website: Once you have identified the drivers that need updating, visit the manufacturer’s website to download the latest versions. Make sure to download the drivers that are compatible with Windows 11.
- Install the updated drivers: After downloading the updated drivers, double-click on the installation file and follow the on-screen instructions to install them. Restart your computer if prompted.
- Verify driver installation: Once your computer has restarted, go back to the Device Manager and check if the drivers have been successfully updated. Look for any remaining devices with a yellow exclamation mark and repeat the process for those drivers.
By updating your drivers, you can ensure that your computer meets the requirements for Windows 11 and minimize any potential compatibility issues during the upgrade process. It is recommended to regularly check for driver updates even after upgrading to Windows 11 to keep your system running smoothly.
Updating Windows 7 to Windows 11
Updating your Windows 7 operating system to Windows 11 is a straightforward process that requires meeting certain requirements. By following the steps outlined below, you can successfully upgrade your Windows 7 to the latest version, Windows 11.
- Check the system requirements: Before proceeding with the update, ensure that your computer meets the minimum system requirements for Windows 11. These requirements include a compatible processor, sufficient RAM, and available storage space.
- Backup your data: It is always recommended to create a backup of your important files and documents before performing any major system update. This will help you avoid any potential data loss during the installation process.
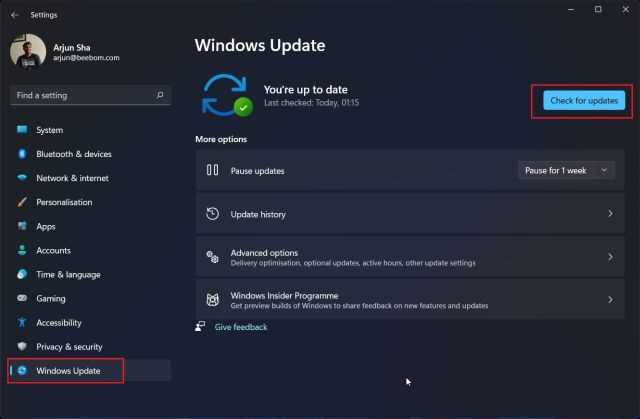
- Download the Windows 11 update: Visit the official Microsoft website and download the Windows 11 update tool. This tool will guide you through the installation process and ensure a smooth transition from Windows 7 to Windows 11.
- Run the update tool: Once the update tool is downloaded, run it on your Windows 7 system. The tool will automatically scan your computer for compatibility and provide you with any necessary recommendations or fixes.
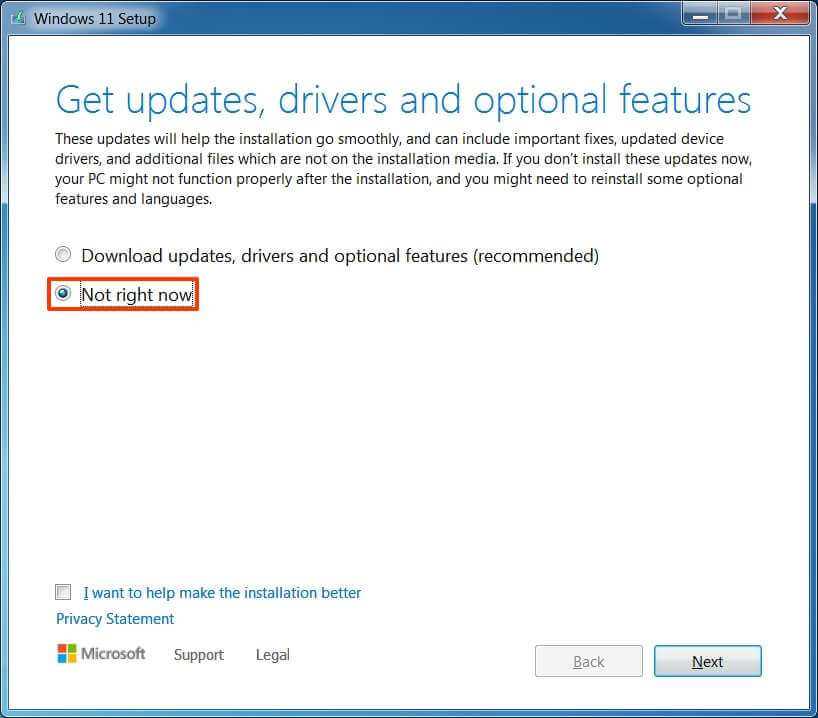
- Start the installation: After the compatibility check is complete, you can proceed with the installation process. The update tool will download the necessary files and guide you through the installation steps.
- Follow the on-screen instructions: During the installation process, you will be prompted to make certain choices and decisions. Follow the on-screen instructions carefully to ensure a successful upgrade to Windows 11.
- Restart your computer: Once the installation is complete, restart your computer to finalize the update. Windows 7 will be replaced with the new Windows 11 operating system.
By following these steps, you can easily update your Windows 7 operating system to Windows 11. Enjoy the new features and improvements that come with the latest version of Windows!