
Are you ready to take your Windows experience to the next level? With the release of Windows 11, Microsoft has introduced a range of exciting new features and improvements that will enhance your productivity and make your computer even more user-friendly. In this step-by-step guide, we will show you how to update your Windows 10 operating system to the latest version, Windows 11.
Updating your operating system is an essential task that ensures your computer stays secure and up to date with the latest software advancements. Windows 11 brings a fresh and modern look to your desktop, with a redesigned Start menu, improved multitasking capabilities, and enhanced gaming features. So, if you’re eager to get your hands on these exciting updates, let’s dive into the process of updating from Windows 10 to Windows 11.
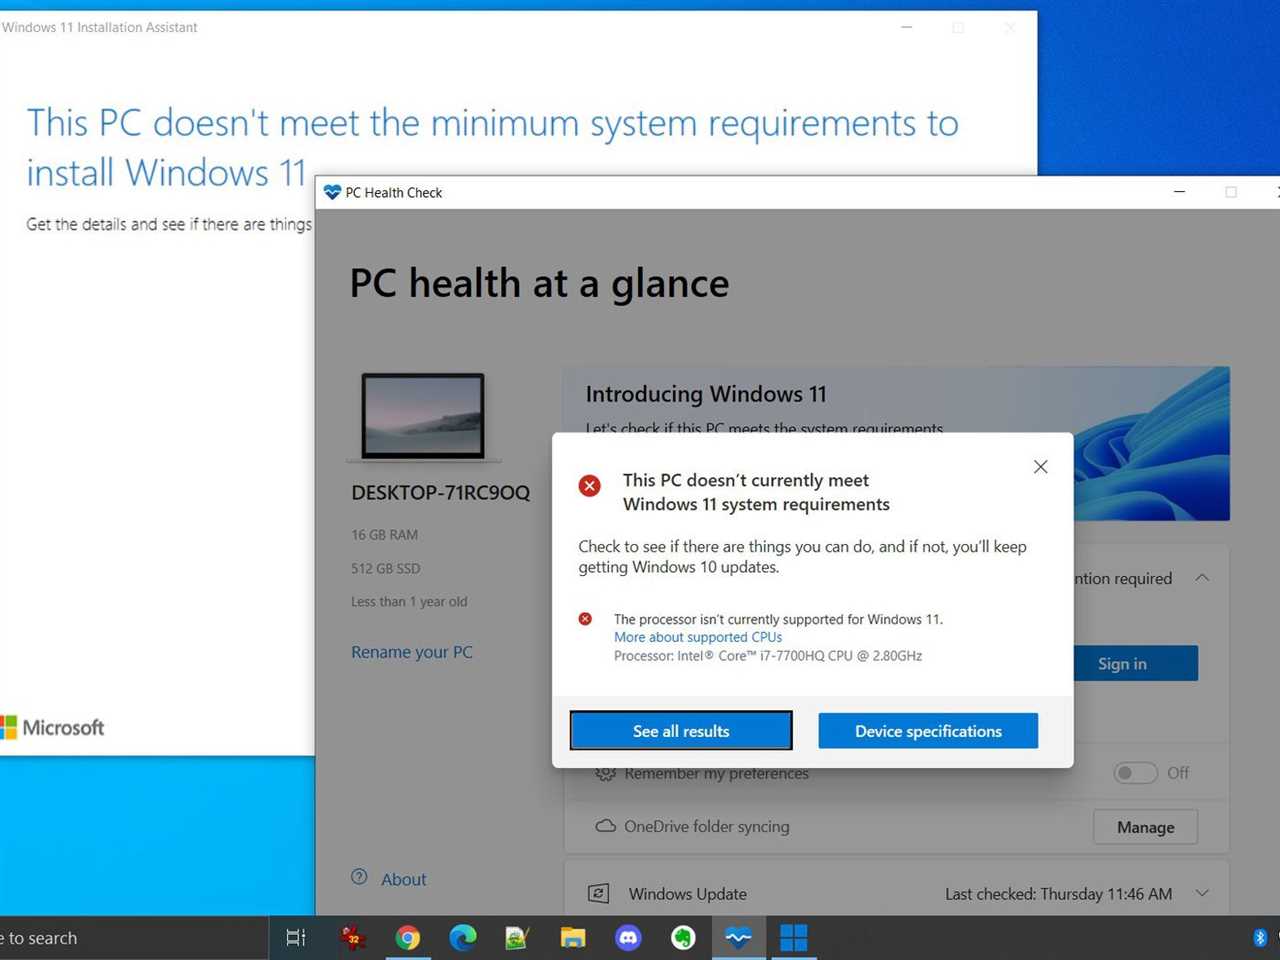
Before we begin, it’s important to note that not all computers will be able to update to Windows 11. Microsoft has set certain hardware requirements to ensure optimal performance and compatibility. So, before you proceed, make sure your computer meets the minimum system requirements for Windows 11. Once you’ve confirmed compatibility, you’re ready to begin the update process.
Preparing Your Device for the Update
Before you can update your device from Windows 10 to Windows 11, it’s important to make sure your device meets the necessary requirements. Here’s how you can prepare your device for the update:
1. Check the system requirements:
Make sure your device meets the minimum system requirements for Windows 11. This includes having a compatible processor, at least 4GB of RAM, and 64GB of storage. You can find the full list of system requirements on the Microsoft website.
2. Update your current version of Windows 10:
Before you can update to Windows 11, make sure your current version of Windows 10 is up to date. Go to Settings > Update & Security > Windows Update and check for any available updates. Install any pending updates and restart your device if necessary.
3. Backup your important files:
It’s always a good idea to backup your important files before performing any major updates. This will ensure that your files are safe in case anything goes wrong during the update process. You can backup your files to an external hard drive, cloud storage, or another device.
4. Check for compatibility issues:
Use the PC Health Check tool provided by Microsoft to check if your device is compatible with Windows 11. This tool will scan your device and provide you with information about any compatibility issues that may prevent you from updating to Windows 11. If there are any issues, you may need to address them before proceeding with the update.
5. Prepare for a longer update process:
Updating from Windows 10 to Windows 11 may take longer than a regular Windows update. Make sure you have enough time set aside for the update process, as it may require multiple restarts and can take several hours to complete.
By following these steps, you can ensure that your device is ready for the update to Windows 11. Once you have completed these preparations, you can proceed with the actual update process.
Check System Requirements

Before you can update your Windows 10 to Windows 11, it is important to check if your system meets the minimum requirements for the update. Here are the system requirements for Windows 11:
– 1 gigahertz (GHz) or faster with 2 or more cores on a compatible 64-bit processor
– 4 gigabytes (GB) of RAM or more
– 64 GB of storage or more
– DirectX 12 compatible graphics with a WDDM 2.0 driver
– A display with at least 720p resolution
– Internet connection for Windows 11 Home edition
If your system meets these requirements, you can proceed with the update. Otherwise, you may need to upgrade your hardware to be able to update to Windows 11.
Backup Your Data

Before you proceed with the update to Windows 11, it is crucial to back up your data to ensure that you don’t lose any important files or documents. Here’s how you can do it:
- Identify the files and folders that you want to back up. This can include documents, photos, videos, music, and any other files that are important to you.
- Connect an external storage device, such as a USB drive or an external hard drive, to your computer.
- Open the File Explorer by pressing the Windows key + E.
- Navigate to the files and folders that you want to back up.
- Select the files and folders by holding down the Ctrl key and clicking on each item.
- Right-click on the selected items and choose “Copy” from the context menu.
- Go to the external storage device in the File Explorer.
- Right-click on an empty space and choose “Paste” from the context menu to copy the files and folders to the external storage device.
- Wait for the copying process to complete. The time it takes will depend on the size of the files and the speed of your computer and external storage device.
- Once the backup is complete, safely eject the external storage device from your computer.
By following these steps, you can ensure that your important data is safely backed up before you proceed with the update to Windows 11. In case anything goes wrong during the update process, you can restore your files and folders from the backup.
Free Up Disk Space
Before you update your Windows 10 to Windows 11, it’s important to make sure you have enough disk space to accommodate the new operating system. Windows 11 requires at least 64GB of storage space, so it’s a good idea to free up some space on your hard drive before proceeding with the update.
Here are a few steps you can take to free up disk space:
1. Delete unnecessary files: Go through your files and folders and delete any files that you no longer need. This can include old documents, pictures, videos, and downloads. You can also use the built-in Disk Cleanup tool to remove temporary files and other unnecessary system files.
2. Uninstall unused programs: Take a look at the programs installed on your computer and uninstall any that you no longer use. This will not only free up disk space but also help improve the overall performance of your system.
3. Move files to an external storage device: If you have large files or folders that you don’t need immediate access to, consider moving them to an external hard drive or cloud storage. This will help free up space on your main hard drive.
4. Clear your browser cache: Web browsers store temporary files, cookies, and other data that can take up a significant amount of disk space over time. Clearing your browser cache can help free up some space.
By following these steps, you can ensure that you have enough disk space to successfully update your Windows 10 to Windows 11. It’s always a good idea to regularly clean up your hard drive and keep it organized to optimize the performance of your computer.
Updating to Windows 11

Updating your operating system to Windows 11 is a straightforward process that can be done in a few simple steps. This guide will walk you through the process of updating your Windows 10 to the latest version, Windows 11.
Before you begin, make sure your device meets the minimum system requirements for Windows 11. This includes having a compatible processor, sufficient RAM, and available storage space. You can check the system requirements on the official Microsoft website.
To update to Windows 11, follow these steps:
| Step 1 | Open the Windows Update settings by clicking on the Start menu and selecting “Settings”. |
| Step 2 | In the Settings window, click on “Update & Security”. |
| Step 3 | Click on “Windows Update” in the left sidebar. |
| Step 4 | Click on the “Check for updates” button. Windows will now check for any available updates. |
| Step 5 | If there is an update available for Windows 11, it will be displayed. Click on the “Download and install” button to start the update process. |
| Step 6 | Wait for the update to download and install. This may take some time, so be patient. |
| Step 7 | Once the update is complete, your device will restart. After the restart, you will be running Windows 11. |
It is important to note that updating to Windows 11 may require you to reinstall certain applications and drivers. Make sure to back up any important files and create a system restore point before proceeding with the update.
Now that you know how to update Windows 10 to Windows 11, you can enjoy the new features and improvements that come with the latest version of the operating system.
Check for Windows Updates
Before updating your Windows 10 to Windows 11, it is important to ensure that your current operating system is up to date. Checking for Windows updates is a crucial step to make sure you have the latest security patches, bug fixes, and performance improvements.
To check for updates, follow these steps:
- Click on the Start menu and select “Settings”.
- In the Settings window, click on “Update & Security”.
- In the left sidebar, click on “Windows Update”.
- Click on the “Check for updates” button.
Windows will now search for any available updates for your system. If there are updates available, they will be downloaded and installed automatically. It is recommended to keep your computer connected to the internet during this process.
Once the updates are installed, you may need to restart your computer for the changes to take effect. After restarting, repeat the above steps until there are no more updates available.
By regularly checking for Windows updates, you can ensure that your operating system is always up to date and secure. This will help you to smoothly update from Windows 10 to Windows 11 when it becomes available.


