If you are wondering how to remove a repository on Github, you have come to the right place. Github is a popular platform for hosting and collaborating on code repositories, but sometimes you may need to delete a repository for various reasons. Whether you have created a repository by mistake or you no longer need it, this step-by-step guide will walk you through the process of removing a repository on Github.
Step 1: Sign in to your Github account
The first step in removing a repository on Github is to sign in to your Github account. If you don’t have an account, you will need to create one before you can proceed. Once you are signed in, you will be able to access your repositories and make changes to them.
Step 2: Go to the repository you want to remove
Once you are signed in to your Github account, navigate to the repository you want to remove. You can do this by clicking on the repository name in the list of repositories on your Github dashboard. This will take you to the repository’s main page.
Step 3: Access the repository settings
On the repository’s main page, you will find a tab called “Settings”. Click on this tab to access the settings for the repository. The settings page contains various options for managing your repository, including the option to delete it.
Step 4: Delete the repository
Once you are on the repository’s settings page, scroll down to the bottom of the page until you find the “Danger Zone” section. In this section, you will see a button labeled “Delete this repository”. Click on this button to start the process of deleting the repository.
Step 5: Confirm the deletion
After clicking on the “Delete this repository” button, Github will ask you to confirm the deletion. This is an important step, as deleting a repository is irreversible and all the data associated with the repository will be permanently deleted. Make sure you have a backup of any important data before proceeding.
Step 6: Enter the repository name and confirm
To confirm the deletion, Github will ask you to enter the name of the repository. This is a security measure to ensure that you are deleting the correct repository. Once you have entered the repository name, click on the “I understand the consequences, delete this repository” button to complete the deletion process.
By following these step-by-step instructions, you can easily remove a repository on Github. Just remember to be cautious when deleting a repository, as the process is irreversible. Make sure you have a backup of any important data before proceeding. Happy coding!
Removing a Repository on Github

If you no longer need a repository on Github, you can easily remove it. This step-by-step guide will show you how to delete a repository on Github.
Step 1: First, log in to your Github account and navigate to the repository you want to remove.
Step 2: Once you are on the repository page, click on the “Settings” tab located at the top right corner of the page.
Step 3: Scroll down to the “Danger Zone” section at the bottom of the settings page.
Step 4: In the “Danger Zone” section, you will find the “Delete this repository” button. Click on it.
Step 5: Github will ask you to confirm the deletion. If you are sure you want to delete the repository, type in the name of the repository and click on the “I understand the consequences, delete this repository” button.
Step 6: Congratulations! You have successfully removed the repository from Github. Please note that this action cannot be undone, so make sure you have a backup of any important files or data before deleting the repository.
That’s it! Now you know how to remove a repository on Github. Keep in mind that deleting a repository will permanently remove all of its files, branches, issues, and pull requests. So, be cautious when deleting repositories.
Step 1: Accessing Github

To remove a repository on Github, you need to first access the Github website. Open your preferred web browser and go to https://github.com. If you don’t have an account, you will need to sign up for one. Once you have signed in, you will be directed to your Github dashboard.
From your dashboard, you can navigate to the repository you want to remove. You can either click on the repository name if it is listed on your dashboard, or you can use the search bar at the top of the page to search for the repository by name.
Once you have accessed the repository, you are ready to proceed with the steps to remove it. Make sure you have the necessary permissions to remove the repository, as only the repository owner or an organization owner can delete a repository.
Step 2: Selecting the Repository
Once you have logged in to your GitHub account, you can proceed to remove a repository. Here’s how:
1. On the GitHub homepage, click on the “Repositories” tab located at the top of the page.
2. You will be directed to a page that displays all of your repositories. Scroll through the list and find the repository that you want to remove.
3. Once you have located the repository, click on its name to access its main page.
4. On the repository’s main page, look for the “Settings” tab located towards the right side of the page. Click on it.
5. In the settings page, scroll down until you find the “Danger Zone” section. This section contains options to delete the repository.
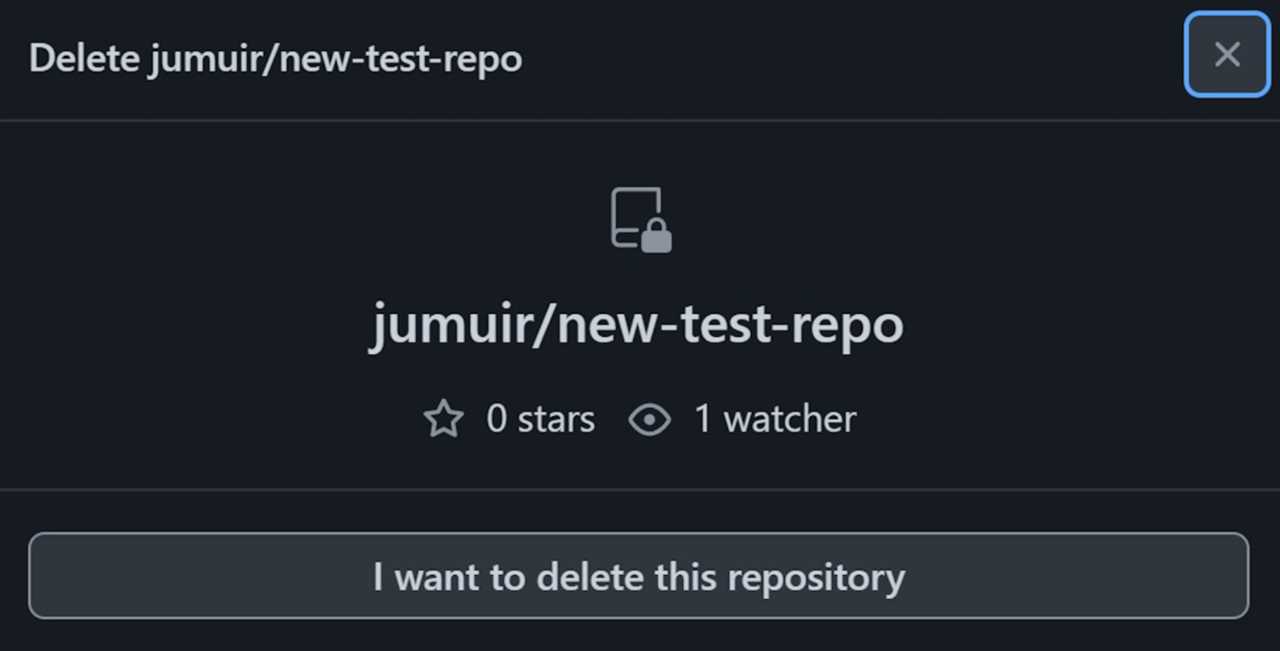
6. To remove the repository, click on the “Delete this repository” button. A confirmation dialog box will appear.
7. Read the warning message in the confirmation dialog box carefully. Make sure you understand the consequences of deleting the repository.
8. If you are certain that you want to proceed with the removal, type the name of the repository in the text field provided and click on the “I understand the consequences, delete this repository” button.
9. GitHub will ask you to enter your GitHub password to confirm the deletion. Enter your password and click on the “Delete repository” button.
10. Congratulations! You have successfully removed the repository from your GitHub account.
| Note: | Deleting a repository is irreversible. Once a repository is deleted, all of its data, including issues, pull requests, and commits, will be permanently removed from GitHub. Make sure you have a backup of any important data before proceeding with the deletion. |
Step 3: Opening Repository Settings

Once you have logged in to your GitHub account, navigate to the main page of the repository you want to remove. You can do this by clicking on the repository name from your GitHub dashboard.
On the repository page, you will find a navigation bar with different tabs. Click on the “Settings” tab to open the repository settings.
Within the settings page, you will find various options to configure your repository. This is where you can manage the repository’s settings, including removing it.
Scroll down the settings page until you find the “Danger Zone” section. In this section, you will see the option to delete the repository. Click on the “Delete this repository” button to proceed with the removal process.
A confirmation dialog box will appear, asking you to confirm the deletion. Make sure you understand the consequences of deleting a repository, as this action cannot be undone. If you are certain about removing the repository, click on the “I understand the consequences, delete this repository” button.
After confirming the deletion, the repository will be permanently removed from GitHub. Keep in mind that this action will delete all the repository’s files, branches, issues, and pull requests. Make sure you have a backup of any important data before proceeding with the removal.
Deleting a Repository on Github
If you no longer need a repository on Github, you can easily delete it. Deleting a repository is a permanent action and cannot be undone, so make sure you have a backup of any important data before proceeding.
Here is how you can delete a repository on Github:
| Step 1: | Go to the Github website and log in to your account. |
| Step 2: | Click on the repository you want to delete. |
| Step 3: | On the repository page, click on the “Settings” tab. |
| Step 4: | Scroll down to the “Danger Zone” section. |
| Step 5: | Click on the “Delete this repository” button. |
| Step 6: | Enter the name of the repository to confirm the deletion. |
| Step 7: | Click on the “I understand the consequences, delete this repository” button. |
Once you have completed these steps, the repository will be permanently deleted from Github. Make sure to double-check before deleting, as this action cannot be undone.