If you’re a Windows 10 user and want to explore the world of Ubuntu, you’re in luck! Installing Ubuntu on Windows 10 is easier than you might think. In this step-by-step guide, we’ll walk you through the process of installing Ubuntu on your Windows 10 machine.
Step 1: Download Ubuntu
The first step is to download the Ubuntu installation file. Head over to the official Ubuntu website and download the latest version of Ubuntu. Make sure to choose the version that is compatible with your system architecture (32-bit or 64-bit).
Step 2: Create a Bootable USB Drive
Once you have downloaded the Ubuntu installation file, you’ll need to create a bootable USB drive. This will allow you to install Ubuntu on your Windows 10 machine. There are several tools available that can help you create a bootable USB drive, such as Rufus or UNetbootin. Simply follow the instructions provided by the tool of your choice to create the bootable USB drive.
Step 3: Install Ubuntu
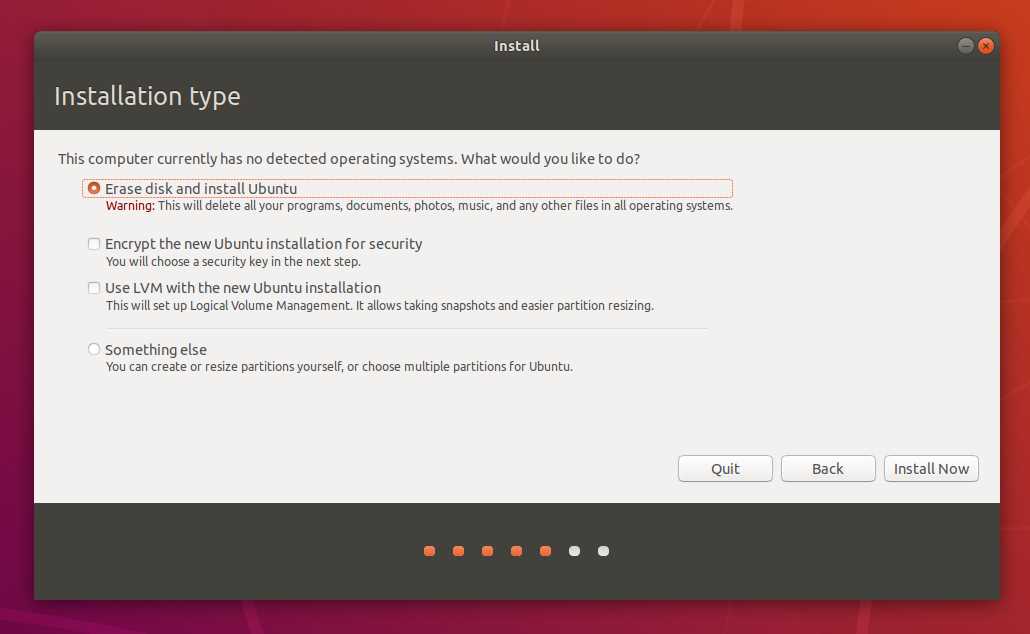
Now that you have a bootable USB drive, it’s time to install Ubuntu on your Windows 10 machine. Insert the bootable USB drive into your computer and restart it. During the boot process, you may need to change the boot order in your BIOS settings to prioritize the USB drive. Once the Ubuntu installer loads, follow the on-screen instructions to install Ubuntu on your Windows 10 machine.
Step 4: Dual Boot or Virtual Machine
After the installation process is complete, you have two options: dual boot or virtual machine. With dual boot, you can choose between Windows 10 and Ubuntu each time you start your computer. This allows you to switch between the two operating systems. On the other hand, a virtual machine allows you to run Ubuntu within Windows 10, without the need to restart your computer. Choose the option that best suits your needs and preferences.
By following these simple steps, you can easily install Ubuntu on your Windows 10 machine and start exploring the world of open-source software. Whether you choose to dual boot or use a virtual machine, Ubuntu offers a user-friendly and powerful operating system that can enhance your computing experience.
Preparation

Before you can install Ubuntu on Windows 10, you need to make sure you have everything you need. Here are the steps to prepare for the installation:
1. Check system requirements:
Make sure your computer meets the minimum system requirements for running Ubuntu. This includes having a compatible processor, enough RAM, and sufficient disk space.
2. Create a backup:
It’s always a good idea to create a backup of your important files and data before making any changes to your system. This will ensure that you don’t lose any data in case something goes wrong during the installation process.
3. Download Ubuntu:
Go to the official Ubuntu website and download the latest version of Ubuntu. Make sure to choose the correct version for your system architecture (32-bit or 64-bit).
4. Create a bootable USB drive:
To install Ubuntu, you’ll need to create a bootable USB drive. You can use tools like Rufus or Etcher to create a bootable USB drive from the downloaded Ubuntu ISO file.
5. Disable Secure Boot:
If your computer has Secure Boot enabled, you’ll need to disable it before you can install Ubuntu. Secure Boot is a security feature that prevents unauthorized operating systems from loading during the boot process.
6. Allocate disk space:
Before installing Ubuntu, you’ll need to allocate disk space for the new operating system. You can do this by shrinking the existing Windows partition or by creating a new partition specifically for Ubuntu.
By following these preparation steps, you’ll be ready to install Ubuntu on your Windows 10 system.
Check system requirements

Before you can install Ubuntu on Windows 10, you need to make sure that your system meets the minimum requirements. Here is a table outlining the recommended specifications:
| Minimum Requirements | Recommended Specifications |
|---|---|
| Processor: 1 GHz dual-core | Processor: 2 GHz quad-core |
| Memory: 2 GB RAM | Memory: 4 GB RAM |
| Storage: 25 GB available space | Storage: 50 GB available space |
| Graphics: VGA capable of 1024×768 screen resolution | Graphics: VGA capable of 1920×1080 screen resolution |
| Internet: Internet access is required for updates and downloading packages | Internet: High-speed internet connection is recommended |
It is important to note that these are the recommended specifications, and Ubuntu may still run on lower-end systems. However, for optimal performance and to take advantage of all the features, it is best to meet or exceed these requirements.
Download Ubuntu ISO file
To install Ubuntu on Windows 10, you will first need to download the Ubuntu ISO file. The ISO file contains the complete Ubuntu operating system that you will install on your computer.
Here is how you can download the Ubuntu ISO file:
- Open your web browser and go to the official Ubuntu website.
- Navigate to the “Download” section of the website.
- Choose the version of Ubuntu you want to install. It is recommended to download the latest LTS (Long Term Support) version for stability and support.
- Select the appropriate architecture for your computer. Most modern computers use the 64-bit architecture, but if you have an older computer, you may need to choose the 32-bit version.
- Click on the “Download” button to start the download.
- Once the download is complete, you will have the Ubuntu ISO file saved on your computer.
Make sure to keep the downloaded ISO file in a safe location, as you will need it later in the installation process.
Create a bootable USB drive
To install Ubuntu 10 on your Windows computer, you will need to create a bootable USB drive. This will allow you to boot into the Ubuntu installer and begin the installation process. Here’s how to create a bootable USB drive:
| Step 1: | Download the Ubuntu ISO file from the official website. |
| Step 2: | Insert a USB drive with at least 4GB of storage into your computer. |
| Step 3: | Open the Rufus application and select the USB drive as the device. |
| Step 4: | Click on the “Select” button and browse to the location where you saved the Ubuntu ISO file. |
| Step 5: | Make sure the “Create a bootable disk using” option is selected and choose “ISO Image” from the dropdown menu. |
| Step 6: | Click on the “Start” button to begin creating the bootable USB drive. |
| Step 7: | Wait for the process to complete and then safely eject the USB drive from your computer. |
Once you have created the bootable USB drive, you can proceed with the installation of Ubuntu 10 on your Windows computer. Simply restart your computer and boot from the USB drive to begin the installation process.