
Are you ready to take the plunge and install Linux on your computer? Installing Linux can be a great way to expand your knowledge of operating systems and open-source software. Whether you’re a seasoned tech enthusiast or a beginner, this step-by-step guide will walk you through the process of installing Linux on your computer.
Why install Linux?
Linux is a powerful and versatile operating system that offers a wide range of benefits. It’s known for its stability, security, and flexibility. Linux also provides access to a vast array of free and open-source software, making it an excellent choice for developers and tech-savvy users. By installing Linux, you can gain a deeper understanding of how operating systems work and take advantage of its many features.
Ready to get started? Let’s dive into the step-by-step process of installing Linux on your computer.
Choosing the Right Linux Distribution
When it comes to installing Linux on your computer, one of the first decisions you’ll need to make is which distribution to choose. With so many options available, it can be overwhelming to know where to start. However, by considering a few key factors, you can find the Linux distribution that best suits your needs.
Firstly, think about how you plan to use Linux. Are you a beginner looking for a user-friendly interface? Or are you an experienced user who wants more control and customization options? Different distributions cater to different skill levels and preferences, so it’s important to choose one that aligns with your goals.
Next, consider the hardware requirements of each distribution. Some Linux distributions are designed to be lightweight and run smoothly on older or less powerful hardware, while others require more resources. If you have an older computer or limited system resources, you’ll want to choose a distribution that is optimized for your hardware.
Another important factor to consider is the package management system used by the distribution. Package management systems are responsible for installing, updating, and removing software on your Linux system. Different distributions use different package management systems, such as apt, yum, or pacman. It’s worth researching the pros and cons of each system to determine which one you prefer.
Lastly, take into account the community and support behind each distribution. Linux has a vibrant and active community of users and developers who contribute to the development and support of different distributions. If you’re new to Linux, choosing a distribution with a large and helpful community can make it easier to find support and resources when you need them.
By considering these factors, you can narrow down your options and choose the Linux distribution that is right for you. Whether you’re a beginner or an experienced user, there is a Linux distribution out there that will meet your needs and help you get started with the exciting world of Linux.
Researching Different Linux Distributions
When it comes to choosing a Linux distribution, it’s important to do your research to find the one that best fits your needs. With so many options available, it can be overwhelming to know where to start. Here are a few steps to help you navigate the process:
- Consider your goals: Think about what you want to achieve with Linux. Are you looking for a user-friendly distribution for beginners, or do you want a more advanced system for development or server management?
- Read reviews: Look for reviews and comparisons of different Linux distributions. This will give you an idea of the pros and cons of each option and help you narrow down your choices.
- Check hardware compatibility: Make sure the distribution you choose is compatible with your computer’s hardware. Some distributions may have specific requirements or limitations.
- Explore the community: Linux has a vibrant and supportive community. Take some time to explore forums, chat rooms, and online communities to get a sense of the community surrounding each distribution.
- Try live versions: Many Linux distributions offer live versions that you can try before installing. This allows you to test out the distribution and see if it meets your needs before committing to an installation.
- Consider long-term support: If you’re looking for a distribution for a production environment or long-term use, consider the level of support and stability offered by each distribution.
By following these steps, you can gather the information you need to make an informed decision about which Linux distribution is right for you. Remember, the beauty of Linux is that there is no one-size-fits-all solution, so take your time and find the distribution that aligns with your goals and preferences.
Considering Your Computer’s Hardware Requirements
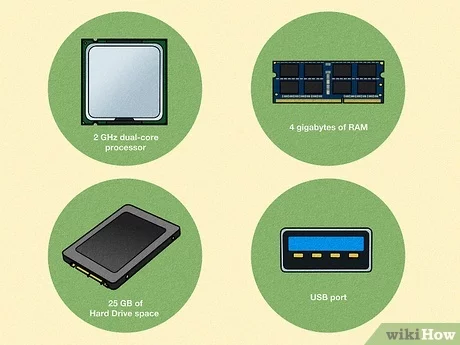
Before installing Linux on your computer, it is important to consider the hardware requirements to ensure compatibility and optimal performance. Here are some key factors to keep in mind:
- Processor: Linux can run on a wide range of processors, including Intel, AMD, and ARM. However, it is recommended to have a processor with at least 1 GHz clock speed for smooth operation.
- Memory (RAM): The amount of RAM you have will directly impact the performance of Linux. While Linux can run on systems with as little as 1 GB of RAM, it is recommended to have at least 4 GB for a better experience.
- Storage: Linux requires a minimum of 20 GB of storage space, but it is advisable to have more for installing additional software and storing files. Solid-state drives (SSDs) are preferred over traditional hard disk drives (HDDs) for faster read and write speeds.
- Graphics: Most Linux distributions support a wide range of graphics cards. However, if you plan to use Linux for gaming or graphic-intensive tasks, it is recommended to have a dedicated graphics card with good driver support.
- Network Connectivity: Linux supports a variety of network adapters, including Ethernet and Wi-Fi. Ensure that your computer has a compatible network adapter for internet connectivity.
By considering these hardware requirements, you can ensure that your computer is capable of running Linux smoothly and efficiently. It is always a good idea to check the specific requirements of the Linux distribution you plan to install, as they may vary slightly.
Downloading the Chosen Linux Distribution
Once you have decided which Linux distribution you want to install on your computer, the next step is to download the necessary files. Here is a step-by-step guide on how to download your chosen Linux distribution:
| Step 1: | Open your web browser and go to the official website of the Linux distribution you have chosen. |
| Step 2: | Look for a “Download” or “Get” button on the website and click on it. |
| Step 3: | You will be redirected to a page where you can choose the version of the Linux distribution you want to download. Select the appropriate version for your computer (32-bit or 64-bit). |
| Step 4: | Click on the “Download” button to start the download process. |
| Step 5: | Depending on the size of the Linux distribution, the download may take some time. Be patient and wait for the download to complete. |
| Step 6: | Once the download is finished, you will have a file with the extension “.iso” or “.img”. This is the installation image of the Linux distribution. |
Now that you have successfully downloaded the Linux distribution, you are ready to proceed to the next step: creating a bootable USB or DVD to install Linux on your computer.
Creating a Bootable USB Drive
One of the easiest ways to install Linux on your computer is by creating a bootable USB drive. This allows you to run the Linux operating system from the USB drive without making any changes to your computer’s hard drive.
Here is a step-by-step guide on how to create a bootable USB drive:
| Step 1: | Download the Linux distribution you want to install. You can find various Linux distributions online, such as Ubuntu, Fedora, or Linux Mint. |
| Step 2: | Insert a USB drive with at least 4GB of storage capacity into your computer. |
| Step 3: | Open a terminal window and run the following command to identify the USB drive: |
sudo fdisk -l |
|
| Step 4: | Make a note of the device name of the USB drive, which will be something like “/dev/sdb” or “/dev/sdc”. |
| Step 5: | Run the following command to format the USB drive with the FAT32 file system: |
sudo mkfs.vfat -F 32 /dev/sdX |
|
| Replace “sdX” with the device name of the USB drive. | |
| Step 6: | Download a tool like “Rufus” or “Etcher” to create a bootable USB drive. |
| Step 7: | Open the tool and select the Linux ISO file you downloaded in Step 1. |
| Step 8: | Select the USB drive as the target device. |
| Step 9: | Click on the “Start” or “Create” button to begin the process of creating a bootable USB drive. |
| Step 10: | Wait for the process to complete, which may take a few minutes. |
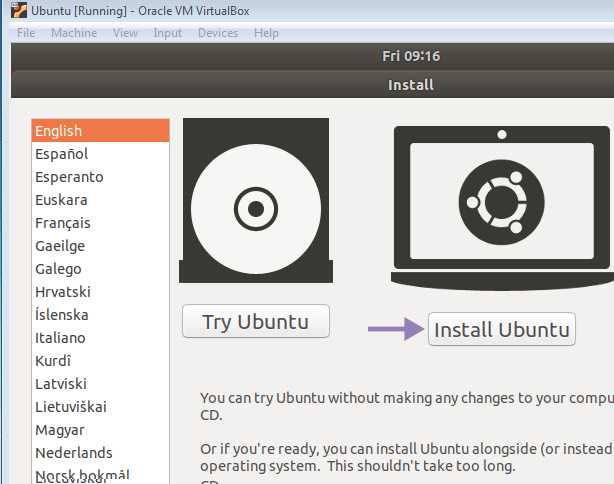
| Step 11: | Once the bootable USB drive is created, restart your computer and boot from the USB drive. |
| Step 12: | Follow the on-screen instructions to install Linux on your computer. |
By following these steps, you can easily create a bootable USB drive and install Linux on your computer.
Formatting the USB Drive
Before you can install Linux on your computer, you need to format the USB drive that you will use to create a bootable installation media. Formatting the USB drive will erase all the data on it, so make sure to back up any important files before proceeding.
To format the USB drive, follow these steps:
- Insert the USB drive into an available USB port on your computer.
- Open the Disk Utility application. You can usually find it in the “Utilities” folder within the “Applications” folder.
- Select the USB drive from the list of available drives on the left-hand side of the Disk Utility window.
- Click on the “Erase” tab at the top of the Disk Utility window.
- Choose a format for the USB drive. In this case, select “MS-DOS (FAT)” if you are planning to install Linux on a computer that uses BIOS, or “ExFAT” if you are installing Linux on a computer that uses UEFI.
- Enter a name for the USB drive in the “Name” field.
- Click on the “Erase” button to start the formatting process. This will erase all the data on the USB drive and prepare it for the Linux installation.
Once the formatting process is complete, you can proceed with creating a bootable USB drive to install Linux on your computer.
Downloading and Installing a Bootable USB Creation Tool
Before you can install Linux on your computer, you will need to create a bootable USB drive. This will allow you to boot your computer from the USB drive and install Linux without affecting your existing operating system.
To create a bootable USB drive, you will need to download and install a bootable USB creation tool. There are several options available, but one popular tool is Rufus.
| Step | Description |
|---|---|
| 1 | Open your web browser and navigate to the Rufus website. |
| 2 | Download the latest version of Rufus for your operating system. |
| 3 | Once the download is complete, locate the downloaded file and double-click on it to start the installation process. |
| 4 | Follow the on-screen instructions to install Rufus on your computer. |
| 5 | Once the installation is complete, launch Rufus. |
Now that you have downloaded and installed a bootable USB creation tool, you are ready to proceed with creating a bootable USB drive for installing Linux on your computer.
Creating a Bootable USB Drive with the Linux Distribution
One of the most common methods for installing Linux on a computer is by using a bootable USB drive. This allows you to easily install the Linux distribution of your choice without the need for a CD or DVD drive. Here’s how you can create a bootable USB drive with the Linux distribution:
- First, you’ll need to download the Linux distribution you want to install. Visit the official website of the Linux distribution and look for the download page. Choose the appropriate version for your computer, whether it’s 32-bit or 64-bit.
- Once you have downloaded the Linux distribution, you’ll need to download a tool that can create a bootable USB drive. There are several tools available, such as Rufus, UNetbootin, and Etcher. Choose the tool that is compatible with your operating system.
- Insert your USB drive into your computer. Make sure it is empty or that you have backed up any important files, as the process will erase all data on the USB drive.
- Open the tool you downloaded and follow the instructions to create a bootable USB drive. This usually involves selecting the Linux distribution ISO file you downloaded, choosing the USB drive as the destination, and clicking the “Create” or “Start” button.
- Once the process is complete, you will have a bootable USB drive with the Linux distribution. You can now restart your computer and boot from the USB drive to begin the installation process.
Creating a bootable USB drive with the Linux distribution is a straightforward process that allows you to easily install Linux on your computer. It is a convenient alternative to using a CD or DVD drive and gives you the flexibility to try out different Linux distributions without the need for physical media.
Preparing Your Computer for Installation
Before you begin the installation process, it is important to make sure your computer is ready for Linux. Here are the steps you need to follow:
1. Check system requirements:
Make sure your computer meets the minimum system requirements for the Linux distribution you want to install. This includes the processor, RAM, and storage space. Refer to the documentation or website of the Linux distribution for specific requirements.
2. Backup your data:
Before installing Linux, it is always a good idea to backup your important data. This will ensure that you don’t lose any important files during the installation process. You can backup your data to an external hard drive, cloud storage, or another computer.
3. Create a bootable USB or DVD:
To install Linux, you will need a bootable USB or DVD. You can create a bootable USB using software like Rufus or Etcher. If you prefer using a DVD, you can burn the Linux ISO file to a blank DVD using software like ImgBurn or Brasero.
4. Disable secure boot:
If your computer has secure boot enabled, you may need to disable it before installing Linux. Secure boot is a feature that prevents unauthorized operating systems from booting on your computer. You can usually disable secure boot from the BIOS or UEFI settings.
5. Allocate disk space:
Decide how much disk space you want to allocate for Linux. You can either install Linux alongside your existing operating system in a dual-boot configuration or replace your current operating system with Linux. Make sure you have enough free space on your hard drive for the installation.
6. Research compatibility:
Before installing Linux, it is a good idea to research the compatibility of your hardware with the Linux distribution you want to install. Some hardware may require additional drivers or may not be fully supported by Linux. Check the documentation or forums of the Linux distribution for any known compatibility issues.
7. Gather necessary information:
Before starting the installation process, gather any necessary information such as your Wi-Fi network name and password, timezone, and keyboard layout. This will make the installation process smoother and ensure that you have all the required information at hand.
By following these steps, you can ensure that your computer is prepared for the Linux installation process. Once you have completed these preparations, you can proceed with the installation of Linux on your computer.


