If you’re a Windows 10 user and want to install Java SDK on your system, you’ve come to the right place. Java is a popular programming language used for developing a wide range of applications, from desktop software to web applications. Installing Java SDK on Windows 10 is a straightforward process, and this step-by-step guide will walk you through it.
Step 1: Download Java SDK
The first step is to download the Java SDK (Software Development Kit) from the official website. Make sure to choose the version that is compatible with your Windows 10 operating system. Once the download is complete, locate the installation file on your computer.
Step 2: Run the Installation Wizard
Double-click on the installation file to run the Java SDK installation wizard. Follow the on-screen instructions to proceed with the installation. You may be asked to choose the installation directory and agree to the terms and conditions.
Step 3: Set Up Environment Variables
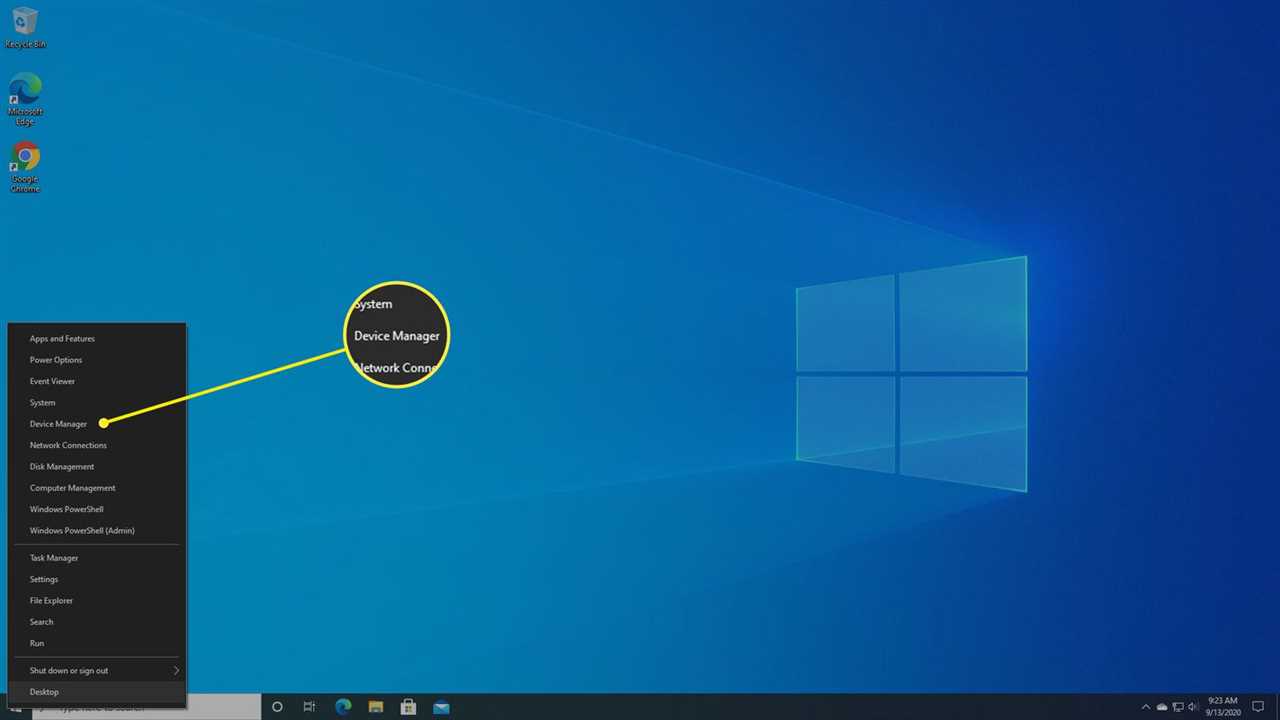
After the installation is complete, you need to set up the environment variables to ensure that Java is accessible from the command line. Open the System Properties window by right-clicking on the Start button and selecting “System”. Click on the “Advanced system settings” link, then click on the “Environment Variables” button.
Step 4: Add Java to the Path
In the Environment Variables window, locate the “Path” variable under the “System variables” section and click on the “Edit” button. In the Edit Environment Variable window, click on the “New” button and enter the path to the Java installation directory. Click “OK” to save the changes.
Step 5: Verify the Installation
To verify that Java SDK is installed correctly on your Windows 10 system, open the command prompt and type “java -version”. If you see the version information displayed, congratulations! You have successfully installed Java SDK on your Windows 10 computer.
Now that you have Java SDK installed, you can start developing and running Java applications on your Windows 10 system. Enjoy exploring the world of Java programming!
Section 1: Downloading Java SDK

Before you can start developing Java applications on your Windows machine, you need to install the Java Software Development Kit (SDK). The SDK includes everything you need to compile, debug, and run Java programs.
To download the Java SDK for Windows, follow these steps:
- Open your preferred web browser and go to the official Java website.
- Navigate to the Java SE Downloads page.
- Click on the “Java Platform (JDK)” download button.
- On the next page, make sure to select the correct version of Java for your Windows operating system. You can choose between 32-bit and 64-bit versions.
- Read and accept the terms of the Oracle Binary Code License Agreement for Java SE.
- Click on the download link to start the download.
- Once the download is complete, locate the downloaded file on your computer.
- Double-click on the downloaded file to start the installation process.
- Follow the on-screen instructions to complete the installation.
After the installation is finished, you will have the Java SDK installed on your Windows machine. You can now proceed to set up the necessary environment variables and start developing Java applications.
Step 1: Visit the Oracle website

To install the Java SDK on Windows 10, you need to visit the official Oracle website. Oracle provides the Java Development Kit (JDK) which includes the necessary tools and libraries to develop Java applications. Follow the steps below to download the JDK:
- Open your preferred web browser.
- Go to the Oracle website by typing “oracle.com” in the address bar.
- Once you are on the Oracle website, navigate to the “Downloads” section.
- Click on the “Java” tab to access the Java downloads.
- Scroll down and find the “Java SE Development Kit” section.
- Click on the “JDK Download” button to proceed.
By visiting the Oracle website, you will be able to download the Java SDK and proceed with the installation process on your Windows 10 machine.
Step 2: Accept the license agreement

Before you can install the Java SDK on your Windows 10 operating system, you need to accept the license agreement. This agreement outlines the terms and conditions for using the Java SDK.
To accept the license agreement, follow these steps:
- Open your preferred web browser and navigate to the official Java SDK download page.
- Scroll down to the “Java SE Development Kit” section and click on the download link for the latest version of the Java SDK for Windows.
- Read through the license agreement carefully to understand the terms and conditions.
- If you agree to the terms and conditions, check the box indicating your acceptance.
- Click on the “Download” button to start the download process.
By accepting the license agreement, you acknowledge that you have read and understood the terms and conditions set forth by Oracle, the company behind Java. It is important to review the license agreement to ensure compliance with any restrictions or requirements.
Once you have accepted the license agreement, you can proceed to the next step of the installation process, which involves selecting the installation location for the Java SDK on your Windows 10 system.
Step 3: Choose the appropriate Java SDK version
Before you can install the Java SDK on your Windows 10 computer, you need to choose the appropriate version of the Java SDK to download. The Java SDK, also known as the Java Development Kit, is a set of tools that you need to develop Java applications.
When choosing the Java SDK version, you should consider the version of Java that your application requires. If you are unsure about the version, it is recommended to choose the latest stable version of the Java SDK.
Oracle, the company behind Java, provides different versions of the Java SDK for different purposes. The Java SE Development Kit (JDK) is the most commonly used version for general Java development. However, if you are developing Java applications for specific platforms or devices, such as Java ME for mobile devices, you may need to choose a different version of the Java SDK.
Once you have determined the appropriate Java SDK version for your needs, you can proceed to the next step and download the Java SDK installer.
Section 2: Installing Java SDK

Step 1: Go to the official Java website and download the Java SDK for Windows 10.
Step 2: Once the download is complete, locate the downloaded file and double-click on it to start the installation process.
Step 3: Follow the on-screen instructions to install Java SDK on your Windows 10 computer. Make sure to read and accept the license agreement.
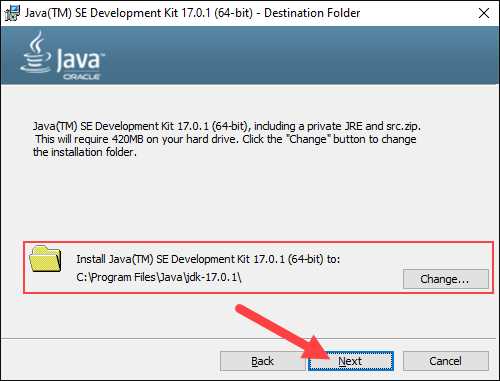
Step 4: Choose the installation directory for Java SDK. It is recommended to keep the default directory unless you have a specific reason to change it.
Step 5: Wait for the installation process to complete. This may take a few minutes.
Step 6: Once the installation is finished, you will see a confirmation message. Click on “Finish” to exit the installer.
Step 7: Verify the installation by opening the command prompt and typing “java -version”. If you see the Java version information, it means that Java SDK has been successfully installed on your Windows 10 computer.
Note: It is recommended to restart your computer after installing Java SDK to ensure that all changes take effect.