Word is a powerful tool that allows you to create and edit documents with ease. Whether you’re writing a report, drafting a letter, or working on a project, knowing how to manipulate the layout of your document can greatly enhance its visual appeal. One common formatting technique is inserting a line to separate sections or highlight important information. In this step-by-step guide, we will show you how to insert a line in Word and make your documents look more professional and organized.
Step 1: Open your Word document
Before you can insert a line, you need to open the Word document you want to work on. Launch Microsoft Word and navigate to the document you wish to edit. If you don’t have an existing document, you can create a new one by clicking on “New Document” or using the shortcut Ctrl + N.
Step 2: Place the cursor where you want to insert the line
Once your document is open, position the cursor at the location where you want to insert the line. This could be between paragraphs, at the end of a section, or anywhere else you think a line would be appropriate. The line will be inserted at the current cursor position, so make sure you have it placed correctly.
Step 3: Insert the line
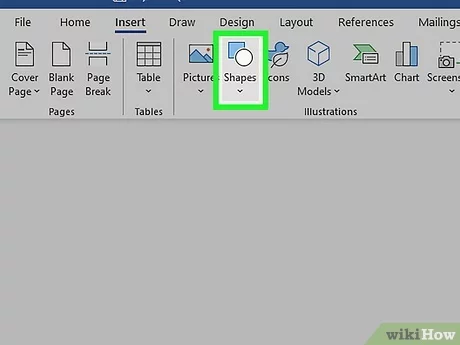
Now that you have the cursor in the right place, it’s time to insert the line. In Word, you can insert a line by using the “Shapes” feature. Go to the “Insert” tab in the top menu, and click on “Shapes” in the “Illustrations” group. A drop-down menu will appear with various shapes to choose from. Scroll down and select the line shape.
Step 4: Customize the line
After inserting the line, you can customize its appearance to suit your needs. Right-click on the line and select “Format Shape” from the context menu. A sidebar will appear on the right side of the screen with various formatting options. Here, you can change the line’s color, thickness, style, and more. Experiment with different settings until you achieve the desired look.
By following these simple steps, you can easily insert a line in Word and enhance the visual appeal of your documents. Whether you’re creating a professional report or a personal letter, adding lines can help organize your content and make it more visually appealing. So go ahead and give it a try!
Using the Horizontal Line Tool
One of the easiest ways to insert a line in Word is by using the Horizontal Line tool. This tool allows you to quickly add a horizontal line to your document, which can be useful for separating sections or adding visual interest.
To use the Horizontal Line tool, follow these steps:
- Place your cursor in the document where you want to insert the line.
- Go to the “Insert” tab in the Word toolbar.
- Click on the “Shapes” button in the “Illustrations” group.
- Scroll down and select the “Horizontal Line” option.
- Click and drag your cursor across the page to create the line.
- Release the mouse button to insert the line.
Once the line is inserted, you can customize its appearance by right-clicking on it and selecting “Format Horizontal Line.” From here, you can change the line color, weight, and style to match your document’s design.
Using the Horizontal Line tool is a quick and easy way to insert a line in Word. Whether you need to separate sections or add visual interest, this tool can help you achieve the desired effect with just a few simple steps.
Accessing the Horizontal Line Tool
Inserting a line in Word is a simple and effective way to visually separate sections of your document. Word provides a convenient tool called the Horizontal Line tool that allows you to easily insert lines into your document.
To access the Horizontal Line tool, follow these steps:
| Step 1: | Open your Word document and place the cursor where you want to insert the line. |
| Step 2: | Click on the “Insert” tab at the top of the Word window. |
| Step 3: | In the “Illustrations” group, click on the “Shapes” button. |
| Step 4: | A drop-down menu will appear. Scroll down and click on the “Line” option. |
| Step 5: | Your cursor will change to a crosshair. Click and drag on the document to draw the line. |
| Step 6: | Release the mouse button to insert the line. |
By following these steps, you can easily access the Horizontal Line tool in Word and insert lines into your document to enhance its visual appearance.
Inserting a Horizontal Line
To insert a horizontal line in Word, follow these steps:
Step 1: Place your cursor in the document where you want to insert the line.
Step 2: Click on the “Insert” tab in the top menu.
Step 3: In the “Illustrations” group, click on the “Shapes” button.
Step 4: In the drop-down menu, select the “Line” option.
Step 5: Click and drag your mouse to draw the line in the document.
Step 6: To customize the line, right-click on it and select “Format Shape” from the context menu.
Step 7: In the “Format Shape” pane, you can change the line color, thickness, style, and other properties.
Step 8: Once you’re satisfied with the line’s appearance, click outside of the shape to finish inserting the horizontal line.
By following these simple steps, you can easily insert a horizontal line in Word to separate sections or add visual elements to your document.
Customizing the Horizontal Line
When working with Word, you can easily insert a horizontal line to separate sections or add visual interest to your document. However, did you know that you can also customize the appearance of the line to match your document’s style?
To customize the horizontal line in Word, follow these steps:
- Select the location in your document where you want to insert the horizontal line.
- Click on the “Insert” tab in the Word toolbar.
- In the “Illustrations” group, click on the “Shapes” button.
- From the drop-down menu, select the “Line” option.
- Click and drag your mouse to draw the horizontal line in your document.
- With the line selected, go to the “Format” tab in the Word toolbar.
- In the “Shape Styles” group, you can choose from a variety of preset line styles by clicking on the desired style.
- If you want to further customize the line, click on the “Shape Outline” button in the “Shape Styles” group.
- From the drop-down menu, you can change the line color, weight, dash style, and more.
- Once you are satisfied with the customization, you can continue working on your document.
By customizing the horizontal line in Word, you can add a personal touch to your document and make it stand out. Whether you prefer a bold and colorful line or a subtle and understated one, Word provides you with the tools to achieve the desired effect.
Now that you know how to insert and customize a horizontal line in Word, you can enhance your documents with this simple yet effective design element.
Using the Border Tool
If you want to insert a line in Word, you can use the Border tool to achieve this. The Border tool allows you to add lines around paragraphs, tables, or even individual words. Here’s how to use the Border tool to insert a line in Word:
Step 1: Open your Word document and navigate to the paragraph or word where you want to insert the line.
Step 2: Select the paragraph or word by clicking and dragging your cursor over it.
Step 3: Go to the “Home” tab in the Word toolbar and click on the “Borders” button in the “Paragraph” group. This will open a drop-down menu with various border options.
Step 4: From the drop-down menu, select the type of line you want to insert. You can choose from options like a solid line, a dashed line, a double line, or a custom line style.
Step 5: Once you’ve selected the line style, the line will be inserted around the selected paragraph or word. You can adjust the line’s appearance by right-clicking on it and selecting “Borders and Shading” from the context menu. This will open a dialog box where you can customize the line’s color, thickness, and other properties.
Step 6: If you want to remove the line, simply select the paragraph or word again and click on the “Borders” button in the “Paragraph” group. From the drop-down menu, select “No Border” to remove the line.
Using the Border tool in Word is a quick and easy way to insert a line around paragraphs or words. It allows you to add visual emphasis or separation to your document, making it more organized and visually appealing.
Accessing the Border Tool
To insert a line in Word, you can use the border tool. This tool allows you to add borders and lines to your document, giving it a more professional and organized look. To access the border tool, follow these steps:
- Open Microsoft Word on your computer.
- Create a new document or open an existing one.
- Click on the “Home” tab at the top of the Word window.
- In the “Paragraph” section, click on the small arrow in the bottom right corner.
- A new window will appear. Click on the “Borders” tab.
- Here, you will find various options for adding borders and lines to your document.
- To insert a line, click on the “Horizontal Line” option.
- You can choose from different line styles and adjust the width and color of the line.
- Once you have selected the desired line style, click “OK” to insert the line into your document.
By accessing the border tool in Word, you can easily insert a line to separate sections or add visual elements to your document. Experiment with different line styles and colors to find the one that best suits your needs.
Inserting a Line Border

If you want to add a line border to your document in Microsoft Word, you can easily do so by following these steps:
- Select the paragraph or text that you want to add a line border to.
- Go to the “Home” tab in the ribbon at the top of the Word window.
- In the “Paragraph” section, click on the small arrow next to the “Borders” button.
- A drop-down menu will appear. Select “Borders and Shading” from the menu.
- In the “Borders and Shading” dialog box, go to the “Borders” tab.
- Under the “Setting” section, choose the type of line border you want to insert.
- Customize the line border by selecting the style, color, and width options.
- Preview the line border in the “Preview” section of the dialog box.
- Click “OK” to insert the line border into your document.
By following these simple steps, you can easily insert a line border to enhance the appearance of your document in Microsoft Word.
Customizing the Line Border

When using Microsoft Word, you have the ability to insert a line border to enhance the appearance of your document. However, simply inserting a line may not always be enough. To truly customize the line border, you can make use of various formatting options available in Word.
Here is a step-by-step guide on how to customize the line border in Word:
- Select the line that you want to customize by clicking on it.
- Go to the “Format” tab in the Word toolbar.
- Click on the “Shape Outline” option to open the drop-down menu.
- From the drop-down menu, you can choose various options to customize the line border. For example, you can change the color of the line by selecting a different color from the “Color” option.
- You can also change the thickness of the line by selecting a different weight from the “Weight” option.
- If you want to add a dash or dot pattern to the line, you can select the desired pattern from the “Dashes” option.
- Additionally, you can adjust the transparency of the line by selecting a different transparency level from the “Transparency” option.
- Once you have customized the line border to your liking, you can click outside the line to apply the changes.
By following these steps, you can easily customize the line border in Word to match your desired style and appearance. Whether you want a bold and colorful line or a subtle and transparent one, Word provides you with the tools to achieve the desired effect.