
Creating a fillable form in Word can be a useful skill to have, whether you need to collect information or create a professional-looking document. With the right tools and a step-by-step approach, you can easily create a form that is both functional and visually appealing.
In this guide, we will walk you through the process of creating a fillable form in Word. We will cover everything from setting up the document to adding form fields and customizing the design. By the end, you will have a comprehensive understanding of how to create a fillable form in Word.
First, open Word and create a new document. This will serve as the foundation for your fillable form. Next, navigate to the “Developer” tab in the Word toolbar. If you don’t see this tab, you may need to enable it in the Word options. Once you have access to the “Developer” tab, you can start adding form fields to your document.
To add a form field, click on the “Legacy Tools” button in the “Controls” group of the “Developer” tab. From the dropdown menu, select the type of form field you want to add, such as a text box or a checkbox. Position the form field in the desired location on your document and adjust its size and formatting as needed.
Section 1: Getting Started
Creating a fillable form in Microsoft Word is a simple and efficient way to collect information from others. Whether you need to create a survey, application, or feedback form, Word provides the tools you need to make it happen. In this step-by-step guide, we will walk you through the process of creating a fillable form in Word.
- Open Microsoft Word and create a new document.
- Decide on the purpose and content of your fillable form. Consider what information you need to collect and how you want the form to look.
- Start by adding the necessary fields to your form. These can include text fields, checkboxes, drop-down menus, and more. To add a field, go to the “Developer” tab and click on “Design Mode”. Then, click on the type of field you want to add from the “Controls” group.
- Position and format the fields as desired. You can resize and move them around the document to create the layout you want.
- Next, add labels to your fields to provide instructions or clarify the information you are collecting. To add a label, simply type the text next to the field.
- Once you have added all the necessary fields and labels, save your document.
- Your fillable form is now ready to be shared with others. You can distribute it via email, upload it to a website, or print it out for physical distribution.
By following these steps, you can easily create a fillable form in Word to collect information efficiently and effectively.
Choosing the Right Template
When creating a fillable form in Microsoft Word, it is important to choose the right template to ensure that your form meets your specific needs. The template you select will determine the layout and design of your form, as well as the types of fields that are available for data entry.
Here are some factors to consider when choosing the right template:
1. Purpose: Consider the purpose of your form. Are you creating a survey, a registration form, or a feedback form? Understanding the purpose of your form will help you select a template that includes the appropriate fields and sections.
2. Design: Look for a template that matches the design aesthetic you have in mind. Word offers a variety of templates with different color schemes, fonts, and styles. Choose a template that aligns with your branding or the overall look and feel you want to achieve.
3. Field Types: Determine the types of fields you need in your form. Word provides various field options, such as text fields, checkboxes, drop-down menus, and date pickers. Make sure the template you choose includes the field types that are necessary for your form.
4. Customization: Consider whether you need to customize the template to fit your specific requirements. Some templates allow for easy customization, while others may have limitations. If you anticipate needing to make significant changes to the template, choose one that provides the flexibility you need.
5. Compatibility: Ensure that the template you choose is compatible with the version of Microsoft Word you are using. Templates created in newer versions of Word may not be fully compatible with older versions, which could result in formatting issues or missing features.
By carefully considering these factors, you can choose the right template for creating your fillable form in Microsoft Word. Remember, the template you select will serve as the foundation for your form, so it is important to choose one that meets your specific requirements.
Opening Word and Creating a New Document

To create a fillable form in Microsoft Word, you first need to open the Word application on your computer. Here’s how to do it:
| Step 1: | Click on the Windows Start menu. |
| Step 2: | Type “Word” in the search bar. |
| Step 3: | Click on the Microsoft Word application from the search results. |
Once you have opened Microsoft Word, you can start creating a new document to turn into a fillable form. Follow these steps:
| Step 1: | Click on the “File” tab at the top left corner of the screen. |
| Step 2: | Click on “New” from the drop-down menu. |
| Step 3: | Choose a blank document template or select a pre-designed template that suits your needs. |
| Step 4: | Click on the “Create” button to open a new blank document. |
Now you have successfully opened Microsoft Word and created a new document. You are ready to start turning it into a fillable form by adding form fields and other elements.
Customizing the Document Layout

When creating a fillable form in Word, it’s important to customize the document layout to ensure that it meets your specific needs. Here are a few steps on how to customize the layout:
1. Adjusting Margins: To change the margins of your document, go to the “Page Layout” tab and click on “Margins”. From here, you can select predefined margin settings or click on “Custom Margins” to set your own.
2. Adding Headers and Footers: To add headers and footers to your form, go to the “Insert” tab and click on “Header” or “Footer”. You can choose from a variety of predefined header and footer designs or create your own.
3. Changing Page Orientation: If you want to change the page orientation of your form, go to the “Page Layout” tab and click on “Orientation”. You can choose between portrait (vertical) or landscape (horizontal) orientation.
4. Adjusting Page Size: To change the page size of your form, go to the “Page Layout” tab and click on “Size”. From here, you can select predefined page sizes or click on “More Paper Sizes” to set a custom size.
5. Formatting Text: To format the text in your form, select the text you want to format and use the formatting options in the “Home” tab. You can change the font, size, color, alignment, and more.
By customizing the document layout, you can create a fillable form in Word that is visually appealing and easy to use.
Section 2: Adding Form Fields

In order to create a fillable form in Microsoft Word, you need to add form fields to your document. Form fields are interactive elements that allow users to input information. Here’s how you can add form fields in Word:
- Open your document in Word.
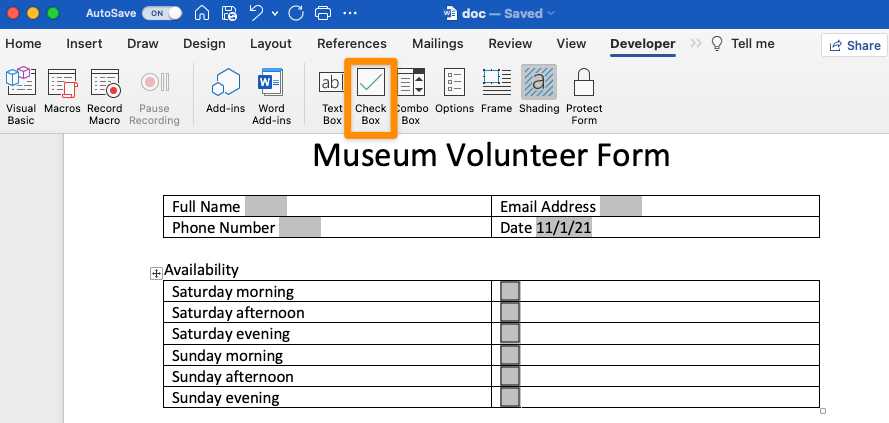
- Click on the “Developer” tab in the ribbon. If you don’t see the “Developer” tab, you may need to enable it in the Word options.
- In the “Controls” group, click on the type of form field you want to add. Word offers several types of form fields, including text fields, checkboxes, and drop-down lists.
- Click on the location in your document where you want to add the form field. A placeholder for the form field will be inserted.
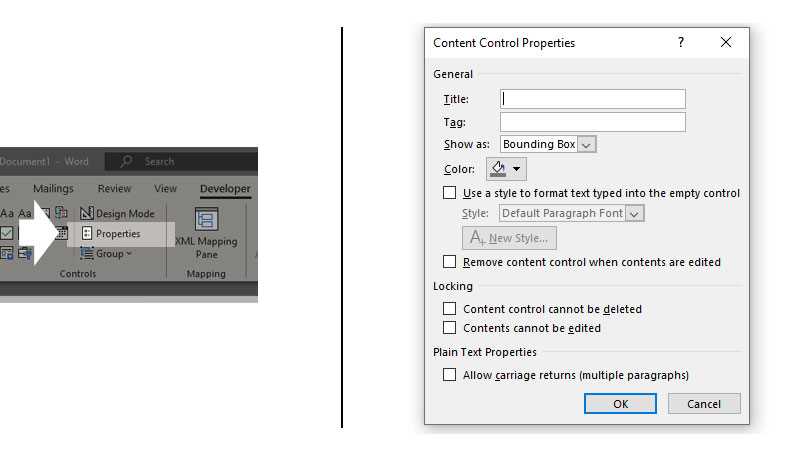
- Right-click on the placeholder and select “Properties” to customize the form field. You can set properties such as the field name, default value, and formatting options.
- Repeat steps 3 to 5 for each form field you want to add to your document.
Once you have added all the necessary form fields, you can protect the form to prevent users from editing the rest of the document. This ensures that users can only input information in the designated form fields.
Adding form fields in Word is a simple and effective way to create fillable forms for various purposes. Whether you’re creating a survey, a feedback form, or an application, using form fields can streamline the data collection process and make it easier for users to provide the required information.
Accessing the Developer Tab
In order to create a fillable form in Word, you will need to access the Developer tab. This tab contains the necessary tools and options to create and customize forms.
Here are the steps to access the Developer tab:
| Step 1: | Open Microsoft Word. |
| Step 2: | Click on the “File” tab located in the top left corner of the screen. |
| Step 3: | From the drop-down menu, select “Options”. |
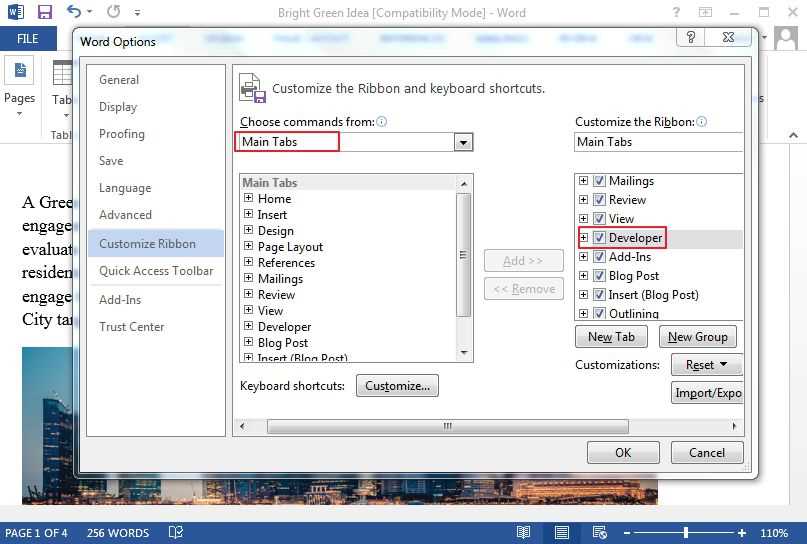
| Step 4: | A new window will appear. Click on “Customize Ribbon” located on the left side of the window. |
| Step 5: | In the “Customize the Ribbon” section, you will see a list of tabs. Check the box next to “Developer” to enable it. |
| Step 6: | Click on the “OK” button to save the changes and close the window. |
Once you have successfully enabled the Developer tab, you will be able to access it from the main Word interface. This tab will provide you with the necessary tools to create a fillable form in Word.
