If you’re looking to disable or remove Cortana from your Windows 11 device, you’ve come to the right place. Cortana, Microsoft’s voice assistant, can be helpful for some users, but for others, it may be an unnecessary feature that takes up valuable resources. In this step-by-step guide, we’ll show you how to uninstall Cortana and regain control over your Windows 11 experience.
Before we begin, it’s important to note that removing Cortana from Windows 11 requires a bit of technical know-how. If you’re not comfortable making changes to your system settings, we recommend seeking assistance from a knowledgeable friend or professional. With that said, let’s get started!
Step 1: Open the Windows 11 Settings
To begin the process of removing Cortana, you’ll need to open the Windows 11 Settings. You can do this by clicking on the Start button in the bottom left corner of your screen and selecting the gear icon. Alternatively, you can press the Windows key + I on your keyboard to open the Settings directly.
Step 2: Navigate to the Apps & Features section
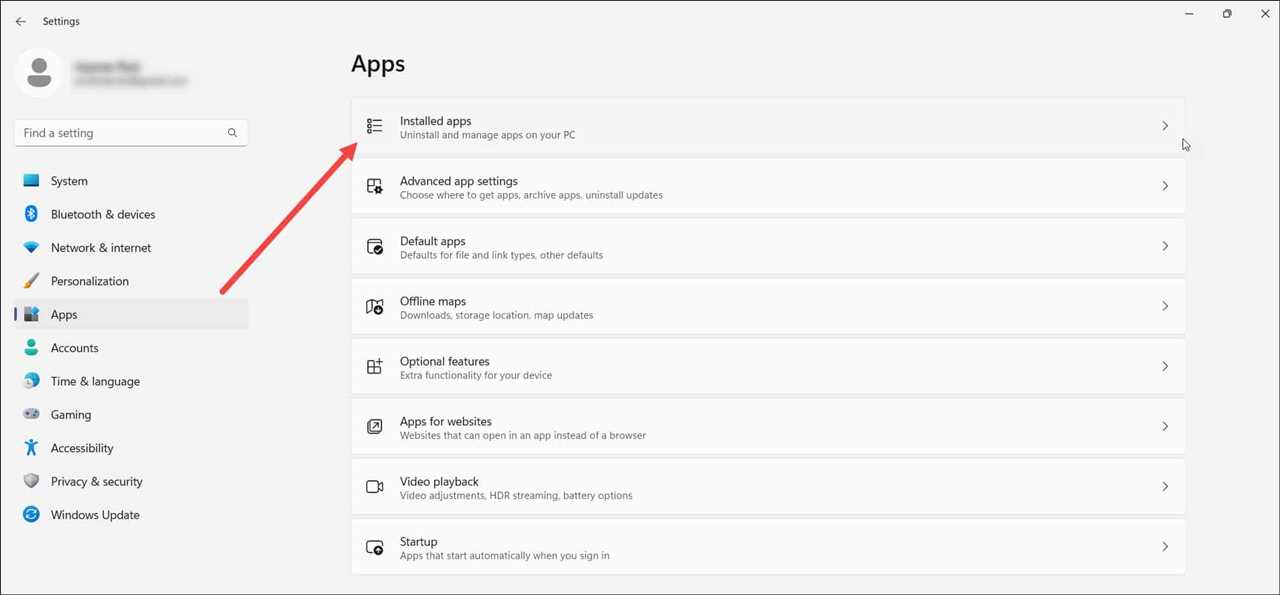
Once you’re in the Windows 11 Settings, navigate to the “Apps & Features” section. You can find this option by scrolling down or using the search bar at the top of the Settings window. Click on “Apps & Features” to proceed.
Step 3: Find and uninstall Cortana
In the “Apps & Features” section, you’ll see a list of all the apps installed on your Windows 11 device. To find Cortana, you can either scroll through the list or use the search bar at the top of the window. Once you’ve located Cortana, click on it to reveal the “Uninstall” button. Click on “Uninstall” to remove Cortana from your system.
Step 4: Confirm the uninstallation
After clicking on “Uninstall,” a confirmation prompt will appear asking if you’re sure you want to remove Cortana from your Windows 11 device. Read the prompt carefully and click on “Uninstall” again to confirm the uninstallation process. Depending on your system, this process may take a few moments.
Step 5: Restart your device
Once Cortana has been successfully uninstalled, it’s a good idea to restart your Windows 11 device. This will ensure that any remaining files or settings associated with Cortana are fully removed. After your device restarts, Cortana should no longer be present on your system.
By following these steps, you can easily remove Cortana from your Windows 11 device and reclaim valuable resources. Whether you find Cortana helpful or not, having the ability to customize your Windows experience is always a plus. Enjoy your Cortana-free Windows 11!
Why Remove Cortana?
Cortana is a virtual assistant developed by Microsoft for Windows 11. While some users find Cortana helpful for managing tasks and providing information, others may prefer to remove or disable it for various reasons.
Here are a few reasons why you might want to remove Cortana from your Windows 11 system:
1. Privacy concerns: Cortana collects and stores personal data, including voice recordings and search history, to improve its functionality. If you are concerned about your privacy and prefer not to have your data stored or analyzed, removing Cortana can help address these concerns.
2. Resource usage: Cortana runs in the background and consumes system resources, including CPU and memory. If you have a low-spec system or want to optimize your computer’s performance, uninstalling Cortana can free up these resources for other tasks.
3. Personal preference: Some users simply prefer not to use virtual assistants or find Cortana’s features unnecessary. If you don’t find Cortana useful or if you prefer to use alternative methods for managing tasks and accessing information, removing Cortana can help declutter your system.
Keep in mind that removing Cortana is a personal choice, and it may not be suitable for everyone. If you decide to remove Cortana, it’s important to follow the proper steps to avoid any unintended consequences or issues with your Windows 11 system.
Benefits of Removing Cortana
There are several benefits to disabling or removing Cortana from Windows 11:
1. Improved Performance: Cortana is a voice assistant developed by Microsoft that runs in the background and uses system resources. By disabling or removing Cortana, you can free up these resources and potentially improve the overall performance of your Windows 11 system.
2. Enhanced Privacy: Cortana collects and stores personal data to provide personalized recommendations and suggestions. By removing Cortana, you can protect your privacy and prevent Microsoft from accessing and using your personal information.
3. Reduced Distractions: Cortana can be distracting, especially if it pops up unexpectedly or interrupts your workflow. By removing Cortana, you can eliminate these distractions and focus on your tasks without any interruptions.
4. Customization: Removing Cortana allows you to customize your Windows 11 experience according to your preferences. You can choose alternative voice assistants or simply rely on manual input for your tasks.
5. Simplified User Interface: Cortana’s presence in the taskbar can clutter the user interface. By removing Cortana, you can achieve a cleaner and more streamlined taskbar, making it easier to navigate and access your favorite apps and features.
Overall, removing Cortana gives you more control over your Windows 11 system, improves performance, enhances privacy, reduces distractions, and allows for a more personalized and simplified user experience.
Step 1: Open the Start Menu
To disable or remove Cortana, Microsoft’s voice assistant in Windows 11, you’ll need to start by opening the Start Menu. Cortana is integrated into the Start Menu, so this is where you’ll find the necessary settings to manage or uninstall it.
To open the Start Menu, simply click on the Windows icon located at the bottom left corner of your screen. This will bring up the Start Menu, which is the central hub for accessing your apps, settings, and files in Windows 11.
Once the Start Menu is open, you can proceed to the next steps to disable or remove Cortana from your Windows 11 system.
Click on the Start button
To uninstall Cortana from your Windows 11 device, you can follow these step-by-step instructions provided by Microsoft. Cortana is a voice assistant developed by Microsoft that can be helpful for some users, but if you prefer to disable or remove it, you can do so easily.
Here’s how you can remove Cortana:
| Step 1 | Click on the Start button located at the bottom left corner of your screen. This will open the Start menu. |
| Step 2 | In the Start menu, click on the Settings icon. This will open the Windows Settings. |
| Step 3 | In the Windows Settings, click on the Apps category. |
| Step 4 | In the Apps category, click on the Apps & features option. |
| Step 5 | Scroll down the list of apps until you find Cortana. Click on Cortana. |
| Step 6 | Click on the Uninstall button. A confirmation prompt will appear. |
| Step 7 | Click on the Uninstall button in the confirmation prompt to remove Cortana from your device. |
By following these steps, you will be able to remove Cortana, the voice assistant, from your Windows 11 device. Keep in mind that removing Cortana will disable its features and you won’t be able to use it anymore.
Select “Settings” from the menu

To remove Cortana from Windows 11, you will need to access the settings menu. Follow the steps below to disable the voice assistant:
- Click on the Windows icon located on the bottom left corner of your screen. This will open the start menu.
- In the start menu, locate and click on the Settings icon. The settings icon is represented by a gear symbol.
- Once you click on the settings icon, the settings menu will open. Here, you can customize various aspects of your Windows 11 experience.
- In the settings menu, you will find a search bar at the top. Type “Cortana” in the search bar.
- From the search results, click on the Cortana & Search settings option. This will open the Cortana settings page.
- On the Cortana settings page, you will see a toggle switch labeled “Let Cortana respond to ‘Hey Cortana'”. Toggle this switch to the off position to disable Cortana’s voice activation feature.
- If you want to completely uninstall Cortana from your Windows 11 system, scroll down on the Cortana settings page and click on the “Uninstall” button.
- A confirmation prompt will appear asking if you want to uninstall Cortana. Click on “Uninstall” to proceed.
- Windows will then uninstall Cortana from your system, and you will no longer have the voice assistant enabled.
By following these steps, you can easily remove Cortana from your Windows 11 system and disable its voice assistant functionality. This can be useful if you prefer not to use Cortana or if you want to free up system resources.
Step 2: Access the Cortana Settings
To remove Cortana from Windows 11, you will need to access the Cortana settings in the Microsoft operating system. Here’s how you can do it:
1. Open the Windows Settings:
Click on the Start button located at the bottom left corner of your screen. In the Start menu, click on the gear icon to open the Windows Settings.
2. Navigate to the Cortana settings:
In the Windows Settings, click on the “Cortana” option. This will open the Cortana settings page.
3. Disable Cortana:
On the Cortana settings page, you will see an option to toggle Cortana on or off. Click on the toggle switch to turn off Cortana.
4. Confirm the removal:
A confirmation prompt will appear asking if you want to keep your current settings or remove Cortana completely. Click on the “Remove” button to uninstall Cortana from your Windows 11 system.
Note: Removing Cortana will disable its voice assistant features and any associated functionalities.
By following these steps, you will be able to access the Cortana settings and remove Cortana from your Windows 11 operating system.
Click on “Cortana & Search”

In Windows 11, Microsoft has integrated Cortana, its voice assistant, with the search functionality. If you want to remove, uninstall, or disable Cortana, you can do so by following these steps:
| Step 1 | Click on the Start button in the taskbar to open the Start menu. |
| Step 2 | Click on the “Settings” icon, which looks like a gear, to open the Settings app. |
| Step 3 | In the Settings app, click on the “Cortana & Search” option in the left sidebar. |
| Step 4 | In the Cortana & Search settings, you will find various options to customize Cortana and the search functionality. To remove Cortana completely, toggle off the “Hey Cortana” option. |
| Step 5 | If you want to disable Cortana’s web search capabilities, toggle off the “Search online and include web results” option. |
By following these steps, you can easily remove, uninstall, or disable Cortana in Windows 11 and customize the search functionality according to your preferences.