
Ubuntu is a popular operating system known for its user-friendly interface and extensive software library. If you’re looking to set up a web server or develop web applications, having PHP installed on your Ubuntu system is essential. PHP is a powerful scripting language that is widely used for web development.
In this step-by-step guide, we will walk you through the process of setting up PHP on Ubuntu. Whether you’re a beginner or an experienced developer, this guide will help you get PHP up and running on your Ubuntu system in no time.
Before we begin, make sure you have a working Ubuntu installation. If you haven’t installed Ubuntu yet, you can download it from the official Ubuntu website and follow the installation instructions.
Prerequisites

Before setting up PHP on Ubuntu, make sure you have the following:
- An Ubuntu operating system installed on your machine
- Basic knowledge of the Linux command line
- A web server installed and running on your Ubuntu system
- PHP installed on your Ubuntu system
If you don’t have Ubuntu installed, you can download it from the official Ubuntu website and follow the installation instructions. It is recommended to have the latest version of Ubuntu for better compatibility with PHP.
Having a basic understanding of the Linux command line is essential for setting up PHP on Ubuntu. You will need to use commands to install packages, configure settings, and manage your web server.
Before installing PHP, you need to have a web server installed and running on your Ubuntu system. Apache is a popular choice for a web server, but you can also use Nginx or other alternatives. Make sure your web server is properly configured and accessible.
Lastly, ensure that PHP is installed on your Ubuntu system. You can check if PHP is already installed by running the command php -v in the terminal. If PHP is not installed, you can install it using the package manager or by downloading it from the official PHP website.
Ubuntu Installation
To set up PHP on Ubuntu, follow these step-by-step instructions:
1. Open the terminal on your Ubuntu system.
2. Update the package list by running the following command:
sudo apt-get update
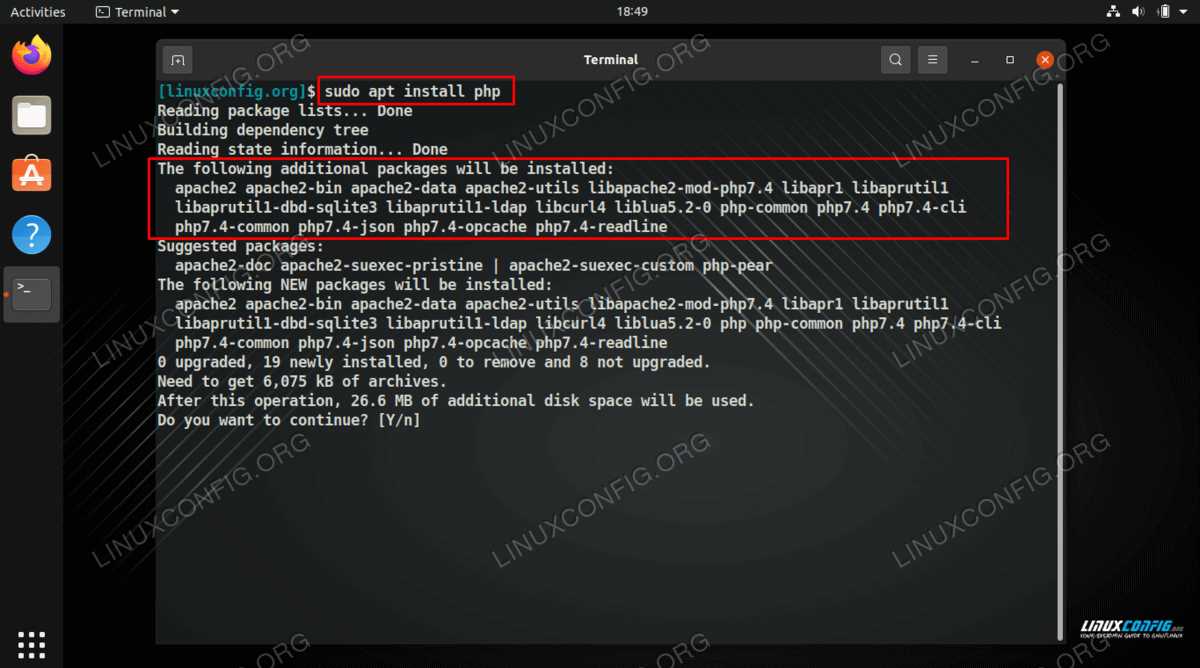
3. Install PHP by running the following command:
sudo apt-get install php
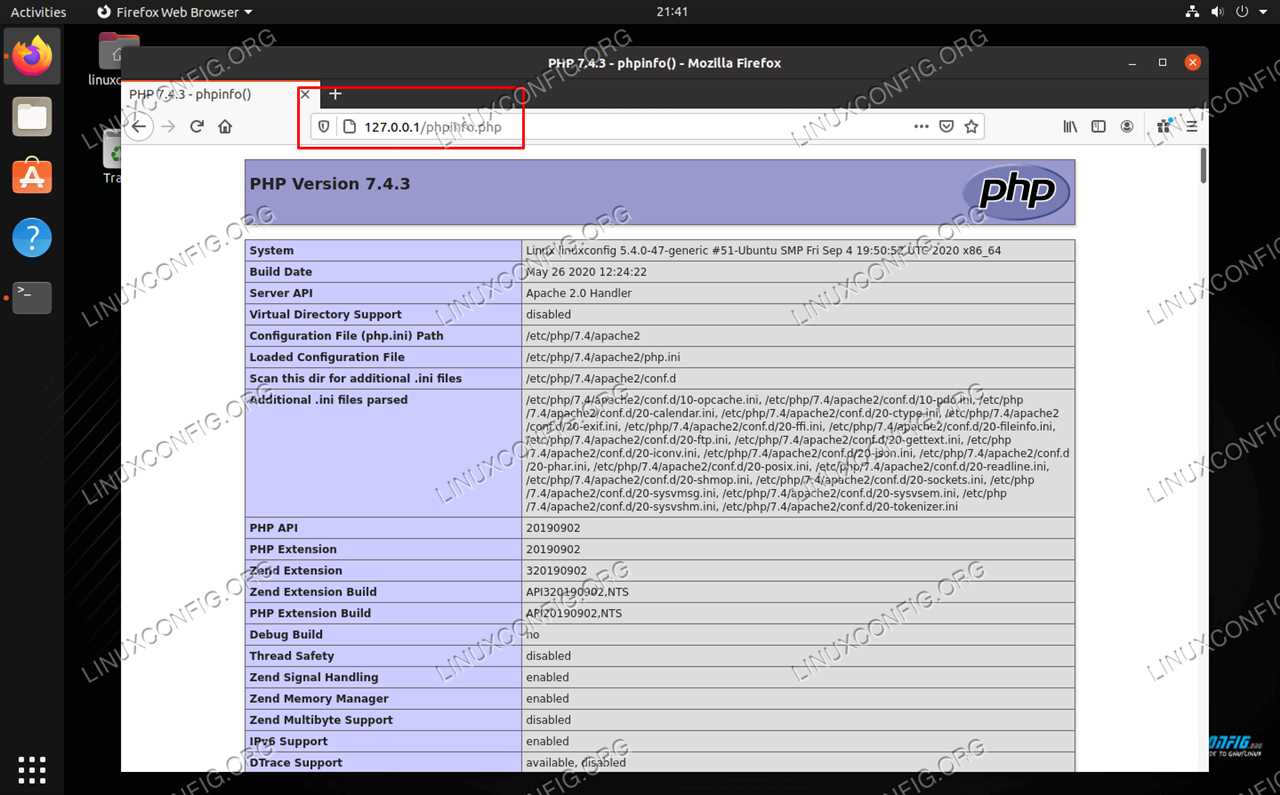
4. Verify the installation by checking the PHP version:
php -v
5. You can also install additional PHP modules if needed. For example, to install the MySQL module, run the following command:
sudo apt-get install php-mysql
6. Restart the Apache web server for the changes to take effect:
sudo service apache2 restart
7. Test PHP by creating a simple PHP file. Open a text editor and create a new file with the .php extension, such as test.php. Add the following code to the file:
<?php

echo "Hello, World!";

?>
Save the file and place it in the web server’s document root directory, typically /var/www/html/.
8. Open a web browser and navigate to http://localhost/test.php. If you see the message “Hello, World!”, PHP is successfully set up on your Ubuntu system.
Congratulations! You have successfully set up PHP on Ubuntu.
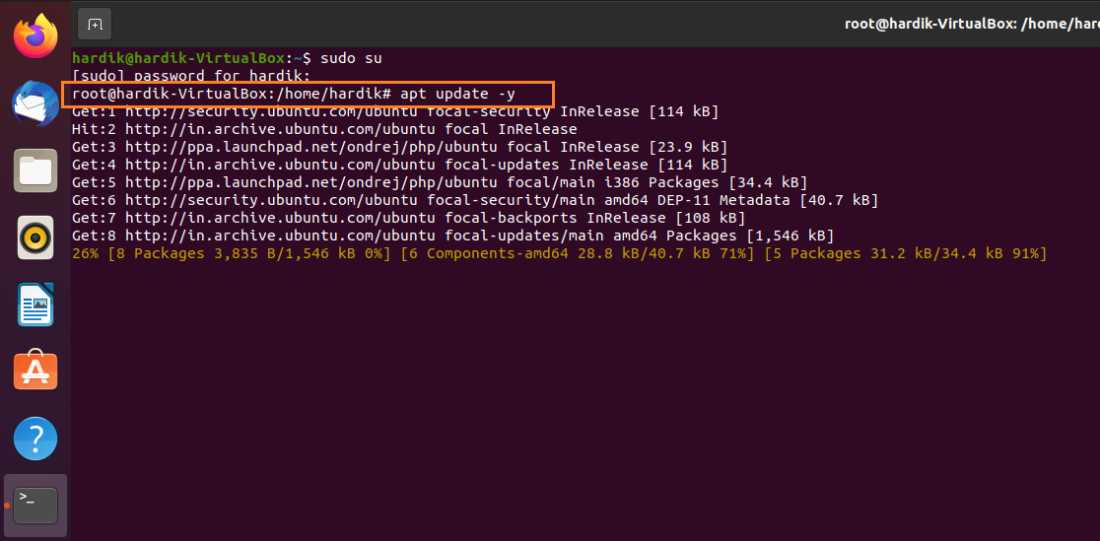
Update System Packages

Before setting up PHP on Ubuntu, it is important to update the system packages to ensure that you have the latest software versions and security patches. This can be done using the following command:
| sudo apt update |
This command will update the package lists for upgrades and new installations on your Ubuntu system. It will fetch the information about available updates and their dependencies.
Once the update process is complete, you can proceed with the installation of PHP on Ubuntu.
Install Apache Web Server

To setup PHP on Ubuntu, you need to install the Apache web server. Apache is a popular and powerful web server that can serve PHP files.
To install Apache, open the terminal and run the following command:
sudo apt-get install apache2
This command will install Apache and all its dependencies. You will be prompted to enter your password to confirm the installation.
Once the installation is complete, you can check if Apache is running by opening a web browser and entering http://localhost in the address bar. If Apache is running, you will see the default Apache page.
Now that Apache is installed, you can proceed to install PHP and configure it to work with Apache.
Step 1: Install PHP

To set up PHP on Ubuntu, you need to install the PHP package. PHP is a popular server-side scripting language used for web development. It is widely supported and compatible with various web servers, including Apache and Nginx.
To install PHP on Ubuntu, open the terminal and run the following command:
sudo apt-get install php
This command will download and install the latest version of PHP from the Ubuntu package repository. You may be prompted to enter your password to authorize the installation process.
Once the installation is complete, you can verify that PHP is installed by running the following command:
php -v
This command will display the installed version of PHP along with other information about the PHP configuration.
Now that PHP is installed on your Ubuntu system, you can start using it to develop dynamic web applications and websites.
Add PHP Repository
To install PHP on Ubuntu, you need to add the PHP repository to your system. This repository contains the latest version of PHP and ensures that you have access to all the necessary packages and updates.
To add the PHP repository, follow these steps:
- Open a terminal window.
- Run the following command to add the repository:
- Enter your password when prompted.
- Press Enter to confirm adding the repository.
- Wait for the repository to be added to your system.
sudo add-apt-repository ppa:ondrej/php
Once the repository is added, you can proceed with the installation of PHP on Ubuntu.
Note: Adding the PHP repository ensures that you have access to the latest version of PHP and its related packages. It is recommended to add the repository to stay up to date with the latest security patches and bug fixes.
Update System Packages
To ensure that your Ubuntu system is up to date and has the latest security patches, it is important to regularly update the system packages. This will also ensure that you have the latest versions of software and libraries installed.
To update the system packages, open a terminal and run the following command:
sudo apt update && sudo apt upgrade
The apt update command updates the package lists for upgrades and new installations, while the apt upgrade command actually performs the upgrades.
During the update process, you may be prompted to enter your password. This is because the sudo command is used to run the update with administrative privileges.
After entering your password, the system will check for available updates and display a list of packages that can be upgraded. You will be asked to confirm whether you want to proceed with the upgrades. Type y and press Enter to continue.
The system will then download and install the updates. This may take some time depending on the size of the updates and your internet connection speed.
Once the updates are installed, you can verify that the system is up to date by running the following command:
sudo apt list --upgradable
This command will display a list of packages that have updates available. If the list is empty, it means that your system is up to date.
Updating the system packages regularly is an important step in maintaining the security and stability of your Ubuntu setup. Make sure to perform these updates on a regular basis to keep your system protected.
Install PHP

To install PHP on Ubuntu, follow these steps:
Step 1: Open the terminal.
Step 2: Update the package list by running the following command:
sudo apt update
Step 3: Install PHP by running the following command:
sudo apt install php
Step 4: Verify the installation by checking the PHP version:
php -v
Step 5: Congratulations! PHP is now installed on your Ubuntu system.
Step 2: Configure PHP
After successfully installing PHP on your Ubuntu system, the next step is to configure it according to your requirements. The configuration file for PHP is located at /etc/php/{version}/apache2/php.ini.
Open the terminal and navigate to the PHP configuration file using the following command:
sudo nano /etc/php/{version}/apache2/php.ini
Replace {version} with the version of PHP you have installed on your system, for example, 7.4.
Once the file is open, you can modify various PHP settings based on your needs. Some common settings you might want to consider changing are:
- memory_limit: This setting determines the maximum amount of memory PHP can use. You can increase or decrease this value based on your application’s memory requirements.
- upload_max_filesize: This setting controls the maximum size of files that can be uploaded through PHP. If you need to allow larger file uploads, you can increase this value.
- post_max_size: This setting specifies the maximum size of POST data that PHP will accept. If you need to handle larger amounts of data in your POST requests, you can adjust this value accordingly.
Make the necessary changes to the configuration file and save the changes by pressing Ctrl + X, followed by Y, and then Enter to confirm.
After making the changes, you need to restart the Apache web server for the changes to take effect. Use the following command to restart Apache:
sudo service apache2 restart
That’s it! You have successfully configured PHP on your Ubuntu system. You can now start developing PHP applications or hosting PHP-based websites on your Ubuntu server.


