If you’re a Mac user and want to experience the new features of Windows 11, you may be wondering how to install it on your Mac using Bootcamp. In this step-by-step guide, we will walk you through the process of installing Windows 11 on your Mac using Bootcamp.
Step 1: Check System Requirements
Before you begin, make sure your Mac meets the system requirements for Windows 11. Windows 11 requires a compatible processor, at least 4GB of RAM, and 64GB of storage. You can check the system requirements on the official Windows website.
Step 2: Download Windows 11 ISO
Next, you’ll need to download the Windows 11 ISO file from the official Microsoft website. Make sure to download the correct version for your Mac, either 32-bit or 64-bit.
Step 3: Prepare Bootcamp
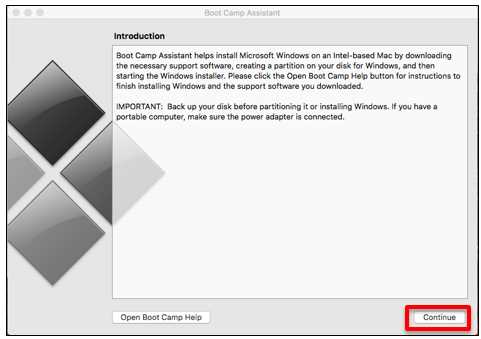
Open Bootcamp Assistant on your Mac and follow the on-screen instructions to create a Windows partition on your hard drive. Make sure to allocate enough space for Windows 11, as it will require a significant amount of storage.
Step 4: Install Windows 11
Insert a USB drive into your Mac and format it as FAT32. Then, use Bootcamp Assistant to copy the Windows 11 ISO file to the USB drive. Restart your Mac and hold the Option key to boot from the USB drive. Follow the on-screen instructions to install Windows 11 on your Mac.
Step 5: Set Up Windows 11
Once the installation is complete, you can set up Windows 11 on your Mac. Follow the on-screen instructions to customize your settings and create a user account. You can now enjoy the new features of Windows 11 on your Mac using Bootcamp!
Installing Windows 11 on your Mac using Bootcamp is a straightforward process if you follow these step-by-step instructions. Now you can experience the best of both worlds with the power of Mac and the new features of Windows 11.
Preparing Your Mac for Windows 11 Installation

Before you can install Windows 11 on your Mac using Bootcamp, there are a few steps you need to take to ensure a smooth installation process. Follow the steps below to prepare your Mac:
1. Check your Mac’s compatibility: Make sure your Mac meets the minimum system requirements for Windows 11. Visit the official Microsoft website to find the list of supported Mac models.
2. Update macOS: It’s important to have the latest version of macOS installed on your Mac before installing Windows 11. Check for any available updates and install them.
3. Backup your data: Before proceeding with the Windows 11 installation, it’s always a good idea to backup your important files and documents. This will ensure that you don’t lose any data during the installation process.
4. Free up disk space: Windows 11 requires a certain amount of disk space to be installed. Make sure you have enough free space on your Mac’s hard drive before starting the installation process. Delete any unnecessary files or applications to free up space.
5. Disable FileVault: If you have FileVault enabled on your Mac, you’ll need to disable it before installing Windows 11. FileVault encrypts your data and can cause issues during the installation process.
6. Disable Secure Boot: Secure Boot is a security feature that prevents unauthorized operating systems from loading during startup. Disable Secure Boot in the macOS settings before installing Windows 11.
7. Download the Windows 11 ISO: Visit the official Microsoft website and download the Windows 11 ISO file. Make sure to choose the correct version for your Mac.
Once you have completed these steps, your Mac will be ready for the Windows 11 installation using Bootcamp. Follow the next steps in the guide to learn how to install Windows 11 on your Mac.
Check System Requirements

Before you begin the installation process, it is important to ensure that your Mac meets the necessary system requirements to install Windows 11 on Bootcamp. Here are the minimum requirements:
- A compatible Mac model with an Intel processor
- At least 64GB of free storage space on your Mac
- 8GB of RAM or more
- A USB flash drive with at least 16GB of storage capacity
- A stable internet connection
It is also recommended to have the latest version of macOS installed on your Mac before proceeding with the installation. This will ensure compatibility and a smoother installation process.
Once you have confirmed that your Mac meets these requirements, you can proceed to the next step and learn how to install Windows 11 on Bootcamp.
Backup Your Mac

Before you proceed with installing Windows 11 on your Mac using Bootcamp, it is highly recommended to backup your Mac to ensure that your data is safe in case anything goes wrong during the installation process. Here’s how you can backup your Mac:
- Connect an external hard drive or use a cloud storage service to store your backup files.
- Open the Time Machine application on your Mac.
- Select the external hard drive or cloud storage service as the backup disk.
- Click on “Back Up Now” to start the backup process.
- Wait for the backup to complete. This may take some time depending on the size of your data.
- Once the backup is finished, you can proceed with the installation of Windows 11 on your Mac using Bootcamp.
By backing up your Mac, you can ensure that your important files and data are protected and can be easily restored if needed. It is always better to be safe than sorry when it comes to installing a new operating system like Windows 11 on your Mac.
Download Windows 11 ISO

If you want to install Windows 11 on your Mac using Bootcamp, you will first need to download the Windows 11 ISO file. The ISO file contains all the necessary installation files for Windows 11.
To download the Windows 11 ISO, you can follow these steps:
- Go to the official Windows website or use a trusted third-party website to download the Windows 11 ISO.
- Click on the “Download” button to start the download.
- Choose the version of Windows 11 that is compatible with your Mac’s architecture (32-bit or 64-bit).
- Once the download is complete, you will have the Windows 11 ISO file on your computer.
It is important to note that downloading Windows 11 ISO from unofficial sources can be risky. Make sure to download it from a trusted website to avoid any potential security threats.
Tip: If you are unsure about the architecture of your Mac, you can check it by going to “About This Mac” in the Apple menu and looking for the “Processor” information.
Now that you have downloaded the Windows 11 ISO file, you can proceed with the installation process on your Mac using Bootcamp. Follow the next steps in this guide to learn how to install Windows 11 on your Mac using Bootcamp.
Creating a Bootable USB Drive

To install Windows 11 on your Mac using Bootcamp, you will need to create a bootable USB drive. This will allow you to easily install the operating system on your Mac.
Here is a step-by-step guide on how to create a bootable USB drive:
Step 1: Download the Windows 11 ISO file from the official Microsoft website.
Step 2: Connect a USB drive to your Mac. Make sure it has at least 8GB of storage space.
Step 3: Open the Disk Utility on your Mac. You can find it in the Utilities folder, which is located in the Applications folder.
Step 4: Select the USB drive from the list of available drives on the left side of the Disk Utility window.
Step 5: Click on the “Erase” tab at the top of the Disk Utility window.
Step 6: Choose a name for your USB drive and select the “MS-DOS (FAT)” format. Click on the “Erase” button to format the drive.
Step 7: Once the formatting is complete, open the Terminal application on your Mac. You can find it in the Utilities folder, which is located in the Applications folder.
Step 8: In the Terminal window, type the following command: sudo /Applications/Install\ macOS\ Sierra.app/Contents/Resources/createinstallmedia –volume /Volumes/Untitled –applicationpath /Applications/Install\ macOS\ Sierra.app (replace “Sierra” with the name of the Windows 11 ISO file).
Step 9: Press Enter and enter your administrator password when prompted.
Step 10: The Terminal will now create a bootable USB drive with the Windows 11 ISO file. This process may take some time.
Once the bootable USB drive is created, you can proceed with the installation of Windows 11 on your Mac using Bootcamp. Simply restart your Mac and hold down the Option key while it is booting up to access the boot menu. Select the USB drive as the boot device and follow the on-screen instructions to install Windows 11.
Creating a bootable USB drive is an essential step in the process of installing Windows 11 on your Mac using Bootcamp. Make sure to follow these steps carefully to ensure a successful installation.
Format the USB Drive

Before you can install Windows 11 on your Mac using Bootcamp, you will need to format a USB drive to create a bootable installation media. This will allow you to install Windows 11 on your Mac.
Here is how to format the USB drive:
| Step 1: | Insert the USB drive into your Mac. |
| Step 2: | Open the Disk Utility application. You can find it by going to “Applications” > “Utilities” > “Disk Utility”. |
| Step 3: | Select the USB drive from the list of devices on the left side of the Disk Utility window. |
| Step 4: | Click on the “Erase” button at the top of the Disk Utility window. |
| Step 5: | In the “Format” dropdown menu, select “MS-DOS (FAT)”. |
| Step 6: | Enter a name for the USB drive in the “Name” field. |
| Step 7: | Click on the “Erase” button to format the USB drive. |
Once the USB drive is formatted, you can proceed with the installation of Windows 11 on your Mac using Bootcamp.
Mount the Windows 11 ISO

To install Windows 11 on your Mac using Bootcamp, you will need to mount the Windows 11 ISO file. Here’s how:
Step 1: Download the Windows 11 ISO file from the official Microsoft website.
Step 2: Open the Finder on your Mac and navigate to the location where you saved the Windows 11 ISO file.
Step 3: Right-click on the ISO file and select “Open With” from the context menu.
Step 4: Choose the “DiskImageMounter” option from the list of available applications. This will mount the ISO file as a virtual disk on your Mac.
Step 5: Once the ISO file is mounted, you will see a new disk icon on your desktop or in the Finder sidebar.
Step 6: Double-click on the disk icon to open it and access the contents of the Windows 11 ISO file.
Step 7: Now you are ready to proceed with the installation of Windows 11 on your Mac using Bootcamp.
Note: Make sure you have enough free disk space on your Mac to accommodate the Windows 11 installation.
By following these steps, you can easily mount the Windows 11 ISO file and prepare your Mac for the installation process.

