If you’re wondering how to install Python extension in Visual Studio Code, you’ve come to the right place. Visual Studio Code is a powerful code editor that supports a wide range of programming languages, including Python. By installing the Python extension, you can take advantage of additional features and tools specifically designed for Python development.
To install the Python extension, follow these simple steps:
- Open Visual Studio Code and click on the Extensions icon in the sidebar. Alternatively, you can use the shortcut Ctrl+Shift+X.
- In the search bar, type “Python” and press Enter. This will display a list of available Python extensions.
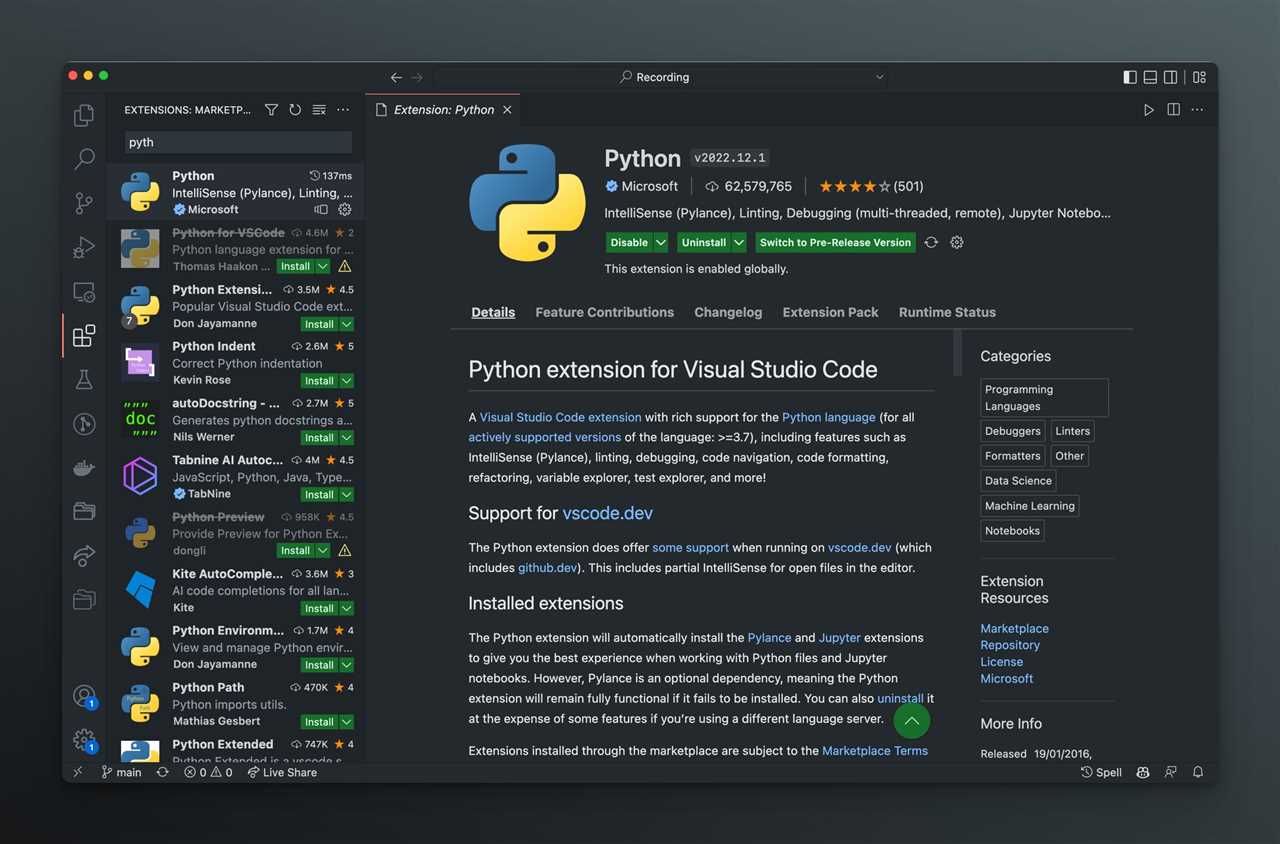
- Look for the official Python extension, which is published by Microsoft. It should be the first result in the list.
- Click on the “Install” button next to the Python extension. Visual Studio Code will start downloading and installing the extension.
- Once the installation is complete, you will see a notification at the bottom right corner of the window. Click on the “Reload” button to activate the extension.
That’s it! You have successfully installed the Python extension in Visual Studio Code. Now you can start writing and running Python code directly in the editor. The extension provides features like code completion, syntax highlighting, debugging, and more, making it easier and more efficient to develop Python applications.
So, don’t wait any longer. Install the Python extension in Visual Studio Code today and take your Python development to the next level!
Section 1: Installing Visual Studio Code

Before you can start using Python extensions in Visual Studio Code, you need to have the software installed on your computer. Follow the steps below to install Visual Studio Code:
- Go to the official Visual Studio Code website at https://code.visualstudio.com/.
- Click on the “Download” button to download the installer for your operating system (Windows, macOS, or Linux).
- Once the download is complete, run the installer and follow the on-screen instructions to install Visual Studio Code.
- After the installation is finished, launch Visual Studio Code.
Now that you have Visual Studio Code installed on your computer, you can proceed to the next section to learn how to install the Python extension.
Step 1: Downloading Visual Studio Code

To install the Python extension in Visual Studio Code, you first need to download and install Visual Studio Code itself. Visual Studio Code is a lightweight and powerful code editor that supports various programming languages, including Python.
To download Visual Studio Code, follow these steps:
- Go to the official Visual Studio Code website at https://code.visualstudio.com/.
- Click on the “Download” button to start the download process.
- Choose the appropriate version for your operating system (Windows, macOS, or Linux) and click on the download link.
- Once the download is complete, open the installer and follow the on-screen instructions to install Visual Studio Code.
After installing Visual Studio Code, you are ready to proceed to the next step and install the Python extension.
Step 2: Installing Visual Studio Code
In order to install the Python extension in Visual Studio Code, you first need to have Visual Studio Code installed on your computer. If you haven’t already installed it, follow the steps below:
| Step 1: | Go to the Visual Studio Code website at https://code.visualstudio.com/ |
| Step 2: | Click on the “Download” button to download the Visual Studio Code installer for your operating system (Windows, macOS, or Linux). |
| Step 3: | Once the download is complete, run the installer and follow the on-screen instructions to install Visual Studio Code. |
| Step 4: | After the installation is complete, open Visual Studio Code. |
Now that you have Visual Studio Code installed, you can proceed to the next step and install the Python extension.
Step 3: Launching Visual Studio Code
After successfully installing Python and the Visual Studio Code editor, you are now ready to launch Visual Studio Code and start coding in Python. Here’s how:
- Open the Visual Studio Code application on your computer.
- Once Visual Studio Code is open, click on the “Extensions” button on the left sidebar.
- In the search bar, type “Python” and press Enter.
- From the search results, locate the “Python” extension and click on the “Install” button.
- Wait for the installation to complete.
- Once the installation is finished, you will see a “Reload” button. Click on it to reload Visual Studio Code.
- After Visual Studio Code has reloaded, you are now ready to start coding in Python!
By following these steps, you have successfully installed the Python extension in Visual Studio Code and are now ready to write and run Python code in the editor. Happy coding!
Section 2: Installing Python Extension

In this section, we will learn how to install the Python extension in Visual Studio Code. The Python extension allows you to write and run Python code directly in the Visual Studio Code editor.
To install the Python extension, follow these steps:
| Step 1 | Open Visual Studio Code. |
| Step 2 | Click on the Extensions button on the left sidebar, or press Ctrl+Shift+X to open the Extensions view. |
| Step 3 | Type “Python” in the search bar at the top of the Extensions view. |
| Step 4 | Click on the Python extension by Microsoft in the search results. |
| Step 5 | Click on the Install button to install the Python extension. |
Once the installation is complete, you will be able to write and run Python code in Visual Studio Code. The Python extension provides features such as code completion, debugging, and linting to help you write better Python code.
Now that you have installed the Python extension, you are ready to start coding in Python in Visual Studio Code!
Step 1: Opening the Extensions View

In order to install the Python extension in Visual Studio Code, you will need to open the Extensions view. Here’s how:
- Open Visual Studio Code.
- Click on the Extensions button in the sidebar, or press
Ctrl+Shift+X(Windows/Linux) orCmd+Shift+X(Mac) to open the Extensions view. - In the Extensions view, you can search for the Python extension by typing “Python” in the search box.
- Once you find the Python extension, click on the Install button to install it.
By following these steps, you will be able to install the Python extension in Visual Studio Code and start using it for your Python development.