If you’re experiencing audio issues on your Windows 11 computer, one of the first steps you should take is to update your audio drivers. Outdated or incompatible drivers can often cause problems with sound playback, such as distorted audio or no sound at all. Updating your audio drivers can help resolve these issues and ensure that you’re getting the best audio quality possible.
Updating audio drivers on Windows 11 is a straightforward process that can be done in just a few simple steps. In this step-by-step guide, we’ll walk you through the process of updating your audio drivers to help you get your sound working perfectly again.
Step 1: Identify Your Audio Device
The first step in updating your audio drivers is to identify the specific audio device that you’re using. This information is crucial because you’ll need to download the correct drivers for your particular device. To find out the details of your audio device, you can follow these steps:
- Open the Start menu and type “Device Manager” in the search bar.
- Click on the Device Manager app to open it.
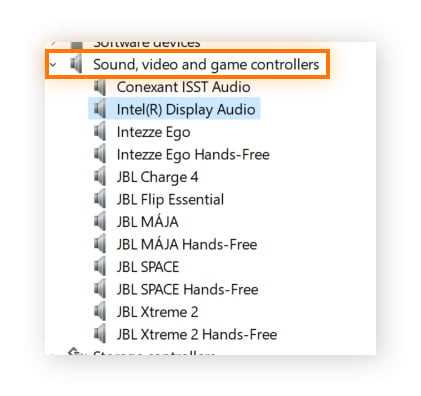
- In the Device Manager window, expand the “Sound, video, and game controllers” category.
- Locate your audio device from the list (it may be named differently depending on your computer and audio hardware).
- Right-click on your audio device and select “Properties”.
- In the Properties window, go to the “Details” tab.
- From the drop-down menu, select “Hardware Ids”.
- Note down the information displayed, especially the Vendor ID and Device ID.
By following these steps, you’ll have the necessary information to download the correct audio drivers for your device.
Step 2: Download and Install the Latest Drivers
Once you have identified your audio device, you can proceed to download the latest drivers from the manufacturer’s website. Most manufacturers provide driver downloads on their support websites, making it easy to find and download the correct drivers for your device.
Visit the manufacturer’s website and navigate to the support or downloads section. Look for the drivers specifically designed for your audio device model and operating system (Windows 11). Download the latest drivers and save them to a location on your computer where you can easily find them.
After downloading the drivers, locate the file and double-click on it to run the installer. Follow the on-screen instructions to complete the installation process. Once the installation is complete, restart your computer to apply the changes.
Updating your audio drivers can greatly improve your audio experience on Windows 11. By following these steps, you’ll be able to easily update your audio drivers and resolve any sound-related issues you may be experiencing.
Why Update Audio Drivers?
Updating audio drivers is essential for optimal performance and compatibility on Windows 11. Audio drivers are software programs that allow your computer’s operating system to communicate with the audio hardware. By keeping your audio drivers up to date, you can ensure that you have access to the latest features, bug fixes, and improvements.
Here are a few reasons why updating your audio drivers is important:
- Improved Sound Quality: Updating your audio drivers can enhance the sound quality of your speakers or headphones. New driver updates often include audio enhancements and optimizations that can provide a better listening experience.
- Bug Fixes: Outdated audio drivers can sometimes cause issues such as crackling or distorted sound. Updating to the latest drivers can help resolve these problems and ensure smooth audio playback.
- Compatibility: Windows 11 introduces new features and technologies, and updated audio drivers are designed to work seamlessly with the latest operating system. By updating your drivers, you can ensure compatibility with new software and hardware.
- Performance Improvements: Audio driver updates can also bring performance improvements, such as reduced latency or improved audio processing. These optimizations can result in smoother audio playback and better overall system performance.
Overall, updating your audio drivers on Windows 11 is crucial for getting the best audio experience and ensuring compatibility with the latest software and hardware. It’s a simple process that can be done in a few steps, and it’s recommended to check for driver updates regularly to keep your system running smoothly.
Benefits of Updating Audio Drivers
Updating audio drivers on Windows can provide several benefits for your system’s audio performance and overall user experience.
Improved Compatibility: Updating audio drivers ensures that your Windows operating system is compatible with the latest audio devices and technologies. This allows you to use the latest audio features and enjoy optimal audio quality.
Bug Fixes and Stability: Audio driver updates often include bug fixes and stability improvements. These updates can address issues such as audio distortion, crackling, or sudden audio loss. By keeping your audio drivers up to date, you can prevent these issues and enjoy a more stable audio experience.
Enhanced Audio Quality: Audio driver updates can also enhance the audio quality of your system. Manufacturers often release driver updates to optimize audio performance, improve sound reproduction, and provide better audio effects. By updating your audio drivers, you can experience improved audio clarity, richer sound, and a more immersive audio experience.
Increased Performance: Outdated audio drivers can sometimes cause performance issues, such as audio lag or latency. By updating your audio drivers, you can ensure that your audio devices are running efficiently and minimize any performance-related issues. This can result in smoother audio playback and a better overall user experience.
Security and Compatibility: Keeping your audio drivers up to date is essential for maintaining the security and compatibility of your Windows system. Driver updates often include security patches and improvements that can protect your system from potential vulnerabilities. Additionally, updated audio drivers ensure compatibility with the latest Windows updates and prevent any compatibility issues.
Overall, updating your audio drivers on Windows is crucial for ensuring optimal audio performance, stability, compatibility, and security. It allows you to take advantage of the latest audio technologies, enjoy improved audio quality, and have a seamless audio experience on your Windows system.
Step 1: Identify Your Audio Device
Before you can update your audio drivers on Windows 11, it’s important to first identify the specific audio device you have. This information will help you find the correct drivers for your device.
To identify your audio device, follow these steps:
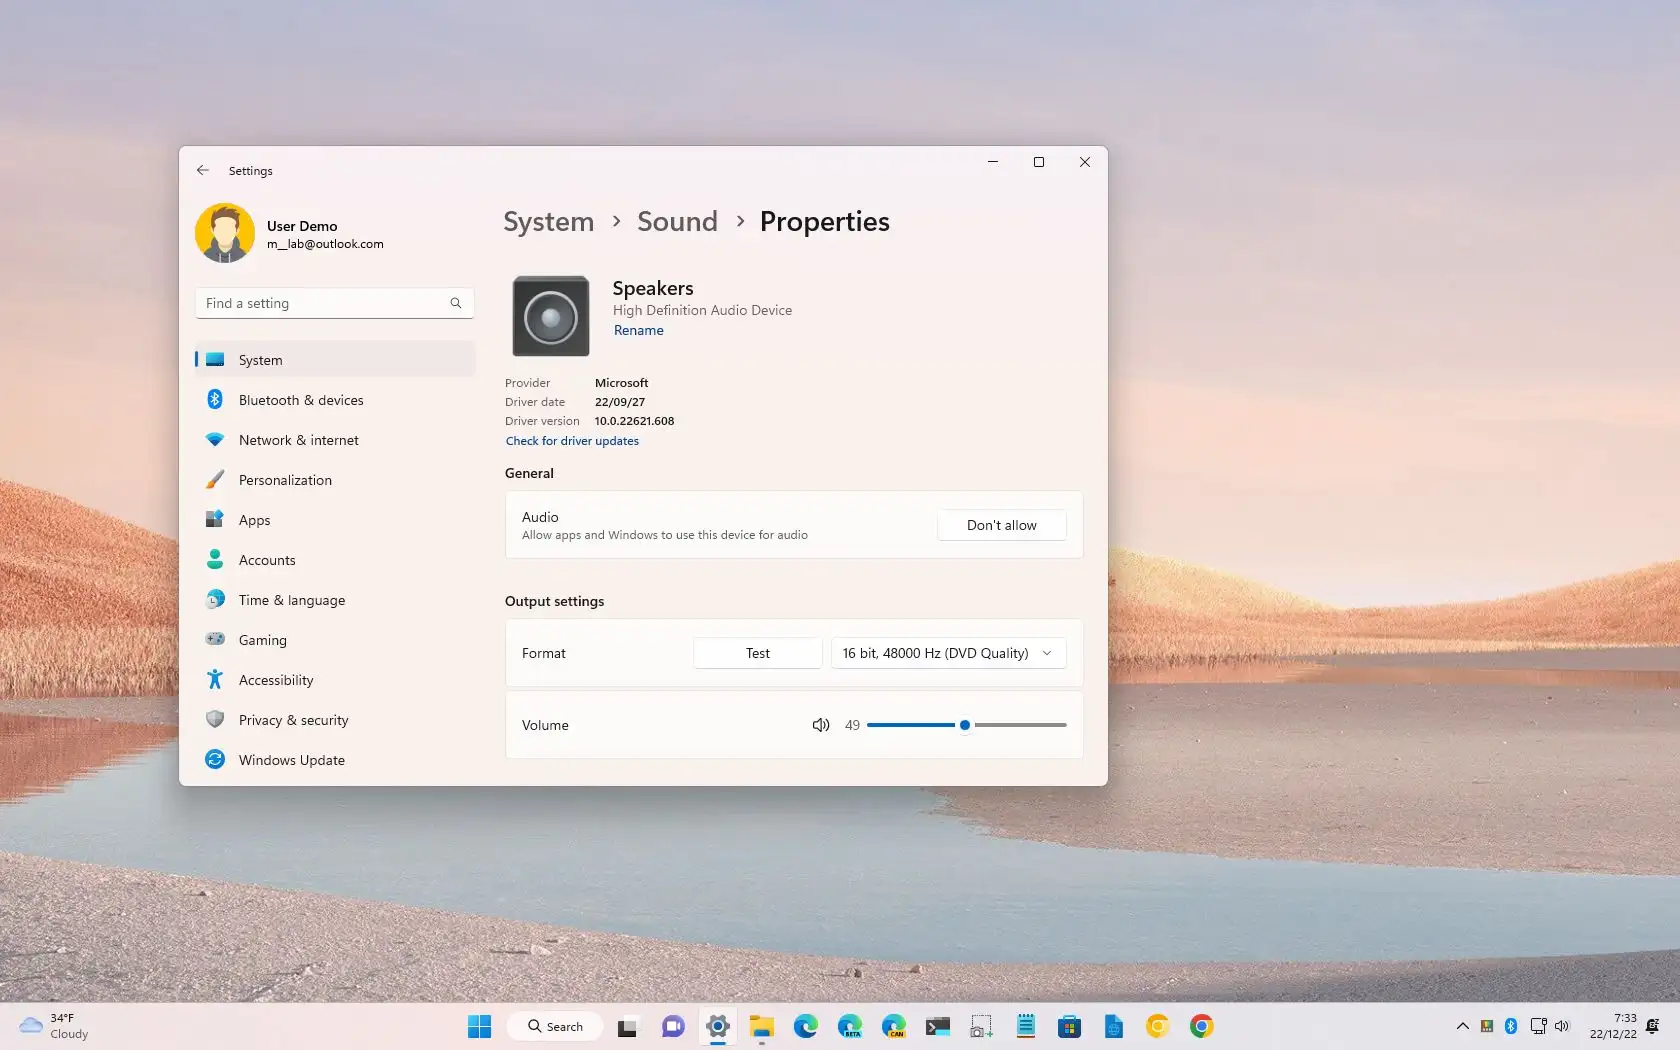
- Open the Start menu and click on the Settings icon.
- In the Settings window, click on the System option.
- From the left sidebar, select the Sound option.
- Under the “Output” or “Input” section, you will see the name of your audio device listed.
Make a note of the name of your audio device, as you will need this information when searching for the latest drivers.
Once you have identified your audio device, you can proceed to the next step to update your audio drivers on Windows 11.
Checking Device Manager
Before updating your audio drivers on Windows 11, it’s important to check the Device Manager to see if there are any issues with your current audio drivers.
To access the Device Manager, follow these steps:
- Press the Windows key + X on your keyboard to open the Power User menu.
- Select “Device Manager” from the list.
Once the Device Manager window opens, look for the “Sound, video, and game controllers” category. Expand this category by clicking on the arrow next to it.
If you see any audio devices listed under this category, it means that you have audio drivers installed on your system. However, if you see a yellow exclamation mark or a red “X” icon next to any of the audio devices, it indicates that there is a problem with the drivers.
If there are no audio devices listed under the “Sound, video, and game controllers” category, it means that you don’t have any audio drivers installed on your system.
In either case, it’s recommended to update your audio drivers to ensure optimal audio performance on Windows 11.
Using Third-Party Software
If you prefer a more automated and convenient way to update your audio drivers on Windows 11, you can use third-party software. There are several reliable programs available that can scan your system, detect outdated drivers, and update them with just a few clicks.
One popular option is Driver Booster, which is known for its user-friendly interface and comprehensive driver database. To update your audio drivers using Driver Booster, follow these steps:
- Download and install Driver Booster from the official website.
- Launch the program and click on the “Scan” button. Driver Booster will scan your system for outdated drivers, including audio drivers.
- Once the scan is complete, you will see a list of outdated drivers. Locate the audio driver in the list and click on the “Update” button next to it.
- Driver Booster will download and install the latest version of the audio driver automatically.
- After the installation is complete, restart your computer to apply the changes.
Using third-party software like Driver Booster can save you time and effort compared to manually searching for and updating audio drivers. However, it’s important to download such software from trusted sources to ensure the safety and reliability of your system.
Note: While third-party software can be convenient, it’s always a good idea to create a system restore point or backup your important files before updating drivers, just in case any issues arise during the process.
Step 2: Download the Latest Audio Drivers
Once you have identified the audio drivers that need to be updated on your Windows 11 system, the next step is to download the latest versions of these drivers. Here’s how you can do it:
1. Open your preferred web browser and navigate to the official website of your computer’s manufacturer.
2. Look for the “Support” or “Downloads” section on the website. This is where you can find the latest drivers for your specific model.
3. Enter the details of your computer, such as the model number and operating system (Windows 11), to filter the search results and find the correct drivers.
4. Locate the audio drivers in the list of available downloads. They are usually labeled as “Audio Driver” or something similar.
5. Click on the download link next to the audio driver to start the download process.
6. Wait for the download to complete. The time it takes will depend on the size of the driver file and your internet connection speed.
7. Once the download is finished, locate the downloaded driver file on your computer. It is usually saved in the “Downloads” folder or a location specified by your browser’s settings.
8. Double-click on the driver file to start the installation process. Follow the on-screen instructions to complete the installation.
9. After the installation is complete, restart your computer to apply the changes and ensure that the new audio drivers are functioning correctly.
By following these steps, you can easily download and install the latest audio drivers for your Windows 11 system. Updating your drivers can help resolve audio issues and improve the overall performance of your computer’s sound system.
Visit the Manufacturer’s Website
When it comes to updating audio drivers on Windows 11, one of the most reliable sources is the manufacturer’s website. The manufacturer of your audio drivers will have the most up-to-date and compatible drivers for your specific hardware.
To visit the manufacturer’s website, you’ll first need to identify the make and model of your audio device. You can do this by opening the Device Manager on your Windows 11 computer. Simply right-click on the Start button and select “Device Manager” from the menu.
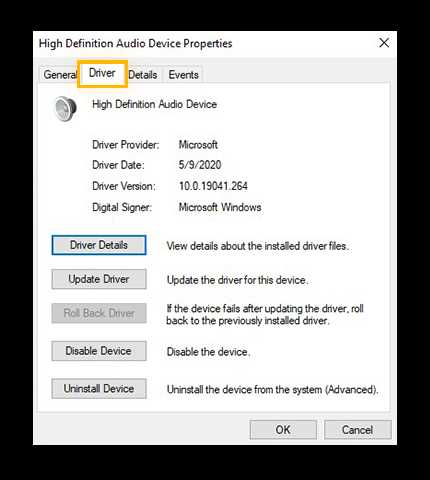
In the Device Manager, expand the “Sound, video, and game controllers” category. Here, you’ll find a list of audio devices installed on your computer. Look for the one that you want to update, right-click on it, and select “Properties.”
In the Properties window, go to the “Driver” tab. Here, you’ll find information about the current driver version and the option to update or roll back the driver. To update the driver, click on the “Update Driver” button.
Windows 11 will then give you two options: “Search automatically for updated driver software” or “Browse my computer for drivers.” If you choose the first option, Windows will search for the latest driver on the internet. However, this method may not always find the most recent driver.
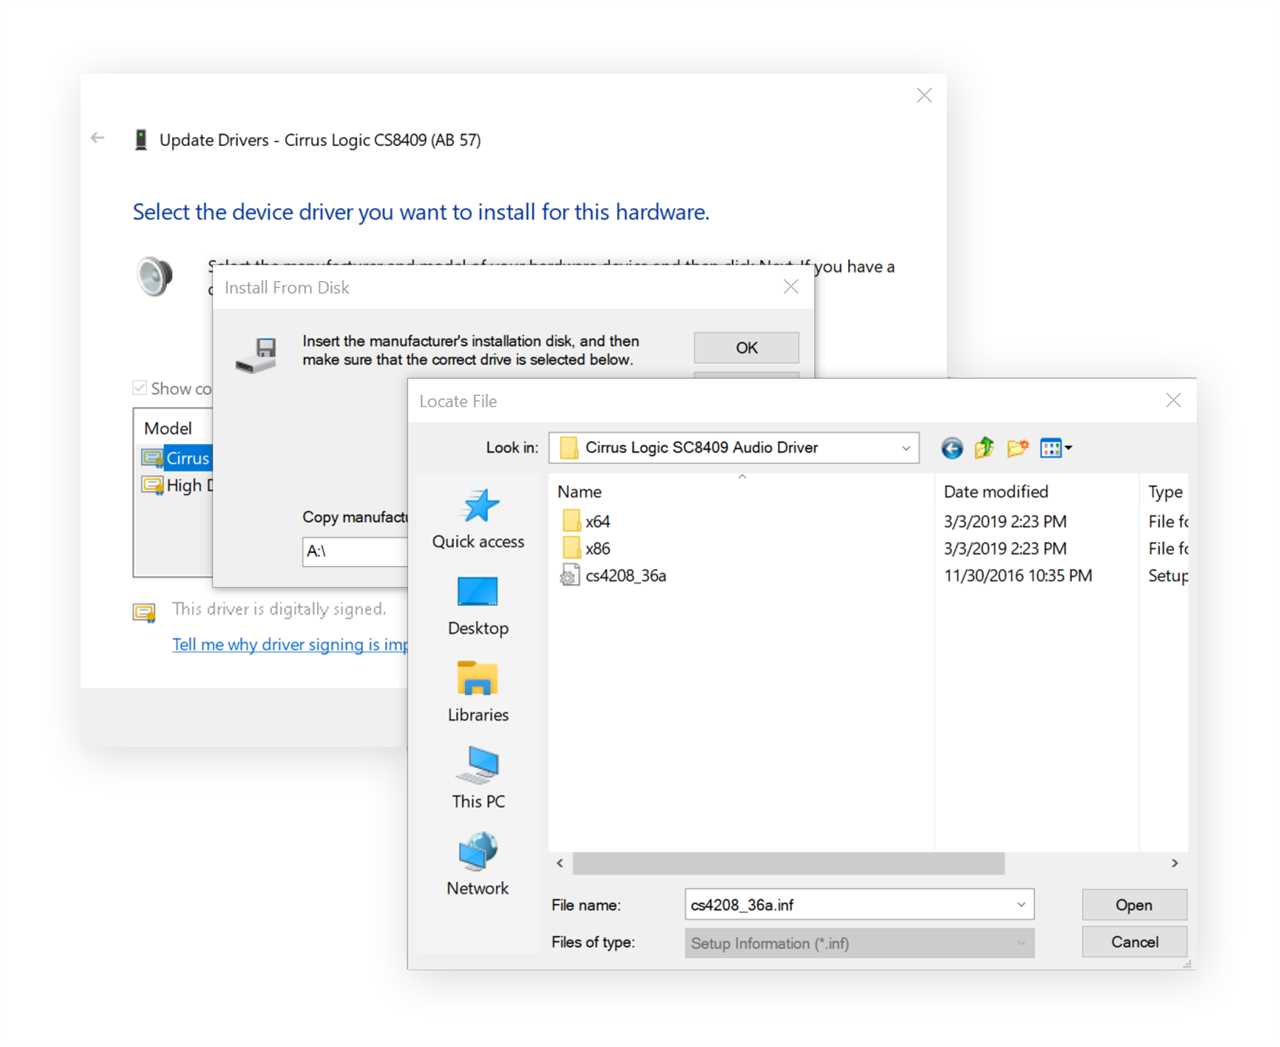
For a more reliable update, it’s recommended to choose the second option and manually browse your computer for the driver. To do this, click on the “Browse my computer for drivers” option and then select the folder where you downloaded the latest driver from the manufacturer’s website.
If you haven’t downloaded the latest driver yet, you can do so by visiting the manufacturer’s website. Look for a “Support” or “Downloads” section on the website, and search for your specific audio device model. Once you find the correct driver, download it to your computer.
After selecting the folder with the downloaded driver, click “Next” and Windows 11 will install the updated audio driver. Once the installation is complete, restart your computer to apply the changes.
Visiting the manufacturer’s website is a crucial step in updating audio drivers on Windows 11. It ensures that you have the most compatible and up-to-date drivers for your audio device, which can improve sound quality and resolve any issues you may be experiencing.
Search for Your Audio Device Model
Before you can update your audio drivers on Windows 11, you need to know the model of your audio device. This information is crucial as it will help you find the correct and latest drivers for your specific device.
To search for your audio device model, follow these steps:
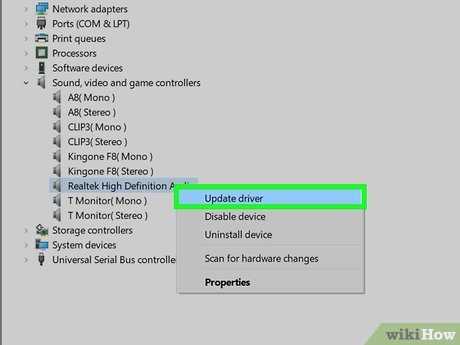
- Open Device Manager: Press the Windows key + X on your keyboard and select “Device Manager” from the menu.
- Expand the “Sound, video, and game controllers” category: In the Device Manager window, locate and click on the arrow next to the “Sound, video, and game controllers” category to expand it.
- Find your audio device: Look for your audio device in the expanded list. It may be listed as “Realtek High Definition Audio,” “Intel Display Audio,” or something similar.
- Note down the model name: Once you have found your audio device, right-click on it and select “Properties.” In the Properties window, go to the “Details” tab and select “Hardware Ids” from the Property dropdown menu. The model name of your audio device will be listed in the Value box.
Now that you have the model name of your audio device, you can proceed to the next step of updating your audio drivers on Windows 11.
Download the Compatible Driver
Before you can update your audio drivers on Windows 11, you need to download the compatible driver for your audio device. Here’s how:
- Identify the audio device you have on your computer. You can do this by going to the Device Manager. Right-click on the Start button and select “Device Manager” from the menu.
- In the Device Manager window, expand the “Sound, video, and game controllers” category. This will display the audio devices installed on your computer.
- Right-click on the audio device you want to update and select “Properties” from the context menu.
- In the Properties window, go to the “Driver” tab and click on the “Update Driver” button.
- Choose the option to “Search automatically for updated driver software”. Windows will then search for the latest driver for your audio device online.
- If Windows finds a compatible driver, it will automatically download and install it for you. If not, you will need to manually download the driver from the manufacturer’s website.
- Visit the manufacturer’s website and navigate to the support or downloads section. Look for the driver that is compatible with your audio device and download it to your computer.
- Once the driver is downloaded, double-click on the installer file and follow the on-screen instructions to install the driver.
- After the driver is installed, restart your computer to apply the changes.
By following these steps, you can easily download the compatible driver for your audio device and update it on Windows 11. This will ensure that you have the latest driver installed, which can improve the audio quality and performance on your computer.