
If you’re looking to remove Cortana from your taskbar, you’ve come to the right place. Cortana, Microsoft’s virtual assistant, can be a helpful tool for some, but for others, it can be a distraction or an annoyance. Luckily, removing Cortana from your taskbar is a relatively simple process that can be done in just a few steps.
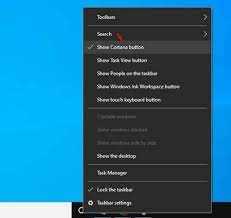
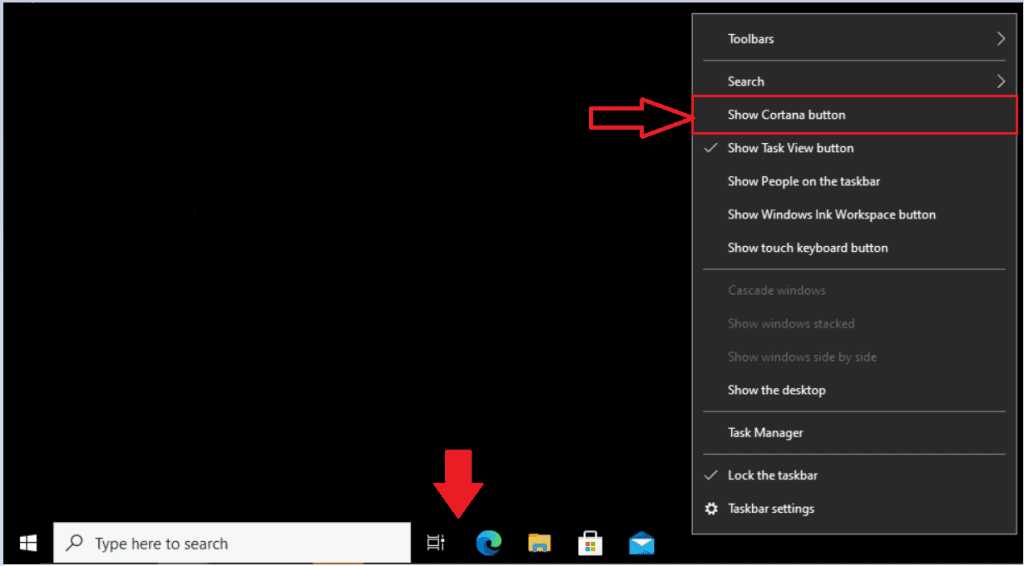
The first step to remove Cortana from your taskbar is to right-click on an empty space on the taskbar. This will bring up a context menu with several options. Look for the option that says “Cortana” or “Search” and hover your mouse over it. This will bring up a sub-menu with additional options.
Next, click on the option that says “Hidden” or “Show Cortana icon”. This will toggle the visibility of the Cortana icon on your taskbar. If the option currently says “Hidden”, click on it to show the Cortana icon. If it says “Show Cortana icon”, click on it to hide the icon.
Once you’ve made your selection, Cortana will either be hidden from your taskbar or the icon will be displayed, depending on your preference. Keep in mind that even if you hide the Cortana icon, you can still access Cortana by clicking on the Windows Start button and typing in your search query.
That’s it! You’ve successfully removed Cortana from your taskbar. If you ever change your mind and want to bring Cortana back, simply follow the same steps and toggle the visibility of the Cortana icon. Now you can enjoy a clutter-free taskbar without the distraction of Cortana.
Section 1: Disabling Cortana
If you want to remove Cortana from the taskbar, follow these step-by-step instructions:
- Right-click on the taskbar to open the context menu.
- Hover over the “Cortana” option in the menu.
- In the sub-menu that appears, click on the “Hidden” option.
- Cortana will now be removed from the taskbar.
By following these simple steps, you can easily remove Cortana from the taskbar and free up space for other icons and shortcuts. This can be especially useful if you don’t use Cortana or prefer to have a cleaner taskbar.
Accessing Cortana Settings
To remove Cortana from the taskbar, you will need to access the Cortana settings. Here is a step-by-step guide on how to do it:
- Right-click on an empty space on the taskbar.
- From the context menu that appears, select “Cortana”.
- A sub-menu will open with various options.
- Click on “Hidden” to remove Cortana from the taskbar.
By following these steps, you can easily remove Cortana from the taskbar and free up space for other icons or shortcuts. Remember that this will only remove Cortana from the taskbar, and it will still be accessible through other means if needed.
Turning off Cortana
If you want to remove Cortana from your taskbar, here’s how you can do it:
Step 1: Right-click on an empty space on your taskbar.
Step 2: From the context menu that appears, hover your mouse over the “Cortana” option.
Step 3: A sub-menu will appear. Click on the “Hidden” option to remove Cortana from your taskbar.
Step 4: Cortana will now be removed from your taskbar, giving you more space and a cleaner look.
Note: Turning off Cortana will disable its voice assistant features, but you can still use the search bar to search for files and applications on your computer.
By following these simple steps, you can easily remove Cortana from your taskbar and customize your Windows experience to your liking.
Verifying Cortana is Disabled

After following the steps mentioned above on how to remove Cortana from the taskbar, it is important to verify that Cortana is indeed disabled. Here’s how you can check:
- Right-click on the taskbar and select “Taskbar settings” from the menu.
- In the settings window, click on the “Taskbar” tab on the left-hand side.
- Scroll down and look for the “Cortana” section.
- If Cortana is disabled, you should see an option that says “Hidden” or “Off” under the “Cortana” section.
- If Cortana is still enabled, you can click on the toggle switch to turn it off.
By following these steps, you can ensure that Cortana is successfully removed from the taskbar and disabled on your Windows device. This will prevent Cortana from running in the background and using system resources.
Section 2: Removing Cortana from Taskbar

If you find Cortana to be more of a nuisance than a helpful assistant, you may want to remove it from your taskbar. Fortunately, removing Cortana from the taskbar is a simple process that can be done in just a few steps.
To remove Cortana from your taskbar, follow these steps:
- Right-click on an empty space on your taskbar to open the context menu.
- Hover your mouse over the “Cortana” option in the context menu.
- In the sub-menu that appears, click on the “Hidden” option.
Once you have completed these steps, Cortana will no longer be visible on your taskbar. However, it is important to note that Cortana will still be accessible through the Start menu or by using the search bar in the taskbar.
If you ever change your mind and want to bring Cortana back to your taskbar, simply follow the same steps outlined above, but select the “Show Cortana button” option instead of “Hidden” in the sub-menu.
By removing Cortana from your taskbar, you can declutter your desktop and have a more streamlined workspace. Whether you prefer to use Cortana or not, the choice is now in your hands.


