Creating a copy of a document is a common task when working with Word. Whether you want to preserve the original document or make changes without affecting the original, making a copy is a simple and efficient solution. In this step-by-step guide, we will walk you through the process of making a copy of a Word document.
Step 1: Open the Document
To begin, open the Word document that you want to make a copy of. You can do this by navigating to the location where the document is saved and double-clicking on it. The document will open in the Word application, ready for you to work with.
Step 2: Save the Document with a New Name
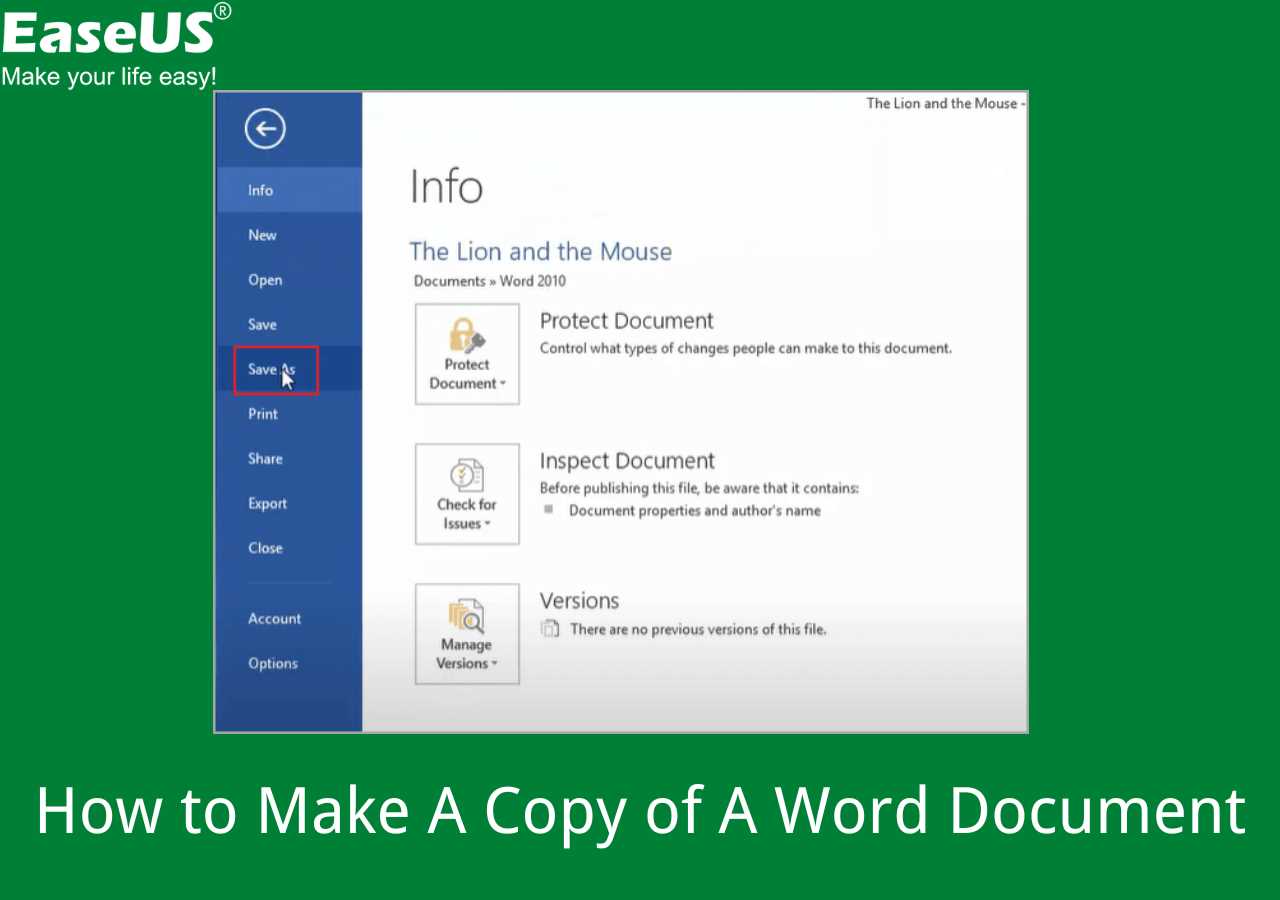
Once the document is open, go to the “File” menu at the top left corner of the Word application. Click on “Save As” to open the save dialog box. In the dialog box, choose the location where you want to save the copy of the document and enter a new name for the copy. Make sure to choose a name that clearly indicates it is a copy of the original document.
Step 3: Make any Necessary Changes
Now that you have made a copy of the document, you can make any necessary changes without affecting the original. This is particularly useful if you want to experiment with different formatting, edit the content, or collaborate with others without altering the original document. Feel free to make any changes you need to the copy.
Step 4: Save the Changes
Once you have made the desired changes to the copy of the document, it’s important to save your work. Go to the “File” menu and click on “Save” or use the shortcut Ctrl+S. This will save the changes you made to the copy of the document, ensuring that your work is preserved.
By following these simple steps, you can easily make a copy of a Word document and work on it without affecting the original. This allows you to experiment, collaborate, and make changes with confidence, knowing that the original document remains intact. Start making copies of your Word documents today and enjoy the flexibility and peace of mind it brings!
Step 1: Open the Word Document
To make a copy of a Word document, you first need to open the document you want to copy. Here’s how:
- Launch Microsoft Word on your computer.
- Click on the “File” tab at the top left corner of the screen.
- From the drop-down menu, select “Open” to browse for the document you want to copy.
- Navigate to the location where the document is saved.
- Select the document by clicking on it once.
- Click on the “Open” button to open the document.
Once the document is open, you can proceed to the next step to make a copy of it.
Locate the Word Document on Your Computer

To make a copy of a Word document, you first need to locate the original document on your computer. This is the document that you want to create a copy of.
Open the file explorer on your computer and navigate to the folder where the Word document is saved. You can do this by clicking on the “File Explorer” icon on your taskbar or by pressing the “Windows key + E” on your keyboard.
Once you have opened the file explorer, you can use the search bar at the top right corner of the window to search for the document by name. Simply type in the name of the Word document and press enter. The file explorer will then display a list of search results that match your search query.
Alternatively, you can manually navigate through the folders on your computer to find the Word document. Click on each folder to open it and look for the document within the folder. If you have organized your files into specific folders, it may be easier to locate the document by following the folder structure.
Once you have located the Word document, you can proceed to make a copy of it. This will allow you to have a duplicate of the original document without making any changes to the original file.
Double-click on the Word Document to Open It

Once you have learned how to make a copy of a Word document, the next step is to open the document. Opening a Word document is a simple process that can be done with just a few clicks.
To open a Word document, locate the file on your computer. This can be done by navigating to the folder where the document is saved. Once you have found the document, simply double-click on it to open it.
When you double-click on the Word document, it will open in the Microsoft Word application. If you have multiple versions of Word installed on your computer, make sure to open the document in the version you want to use.
Once the document is open, you can begin editing or making changes to it. You can also save a new copy of the document by going to the “File” menu and selecting “Save As”. This will allow you to save a duplicate copy of the document with a different name or in a different location.
Opening a Word document is a simple and straightforward process. By double-clicking on the document, you can quickly access and begin working on your copy of the Word document.
Step 2: Save the Word Document as a Copy

Once you have made all the necessary changes to your Word document, it’s important to save it as a copy to avoid overwriting the original file. Follow these steps to save a copy of your document:
- Click on the “File” tab located in the top left corner of the Word window.
- Select the “Save As” option from the drop-down menu. This will open the “Save As” dialog box.
- Choose a location on your computer where you want to save the copy of the document. You can select a different folder or keep it in the same folder as the original file.
- Enter a new name for the copy of the document in the “File name” field. Make sure to choose a unique and descriptive name that will help you easily identify the copy.
- Click on the “Save” button to save the copy of the document.
By following these steps, you will have successfully created a copy of your Word document. This copy will contain all the changes you made, while the original document remains intact. It’s always a good practice to save a copy of your work to ensure that you have a backup in case anything goes wrong.
Click on the “File” Menu in the Top Left Corner

To make a copy of a Word document, you first need to open the document in Microsoft Word. Once you have the document open, you can easily create a copy by following a few simple steps. The first step is to click on the “File” menu, which is located in the top left corner of the Word window.
When you click on the “File” menu, a drop-down menu will appear with various options. Look for the option that says “Save As” or “Save a Copy”. This option allows you to save a duplicate copy of the document with a different name or in a different location.
After selecting the “Save As” or “Save a Copy” option, a new window will open where you can choose the location and name for the copied document. You can select a different folder or directory to save the copy in, and you can also give it a new name to differentiate it from the original document.
Once you have chosen the location and name for the copied document, click on the “Save” button to create the copy. The copied document will now be saved in the specified location with the new name you provided.
Creating a copy of a Word document is a simple process that allows you to preserve the original document while making changes or edits to the copied version. By following these steps, you can easily make a copy of a Word document and have it saved in a separate file.
Select the “Save As” Option from the Dropdown Menu
Once you have opened the Word document that you want to make a copy of, the next step is to select the “Save As” option from the dropdown menu. This option allows you to save a new copy of the document with a different name or in a different location.
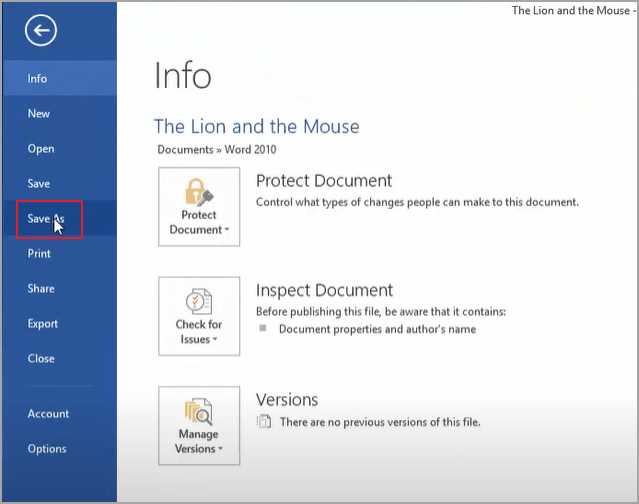
To access the “Save As” option, click on the “File” tab at the top left corner of the Word window. This will open a dropdown menu with various options. Look for the “Save As” option in the menu and click on it.
After clicking on the “Save As” option, a new window will appear where you can specify the name and location for the copied document. You can choose to keep the same file format or select a different one, depending on your needs.
Make sure to choose a descriptive name for the copied document so that you can easily identify it later. You can also select a different folder or directory to save the copied document in, if desired.
Once you have entered the desired name and location for the copied document, click on the “Save” button to create the copy. The copied document will now be saved as a separate file, allowing you to make any changes or edits without affecting the original document.
By following these steps, you can easily make a copy of a Word document and save it with a different name or in a different location. This can be useful for creating backups, sharing documents with others, or working on different versions of the same document.
Choose a Location to Save the Copy of the Document
Once you have decided to make a copy of your Word document, the next step is to choose a location where you want to save it. This location can be on your computer’s hard drive, an external storage device, or even a cloud storage service.
When choosing a location, consider factors such as accessibility and security. If you want to easily access the copy of the document, saving it on your computer’s hard drive or an external storage device would be a good option. On the other hand, if you want to ensure the safety of the copy and have the ability to access it from anywhere, saving it on a cloud storage service like Google Drive or Dropbox would be a better choice.
To choose a location, follow these steps:
- Click on the “File” tab in the top left corner of the Word window.
- Select “Save As” from the drop-down menu.
- In the “Save As” dialog box, navigate to the desired location by clicking on the folders or drives listed on the left-hand side.
- Once you have reached the desired location, you can either create a new folder to save the copy in or select an existing folder.
- Enter a name for the copy of the document in the “File name” field.
- Click the “Save” button to save the copy of the document in the chosen location.
By following these steps, you can easily choose a location to save the copy of your Word document and ensure that it is stored in a place that suits your needs.
Enter a New Name for the Copy of the Document

Once you have learned how to make a copy of a Word document, the next step is to enter a new name for the copy. This is an important step because it allows you to differentiate between the original document and the copy.
To enter a new name for the copy of the document, follow these steps:
- Open the copied document in Microsoft Word.
- Click on the “File” tab in the top left corner of the screen.
- Select the “Save As” option from the drop-down menu.
- A new window will appear, allowing you to choose the location where you want to save the copy of the document.
- In the “File name” field, enter a new name for the copy of the document. Make sure to choose a name that is descriptive and easy to remember.
- Click on the “Save” button to save the copy of the document with the new name.
By entering a new name for the copy of the document, you can easily identify it in your files and avoid confusion with the original document. This step is especially helpful if you plan to make multiple copies of the same document or if you want to make changes to the copy without affecting the original.
Note: It is important to remember that when you make a copy of a Word document, the content of the copy will be the same as the original. Any changes you make to the copy will not affect the original document.
Now that you know how to enter a new name for the copy of a Word document, you can confidently make copies of your important files and keep them organized.