
Welcome to our tutorial on how to install Windows 11 on your PC! If you’re looking to upgrade your system to the latest version of Windows, you’ve come to the right place. In this step-by-step guide, we will walk you through the process of downloading and installing Windows 11 on your PC.
Windows 11 is the latest operating system from Microsoft, offering a range of exciting new features and improvements over its predecessor. Whether you’re a tech enthusiast or just looking to stay up to date with the latest software, upgrading to Windows 11 is a great choice.
Before we begin, it’s important to note that not all PCs will be able to run Windows 11. Microsoft has introduced new system requirements for this version, so it’s essential to check if your PC meets the criteria. If it does, then let’s get started on the installation process!
Preparing for Installation
Before you can install Windows 11 on your PC, it is important to ensure that your system meets the necessary requirements. This will help ensure a smooth installation process and optimal performance of the operating system.
First, check if your PC meets the minimum system requirements for Windows 11. These include having a compatible processor, at least 4 GB of RAM, and 64 GB of storage. Additionally, your PC should have a DirectX 12 compatible graphics card and a display with a resolution of at least 720p.
If your PC meets the requirements, you can proceed with the installation. Start by downloading the Windows 11 installation files from the official Microsoft website. Make sure to download the correct version for your PC, such as the 32-bit or 64-bit version.
Once the download is complete, you can follow a step-by-step tutorial to install Windows 11 on your PC. This tutorial will guide you through the installation process, including creating a bootable USB drive or DVD, and configuring the installation settings.
Before you begin the installation, it is recommended to back up any important files and data on your PC. This will help prevent any data loss during the installation process.
By properly preparing for the installation of Windows 11 on your PC, you can ensure a successful and hassle-free upgrade to the latest operating system.
Check System Requirements

Before you proceed with the installation or upgrade of Windows 11 on your PC, it is important to ensure that your system meets the necessary requirements. This will ensure a smooth and successful installation process.
To install Windows 11, your PC must meet the following minimum requirements:
| Processor | 1 gigahertz (GHz) or faster with 2 or more cores on a compatible 64-bit processor or System on a Chip (SoC) |
|---|---|
| RAM | 4 gigabytes (GB) or more |
| Storage | 64 GB or more available storage |
| Display | 720p resolution or higher. A display with a diagonal screen size of 9 inches or larger is required |
| Graphics Card | DirectX 12 compatible graphics / WDDM 2.x |
| Internet Connection | Internet connectivity is necessary to download and install Windows 11 |
| Other Requirements | Microsoft account and internet connectivity for setup and updates |
It is important to note that these are the minimum requirements, and for the best experience, it is recommended to have a more powerful system. Additionally, some features in Windows 11 may require specific hardware or software.
Before proceeding with the installation, make sure to check your PC’s specifications and ensure that it meets the requirements mentioned above. This will help ensure a smooth and hassle-free installation process.
Backup Your Data

Before proceeding with the installation of Windows 11 on your PC, it is crucial to backup your data to ensure that you don’t lose any important files or documents. Upgrading or installing a new operating system can sometimes lead to data loss or corruption, so it’s always better to be safe than sorry.
To backup your data, you can follow these steps:
- Identify the important files: Take some time to identify the files and folders that you want to backup. This may include documents, photos, videos, music, and any other personal files that you consider valuable.
- Choose a backup method: There are several ways to backup your data, such as using an external hard drive, cloud storage services, or even creating a system image. Choose the method that suits your needs and preferences.
- External hard drive: If you have an external hard drive, you can simply connect it to your PC and copy the important files to the drive. Make sure to organize the files in a way that makes it easy to restore them later.
- Cloud storage services: There are many cloud storage services available, such as Google Drive, Dropbox, or OneDrive. Sign up for an account and upload your important files to the cloud. This way, you can access them from any device with an internet connection.
- Create a system image: Another option is to create a system image, which is an exact copy of your entire Windows system. This can be done using built-in tools like Windows Backup and Restore or third-party software. Creating a system image allows you to restore your entire system, including installed programs and settings, in case anything goes wrong during the installation process.
Remember to double-check your backup to ensure that all your important files are included. Once you have successfully backed up your data, you can proceed with the Windows 11 installation tutorial.
Create a Bootable USB Drive
To install Windows 11 on your PC, you will need to create a bootable USB drive. This tutorial will guide you through the process step by step.
First, you will need to download the Windows 11 installation files from the official Microsoft website. Make sure to choose the correct version for your PC.
Once the download is complete, insert a USB drive with at least 8GB of storage into your computer. Keep in mind that all data on the USB drive will be erased, so make sure to back up any important files.
Next, open the downloaded Windows 11 installation files and locate the “MediaCreationTool.exe” file. Right-click on the file and select “Run as administrator”. This will launch the Windows 11 Media Creation Tool.
Follow the on-screen instructions and select “Create installation media (USB flash drive, DVD, or ISO file) for another PC”. Click “Next” to proceed.
On the next screen, select the language, edition, and architecture that you want to install. Make sure to choose the same options as your current Windows system or the system you want to upgrade.
After selecting the options, choose the “USB flash drive” option and click “Next”. The tool will now format the USB drive and copy the Windows 11 installation files to it. This process may take some time.
Once the process is complete, you will have a bootable USB drive with the Windows 11 installation files. You can now use this USB drive to install or upgrade your Windows system.
Note: Before proceeding with the installation, make sure to backup all your important files and settings. Installing a new operating system may result in data loss.
By following these steps, you can easily create a bootable USB drive for installing Windows 11 on your PC.
Installing Windows 11
To install Windows 11 on your PC, you will need to follow a step-by-step process. Before you begin, make sure your system meets the minimum requirements for Windows 11.
| Requirements | |
|---|---|
| Processor | 1 gigahertz (GHz) or faster with 2 or more cores on a compatible 64-bit processor |
| RAM | 4 gigabytes (GB) or more |
| Storage | 64 GB or more available storage |
| Graphics Card | DirectX 12 compatible graphics / WDDM 2.x |
| Display | High definition (720p) display, 9″ or greater diagonal, 8 bits per color channel |
| Internet Connection | Internet connectivity is necessary to perform updates and to download and take advantage of some features |
Once you have confirmed that your PC meets the requirements, you can proceed with the installation process. Here are the steps to install Windows 11:
- Download the Windows 11 installation file from the official Microsoft website.
- Open the downloaded file and follow the on-screen instructions to start the installation process.
- Choose the installation type (upgrade or custom) based on your preference.
- Read and accept the license terms.
- Select the partition where you want to install Windows 11.
- Wait for the installation process to complete. This may take some time.
- Once the installation is finished, your PC will restart.
- Follow the on-screen instructions to set up Windows 11, including personalizing your settings and signing in with your Microsoft account.
- After completing the setup, you can start using Windows 11 on your PC.
By following these steps, you will be able to successfully install Windows 11 on your PC and enjoy its new features and improvements.
Insert the Bootable USB Drive

Before you can install Windows 11 on your PC, you will need to have a bootable USB drive. This drive should meet the minimum requirements for installing the new operating system. If you don’t have a bootable USB drive, you can follow our tutorial on how to create one.
Once you have your bootable USB drive ready, you can proceed with the installation process. Make sure your PC is turned off and then insert the bootable USB drive into a USB port on your computer.
Next, turn on your PC and enter the BIOS settings. You may need to press a specific key (such as F2 or Del) during the startup process to access the BIOS. Once you are in the BIOS settings, navigate to the “Boot” tab and set the boot priority to prioritize the USB drive. Save the changes and exit the BIOS settings.
Now, your PC will boot from the USB drive and you will see the Windows 11 installation screen. Follow the on-screen instructions to proceed with the installation. You may need to select your language, region, and keyboard layout.
After that, you will be prompted to enter your product key. If you have a valid Windows 11 product key, enter it. If not, you can choose to skip this step and activate Windows later.
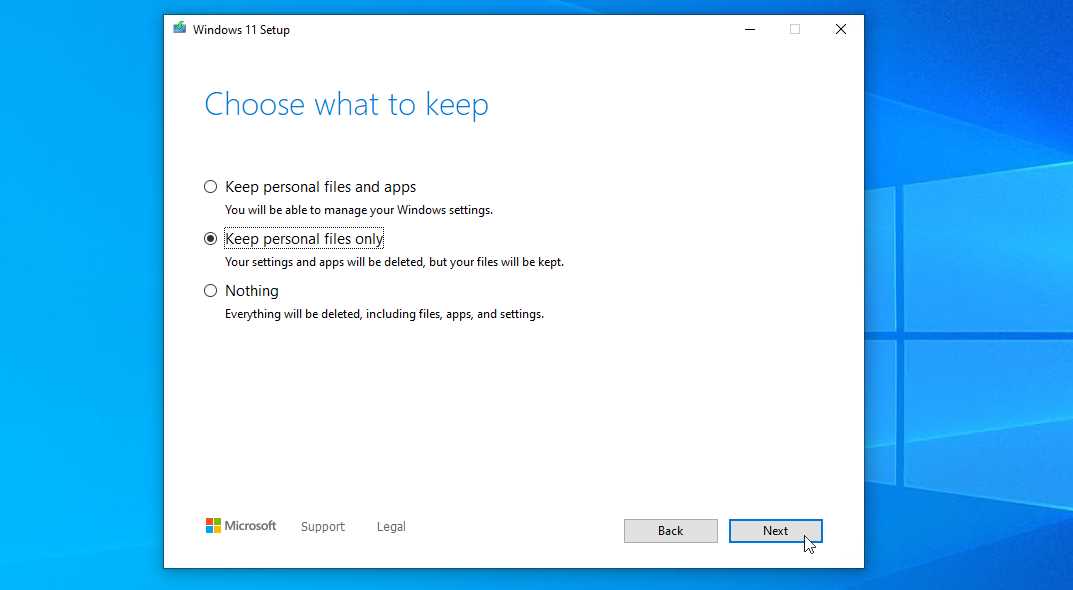
Finally, you will need to choose the installation type. You can either perform a clean install or upgrade your existing Windows system. If you choose to upgrade, make sure you have backed up all your important files and settings.
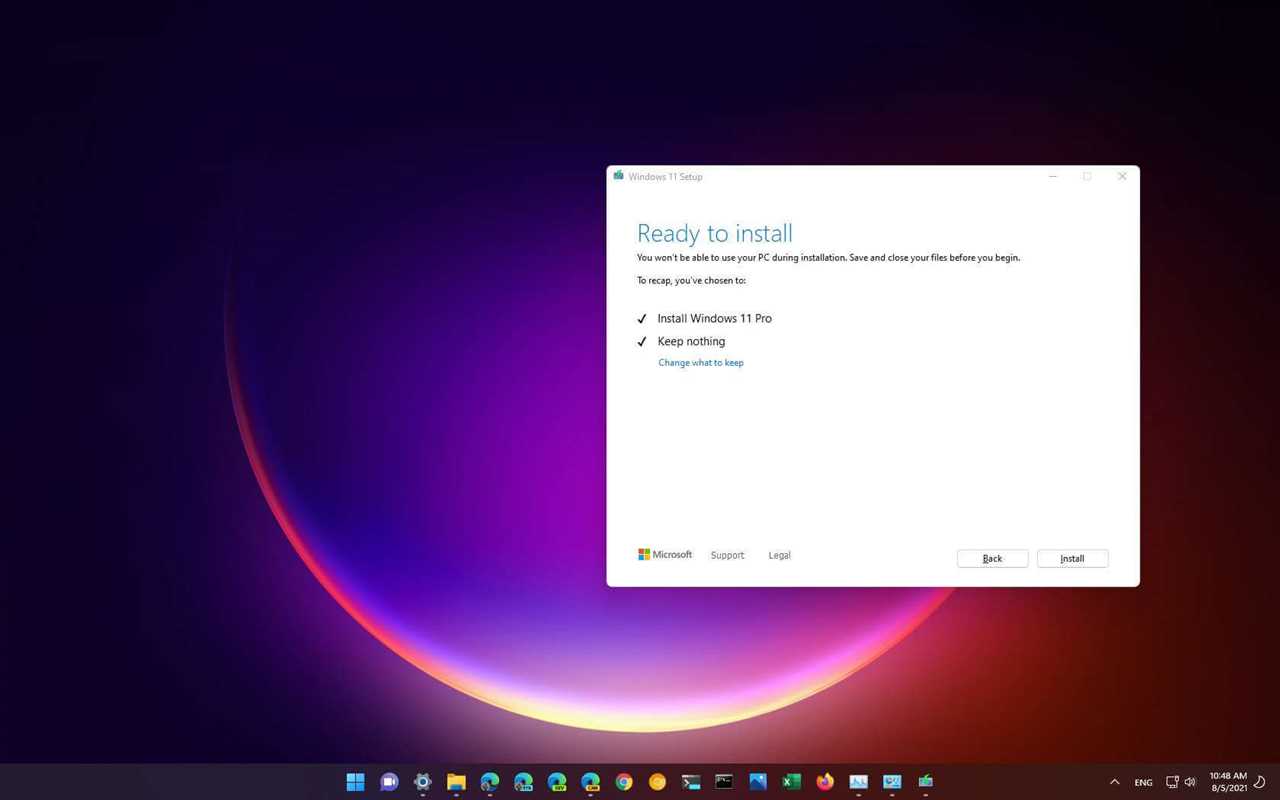
Once you have made your selection, click on the “Install” button and the installation process will begin. It may take some time for the installation to complete, so be patient.
Once the installation is finished, your PC will restart and you will be greeted with the new Windows 11 login screen. Enter your credentials and enjoy the new features and improvements of Windows 11!
Start the Installation Process
Before you begin the installation process, make sure your PC meets the minimum requirements for Windows 11. This includes having a compatible processor, at least 4GB of RAM, and 64GB of storage. Additionally, your system should support DirectX 12 and have a display with a resolution of at least 720p.
To install Windows 11 on your PC, you can either perform a clean install or upgrade from Windows 10. If you choose to upgrade, you can download the Windows 11 installation files from the official Microsoft website. Make sure to back up any important files before proceeding with the installation.
Once you have the Windows 11 installation files, you can start the installation process. Insert the installation media or bootable USB drive into your PC and restart it. Press the necessary key to enter the boot menu and select the installation media as the boot device.
Follow the on-screen instructions to begin the installation. You may be prompted to choose your language, time zone, and keyboard layout. Make sure to select the correct options for your preferences.
Next, you will need to accept the license terms and conditions. Read through the terms carefully and click on the “Accept” button to proceed with the installation.
During the installation process, Windows 11 will check your PC for compatibility and perform any necessary updates. This may take some time, so be patient and do not interrupt the process.
Once the updates are complete, you will be prompted to choose whether you want to perform a clean install or upgrade from Windows 10. Select the appropriate option and click on the “Next” button.
Follow the remaining on-screen instructions to complete the installation. Your PC will restart several times during the process, so make sure not to turn it off or disconnect any devices.
After the installation is complete, you can personalize your Windows 11 settings and set up your user account. You will also have the option to transfer your files and settings from your previous Windows installation.
Congratulations! You have successfully installed Windows 11 on your PC. Enjoy the new features and improvements that come with this latest version of Windows.

