Are you ready to upgrade your operating system to the latest version? Windows 11 is here, and it’s packed with exciting new features and improvements. In this step-by-step guide, we will show you how to download and install Windows 11 on your PC.
Step 1: Check System Requirements
Before you begin, make sure your PC meets the minimum system requirements for Windows 11. This includes having a compatible processor, at least 4GB of RAM, and 64GB of storage. You can also use the PC Health Check tool provided by Microsoft to check if your device is eligible for the upgrade.
Step 2: Download Windows 11
Once you’ve confirmed that your PC is compatible, it’s time to download Windows 11. Visit the official Microsoft website and navigate to the Windows 11 download page. Click on the “Download now” button to start the download. Make sure you have a stable internet connection as the download size can be quite large.
Step 3: Create Installation Media
After the download is complete, you will need to create installation media. This can be done using a USB flash drive or a DVD. Insert the USB flash drive or DVD into your PC and run the Windows 11 Media Creation Tool. Follow the on-screen instructions to create the installation media.
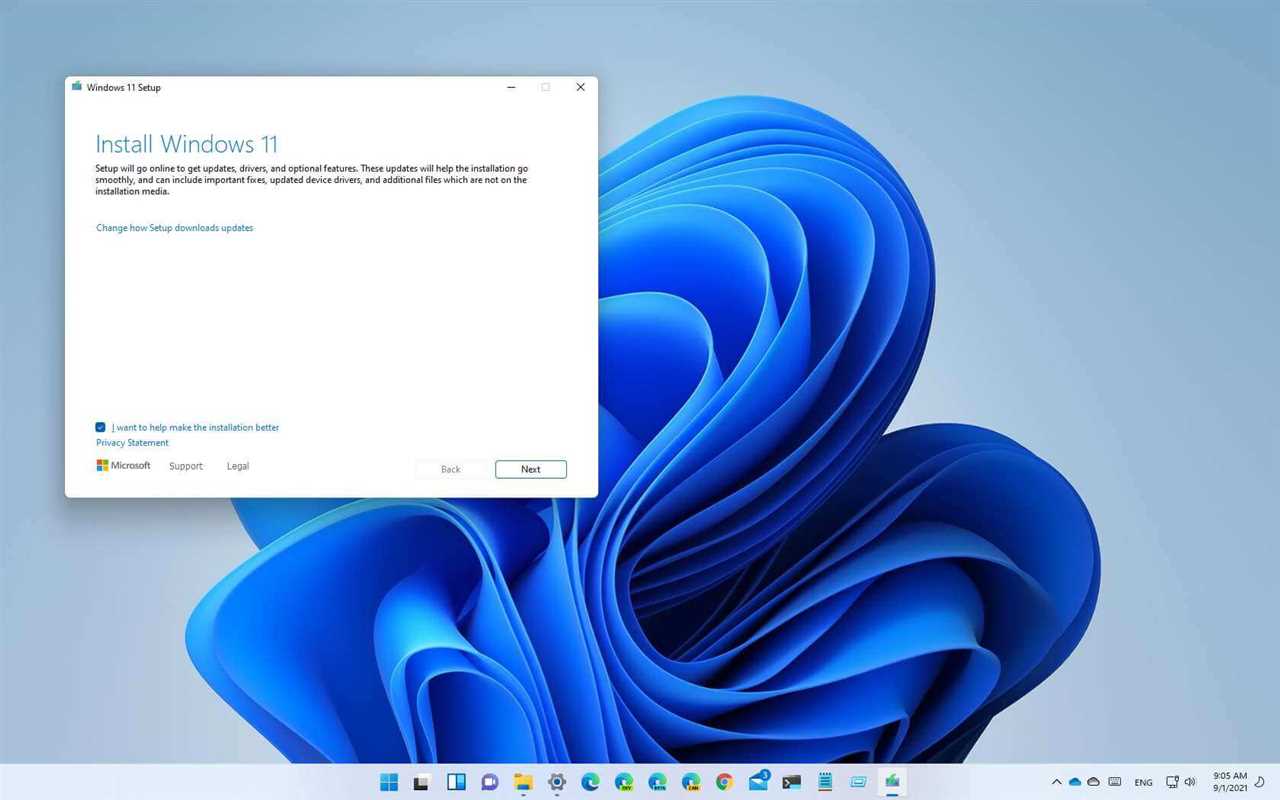
Step 4: Install Windows 11
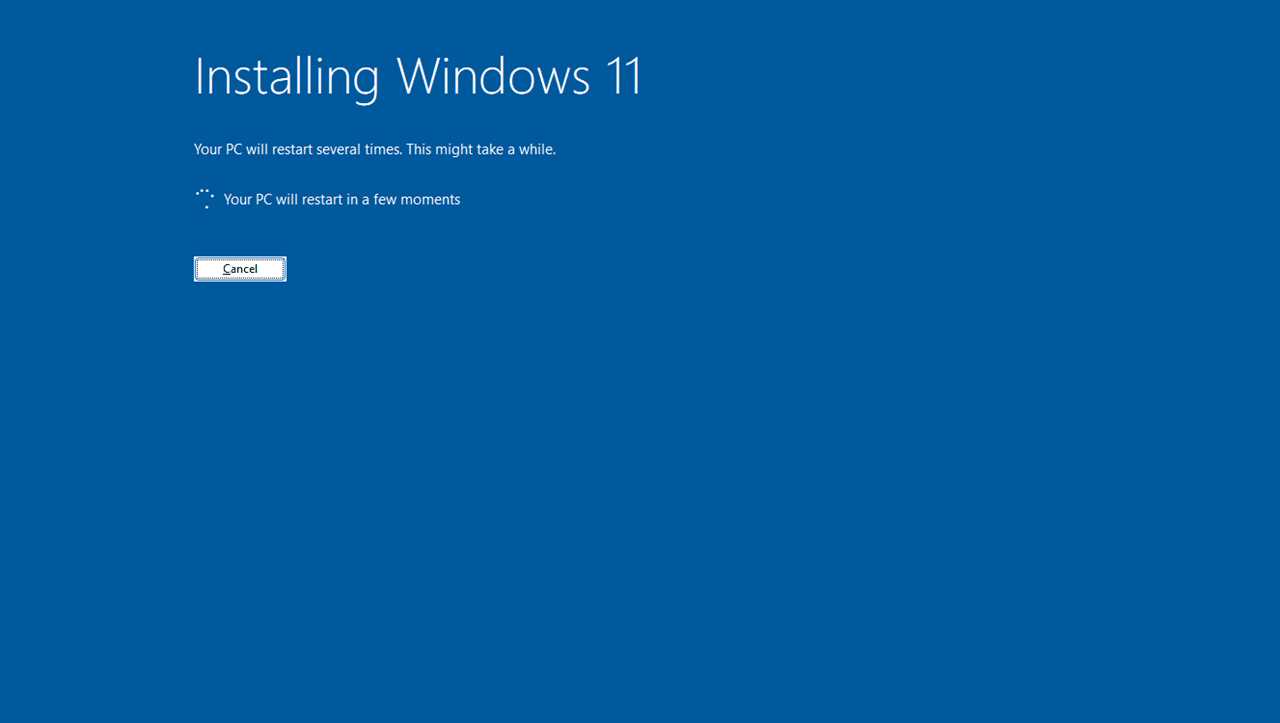
Once you have the installation media ready, restart your PC and boot from the USB flash drive or DVD. Follow the prompts to install Windows 11. Make sure to choose the correct language, time zone, and keyboard layout during the installation process. You may also need to enter your product key if prompted.
Step 5: Set Up Windows 11
After the installation is complete, you will need to set up Windows 11. This includes signing in with your Microsoft account, choosing privacy settings, and customizing your desktop. Take some time to explore the new features and settings of Windows 11.
Congratulations! You have successfully installed Windows 11 on your PC. Enjoy the new and improved operating system!
Preparing Your PC for Windows 11 Installation

Before you can install Windows 11 on your PC, it’s important to ensure that your system meets the necessary requirements. Here’s a step-by-step guide on how to prepare your PC for the installation:
- Check the system requirements: Visit the official Windows website to review the minimum system requirements for Windows 11. Make sure your PC meets these requirements to ensure a smooth installation process.
- Backup your data: It’s always a good idea to back up your important files and documents before performing any major system upgrade. This will help you avoid any potential data loss during the installation process.
- Download the Windows 11 ISO: Visit the official Windows website and download the Windows 11 ISO file. Make sure to download the correct version based on your system architecture (32-bit or 64-bit).
- Create a bootable USB drive: Once the ISO file is downloaded, you’ll need to create a bootable USB drive. There are several tools available online that can help you create a bootable USB drive from the ISO file.
- Backup your current operating system: Before proceeding with the installation, it’s recommended to create a backup of your current operating system. This will allow you to revert back to your previous system if needed.
- Disable secure boot: If your PC has secure boot enabled, you’ll need to disable it in the BIOS settings before installing Windows 11. Refer to your PC’s manual or manufacturer’s website for instructions on how to disable secure boot.
- Restart your PC and boot from the USB drive: Once you’ve created the bootable USB drive and disabled secure boot, restart your PC and boot from the USB drive. This will initiate the Windows 11 installation process.
- Follow the on-screen instructions: During the installation process, you’ll be prompted to select your language, region, and other preferences. Follow the on-screen instructions to complete the installation.
- Activate Windows 11: After the installation is complete, you’ll need to activate Windows 11 using a valid product key. If you don’t have a product key, you can choose to activate Windows 11 later.
- Install necessary drivers and updates: Once Windows 11 is installed, make sure to install any necessary drivers and updates to ensure optimal performance and compatibility with your hardware.
By following these steps, you’ll be well-prepared to install Windows 11 on your PC and enjoy the new features and improvements of the latest operating system upgrade.
Check System Requirements

Before you can upgrade to or install Windows 11, it’s important to check if your PC meets the necessary system requirements. This will ensure that your device is capable of running the new operating system smoothly.
To download and install Windows 11, your PC must meet the following minimum requirements:
| Processor | 1 gigahertz (GHz) or faster with 2 or more cores on a compatible 64-bit processor or System on a Chip (SoC) |
| RAM | 4 gigabytes (GB) or more |
| Storage | 64 GB or more available storage |
| Graphics Card | DirectX 12 compatible graphics / WDDM 2.x |
| Display | High definition (720p) display that is greater than 9″ diagonally, 8 bits per color channel |
| Internet Connection | Internet connectivity is necessary to perform updates and to download and install Windows 11 |
| Other Requirements | Microsoft account and internet connectivity for initial setup |
It’s important to note that these are the minimum requirements, and for the best experience, it is recommended to have a PC that exceeds these specifications.
By checking your system requirements, you can ensure a smooth and successful installation of Windows 11 on your PC.
Backup Your Data

Before you proceed with the installation of Windows 11, it is crucial to back up all your important data. This step ensures that you have a copy of your files in case anything goes wrong during the installation process.
To back up your data, you can follow these steps:
| Step 1: | Open the File Explorer on your Windows operating system. |
| Step 2: | Create a new folder on an external storage device, such as a USB drive or an external hard drive. |
| Step 3: | Select the files and folders that you want to back up. |
| Step 4: | Right-click on the selected files and folders, and choose the “Copy” option. |
| Step 5: | Navigate to the newly created folder on the external storage device. |
| Step 6: | Right-click inside the folder and choose the “Paste” option to copy the files and folders. |
| Step 7: | Wait for the files to finish copying to the external storage device. |
| Step 8: | Once the backup is complete, safely eject the external storage device from your Windows system. |
By following these steps, you can ensure that your important files and folders are safely backed up before you proceed with the Windows 11 installation. This way, even if something goes wrong during the upgrade process, you can restore your data and continue using your system without any loss.
Update Device Drivers
One crucial step in the process of installing or upgrading to Windows 11 is updating your device drivers. Device drivers are software programs that allow your operating system to communicate with hardware devices, such as your graphics card, sound card, or network adapter.
Outdated or incompatible device drivers can cause various issues, including system instability, performance problems, and compatibility issues with the new operating system. Therefore, it is essential to update your device drivers to ensure a smooth and optimal Windows 11 experience.
To update your device drivers, you can follow these steps:
- Identify the devices: Start by identifying the devices that require driver updates. You can do this by checking the Device Manager in Windows. Open the Start menu, search for “Device Manager,” and click on the top result. In the Device Manager window, look for any devices with a yellow exclamation mark or a red X, as these indicate driver issues.
- Download the latest drivers: Once you have identified the devices that need driver updates, visit the manufacturer’s website for each device. Look for the “Support” or “Downloads” section and search for the latest drivers compatible with Windows 11. Download the drivers to a location on your computer where you can easily access them.
- Install the drivers: After downloading the drivers, navigate to the location where you saved them and double-click on the installation file. Follow the on-screen instructions to install the drivers. In some cases, you may need to restart your computer for the changes to take effect.
- Update drivers automatically: Alternatively, you can use driver update software to automate the process. There are various third-party tools available that can scan your system, identify outdated drivers, and download and install the latest versions for you. This can save you time and ensure that all your drivers are up to date.
By updating your device drivers, you can ensure that your hardware components are fully compatible with Windows 11 and take advantage of any performance improvements or new features offered by the operating system.
Note: It is always recommended to create a system restore point or backup your important files before updating device drivers to avoid any potential issues.
Creating a Bootable USB Drive
Before you can install Windows 11 on your PC, you’ll need to create a bootable USB drive. This will allow you to easily upgrade your operating system and install the latest version of Windows.
To begin, you’ll need to download the Windows 11 operating system. You can do this by visiting the official Microsoft website and following the instructions to download the Windows 11 installation file.
Once you have downloaded the Windows 11 installation file, you’ll need to prepare your USB drive. Make sure you have a USB drive with at least 8GB of storage space available. Insert the USB drive into your computer.
Next, open the Windows 11 installation file that you downloaded earlier. Follow the on-screen instructions to create a bootable USB drive. This process may take some time, so be patient.
Once the bootable USB drive has been created, you can proceed with the installation process. Restart your computer and enter the BIOS settings. Set the USB drive as the primary boot device.
Save the changes and exit the BIOS settings. Your computer will now boot from the USB drive. Follow the on-screen instructions to install Windows 11 on your system.
After the installation is complete, you can remove the USB drive and restart your computer. Your system will now be upgraded to Windows 11, and you can enjoy all the new features and improvements that come with it.
Download Windows 11 ISO

If you’re ready to upgrade your operating system to Windows 11, you’ll need to download the Windows 11 ISO file. The ISO file contains all the necessary files to install Windows 11 on your PC.
Here’s how to download the Windows 11 ISO:
- Go to the official Microsoft website.
- Click on the “Download” button.
- Select the edition of Windows 11 you want to download (Home, Pro, etc.).
- Choose the language and architecture (32-bit or 64-bit) that matches your PC.
- Click on the “Download” button to start the download.
Once the download is complete, you’ll have the Windows 11 ISO file on your computer. You can then use this file to create a bootable USB drive or burn it to a DVD. This will allow you to install Windows 11 on your PC.
Make sure to back up any important files before installing Windows 11, as the installation process will erase all the data on your PC.
Now that you have the Windows 11 ISO file, you’re ready to proceed with the installation process. Follow the step-by-step guide to learn how to install Windows 11 on your PC.
Format USB Drive
Before you can upgrade to Windows 11, you will need to create a bootable USB drive with the installation files. To do this, you will first need to format the USB drive to ensure it is compatible with the Windows 11 installation process.
To format the USB drive, follow these steps:
- Insert the USB drive into your computer.
- Open File Explorer and locate the USB drive.
- Right-click on the USB drive and select “Format” from the context menu.
- In the Format window, choose the file system as “FAT32”.
- Make sure the “Quick Format” option is selected.
- Click on the “Start” button to begin the formatting process.
- Wait for the formatting to complete.
- Once the formatting is finished, you can proceed to download the Windows 11 installation files.
Formatting the USB drive will erase all the data on it, so make sure to back up any important files before proceeding. It is also recommended to use a USB drive with at least 8GB of storage capacity to ensure you have enough space for the Windows 11 installation files.
Now that you have successfully formatted the USB drive, you are ready to install Windows 11 on your PC. Follow the next steps in this guide to learn how to download and install Windows 11.
Create Bootable USB Drive

To install Windows 11 on your PC, you will need to create a bootable USB drive. This will allow you to easily install the operating system on your computer. Here’s how to do it:
- First, you will need to download the Windows 11 ISO file from the official Microsoft website. Make sure to select the correct version for your system.
- Once the ISO file is downloaded, you will need to use a tool like Rufus or the Windows USB/DVD Download Tool to create a bootable USB drive. These tools will guide you through the process and make it easy to create the bootable drive.
- Insert a USB drive with at least 8GB of storage into your computer.
- Open the Rufus or Windows USB/DVD Download Tool and select the ISO file you downloaded.
- Choose the USB drive you inserted as the destination for the bootable drive.
- Click on the “Start” or “Create” button to begin the process of creating the bootable USB drive.
- Wait for the tool to finish creating the bootable drive. This may take a few minutes.
- Once the process is complete, you will have a bootable USB drive with the Windows 11 operating system.
Now you are ready to upgrade your system to Windows 11 using the bootable USB drive. Simply insert the USB drive into your computer, restart it, and follow the on-screen instructions to install the new operating system.