Python is a versatile and powerful programming language that is widely used for web development, data analysis, artificial intelligence, and more. If you are using Linux Mint as your operating system, this step-by-step guide will walk you through the process of installing Python.
Step 1: Open the terminal on your Linux Mint system. You can do this by pressing Ctrl+Alt+T or by searching for “terminal” in the applications menu.
Step 2: Update the package lists by running the following command in the terminal:
sudo apt update
Step 3: Install the necessary packages for building Python from source by running the following command:
sudo apt install build-essential zlib1g-dev libncurses5-dev libgdbm-dev libnss3-dev libssl-dev libreadline-dev libffi-dev libsqlite3-dev wget libbz2-dev
Step 4: Download the latest version of Python from the official website. You can use the following command to download Python 3.9.6:
wget https://www.python.org/ftp/python/3.9.6/Python-3.9.6.tgz
Step 5: Extract the downloaded file by running the following command:
tar -xf Python-3.9.6.tgz
Step 6: Navigate to the extracted directory by running the following command:
cd Python-3.9.6
Step 7: Configure the Python build process by running the following command:
./configure --enable-optimizations
Step 8: Build and install Python by running the following commands:
make
sudo make install
Step 9: Verify that Python has been installed successfully by running the following command:
python3 --version
Congratulations! You have successfully installed Python on your Linux Mint system. You can now start using Python for your programming needs.
Section 1: Preparing for Installation
Before you can install Python on your Linux Mint system, you need to make sure you have the necessary prerequisites in place. Here are the steps to prepare for the installation:
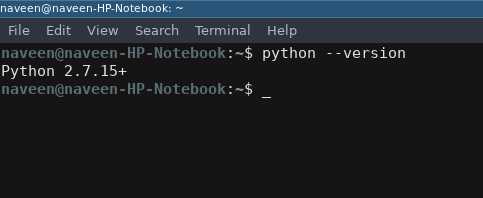
| Step 1: | Check if Python is already installed on your system. Open a terminal and type python --version. If you see a version number, it means Python is already installed. If not, proceed to the next step. |
| Step 2: | Update your system. Open a terminal and run the following commands:
This will ensure that your system is up to date and ready for the installation. |
| Step 3: | Install the necessary dependencies. Python requires certain libraries and tools to function properly. Run the following command in the terminal:
This command will install the required dependencies on your system. |
Once you have completed these steps, you are ready to proceed with the installation of Python on your Linux Mint system. The next section will guide you through the installation process.
Checking the Current Python Version
Before you proceed with the installation of Python on Linux Mint, it’s important to check if Python is already installed on your system and what version it is. This will help you determine if you need to install a newer version or if you can use the existing one.
To check the current Python version on your Linux Mint system, follow these steps:
- Open a terminal by pressing
Ctrl+Alt+Tor by searching for “Terminal” in the applications menu. - Type the following command and press Enter:
- The terminal will display the current Python version installed on your system. For example, it might show something like
Python 3.8.5.
python --versionIf Python is not installed or if you have an older version, you can proceed with the installation process. Otherwise, you can skip the installation steps and start using Python on your Linux Mint system.
Updating the System

Before installing Python on Linux Mint, it is important to update the system to ensure that you have the latest software packages and security updates. Updating the system is a crucial step to ensure a smooth installation process.
To update your Linux Mint system, follow these steps:
- Open the Terminal by pressing Ctrl+Alt+T or by searching for “Terminal” in the applications menu.
- Type the following command and press Enter:
sudo apt updateThis command will update the package lists for upgrades and new package installations.
- Type the following command and press Enter:
sudo apt upgradeThis command will upgrade all the installed packages on your system to their latest versions.
After running these commands, your Linux Mint system will be up to date and ready for the Python installation process.
It is recommended to regularly update your system to ensure that you have the latest security patches and bug fixes. This will help keep your system secure and running smoothly.
Installing Required Dependencies
Before installing Python on Linux Mint, you need to make sure that all the required dependencies are installed. These dependencies are necessary for Python to run smoothly on your system. Here are the steps to install the required dependencies:
- Open the terminal on your Linux Mint system.
- Type the following command to update the package lists:
- After the update is complete, you can install the dependencies by running the following command:
- Wait for the installation to finish. This may take a few minutes.
- Once the installation is complete, you can verify the installation by checking the Python version:
sudo apt updatesudo apt install pythonpython --versionBy following these steps, you will have successfully installed the required dependencies for Python on your Linux Mint system. Now you can proceed with the installation of Python itself.
Section 2: Downloading and Installing Python
Installing Python on Linux Mint is a straightforward process that can be completed in just a few steps. In this section, we will guide you through the process of downloading and installing Python on your Linux Mint system.
- Open a terminal window by pressing
Ctrl+Alt+Ton your keyboard. - Update the package list by running the following command:
sudo apt update- Once the update is complete, you can install Python by running the following command:
sudo apt install python3This command will install the latest version of Python 3 available in the Linux Mint repositories. If you prefer to install a different version of Python, you can specify it by replacing python3 with the desired version number.
- After entering your password, the installation process will begin. You will be prompted to confirm the installation by typing
yand pressingEnter. - Once the installation is complete, you can verify that Python is installed correctly by running the following command:
python3 --versionIf Python is installed correctly, you will see the version number printed in the terminal.
Congratulations! You have successfully downloaded and installed Python on your Linux Mint system. In the next section, we will show you how to verify your installation and start using Python.
Downloading the Python Source Code

To install Python on Linux Mint, you need to download the Python source code. Here is a step-by-step guide on how to do it:
1. Open your web browser and go to the official Python website.
2. On the Python website, navigate to the Downloads section.
3. Click on the “Download Python” button.
4. Choose the version of Python you want to install. It is recommended to install the latest stable version.
5. Select the appropriate installer for your Linux Mint distribution. Make sure to choose the correct architecture (32-bit or 64-bit).
6. Click on the download link to start the download.
7. Once the download is complete, navigate to the directory where the file was saved.
8. Open a terminal window and navigate to the directory where the downloaded file is located.
9. Extract the contents of the downloaded file using the following command: tar -xf Python-X.X.X.tgz (replace X.X.X with the version number).
10. Change into the extracted directory using the following command: cd Python-X.X.X (replace X.X.X with the version number).
Now you have successfully downloaded the Python source code and are ready to proceed with the installation process.
Extracting the Source Code
Before you can install Python on Linux Mint, you need to extract the source code. This step is necessary to ensure that you have the latest version of Python and all the necessary files to complete the installation process.
To extract the source code, follow these steps:
- Open a terminal window on your Linux Mint system.
- Download the Python source code from the official Python website. You can find the latest version of Python at https://www.python.org/downloads/.
- Once the download is complete, navigate to the directory where the source code file is located.
- Right-click on the source code file and select “Extract Here” from the context menu. This will extract the contents of the file to the current directory.
- After the extraction is complete, you will see a new directory with the name of the Python version you downloaded.
Now that you have successfully extracted the source code, you are ready to proceed with the installation process. The next step is to configure and build Python on your Linux Mint system.