
If you’re a Windows 11 user and want to install pip, the package installer for Python, you’ve come to the right place. Installing pip on Windows 11 is a straightforward process that can be done in just a few steps. In this step-by-step guide, we’ll walk you through the process of installing pip on your Windows 11 machine.
Step 1: Download Python for Windows 11
The first step in installing pip is to download and install Python for Windows 11. Python is a programming language that is widely used and has a large community of developers. You can download the latest version of Python for Windows 11 from the official Python website. Make sure to choose the version that is compatible with your Windows 11 operating system.
Step 2: Run the Python Installer
Once you have downloaded the Python installer, locate the file and double-click on it to run the installer. The installer will guide you through the installation process, and you can choose the installation options that suit your needs. Make sure to check the box that says “Add Python to PATH” during the installation process. This will ensure that Python is added to your system’s PATH environment variable, which will allow you to run Python and pip from any command prompt or terminal window.
Step 3: Verify the Installation
After the installation is complete, open a command prompt or terminal window and type “python –version” to verify that Python has been installed correctly. You should see the version number of Python displayed on the screen. Next, type “pip –version” to verify that pip has been installed as well. If both commands return the version numbers, then you have successfully installed pip on your Windows 11 machine.
Now that you have successfully installed pip on your Windows 11 machine, you can start using it to install Python packages and libraries. Pip makes it easy to manage and install third-party packages, which can greatly enhance your Python development experience. Happy coding!
Section 1: Downloading Python
To install pip on Windows 11, you first need to download and install Python. Python is a programming language that comes with a package manager called pip, which allows you to easily install and manage software packages.
Here is a step-by-step guide on how to download Python:
- Go to the official Python website at https://www.python.org/downloads/.
- Click on the “Downloads” tab.
- Scroll down to the “Python Releases for Windows” section.
- Click on the “Latest Python 3 Release – Python x.x.x” link. Make sure to choose the latest stable version of Python.
- Scroll down to the “Files” section and select the appropriate installer for your Windows 11 operating system. Choose either the 32-bit or 64-bit installer, depending on your system.
- Once the installer is downloaded, double-click on it to start the installation process.
- On the first page of the installer, make sure to check the box that says “Add Python x.x to PATH”. This will add Python to your system’s PATH environment variable, allowing you to run Python and pip from any command prompt.
- Click on the “Install Now” button to start the installation.
- Wait for the installation to complete. This may take a few minutes.
- Once the installation is finished, you can verify that Python is installed correctly by opening a command prompt and typing “python –version”. You should see the version number of Python printed on the screen.
Now that you have Python installed on your Windows 11 system, you can proceed to the next section to learn how to install pip.
Step 1: Visit the official Python website
To install pip on Windows 11, you will need to visit the official Python website. Python is a popular programming language that comes with a package manager called pip, which allows you to easily install and manage software packages.
To get started, open your preferred web browser and navigate to the official Python website. You can do this by typing “python.org” into the address bar and pressing Enter.
Once you are on the Python website, you will see a navigation menu at the top of the page. Click on the “Downloads” tab to access the downloads section.
In the downloads section, you will find different versions of Python available for download. Choose the version that is compatible with your Windows 11 operating system. It is recommended to download the latest stable version of Python.
After selecting the version, scroll down to the bottom of the page and locate the “Files” section. Here, you will find a list of installers for different platforms. Look for the Windows installer and click on it to start the download.
Once the download is complete, locate the installer file in your downloads folder and double-click on it to run the installer. Follow the on-screen instructions to complete the installation process.
After the installation is complete, you will have Python and pip installed on your Windows 11 system. You can now proceed to the next step to verify the installation and start using pip to install packages.
Step 2: Click on the “Downloads” tab
Once you have successfully installed Windows 11, the next step is to install pip. To do this, you will need to navigate to the official website of pip.
Open your preferred web browser and search for “pip”. Click on the official website link to access the pip homepage.
On the pip homepage, you will see a navigation menu at the top of the page. Click on the “Downloads” tab to proceed with the installation process.
This tab contains all the necessary files and resources for installing pip on your Windows 11 operating system. It provides different options for various versions of Windows, so make sure to select the appropriate one for your system.
Once you have clicked on the “Downloads” tab, you will be presented with a list of available downloads. Look for the version of pip that is compatible with Windows 11 and click on the corresponding download link.
After clicking on the download link, the installation file will begin downloading. Depending on your internet connection speed, this process may take a few seconds or minutes.
Once the download is complete, you can proceed to the next step of the installation process, which will be covered in the following section.
Step 3: Select the latest version of Python for Windows
To install pip on Windows 11, you will need to have Python installed on your system. Python is a programming language that is widely used and has a large community of developers. It is available for various operating systems, including Windows.
To get started, you will need to download the latest version of Python for Windows. You can do this by visiting the official Python website at https://www.python.org/downloads/windows/.
On the Python downloads page, you will see a list of available versions. Make sure to select the latest version of Python for Windows 11. This will ensure that you have the most up-to-date features and bug fixes.
Once you have selected the latest version, click on the download link to start the installation process. The Python installer will guide you through the installation steps, and you can choose the installation options that best suit your needs.
After the installation is complete, you will have Python installed on your Windows 11 system. You can verify the installation by opening a command prompt and typing python --version. If the installation was successful, you should see the version number of Python displayed.
Now that you have Python installed, you can proceed to the next step and install pip, which is the package installer for Python.
Section 2: Installing Python
To use pip and install packages on Windows 11, you first need to install Python. Here’s how:
- Open a web browser and go to the official Python website.
- Click on the “Downloads” tab.
- Scroll down and click on the “Python for Windows” button.
- On the next page, you will see a list of available Python versions. Choose the version you want to install (e.g., Python 3.9.7).
- Click on the download link for the Windows installer (.exe file).
- Once the download is complete, locate the installer file and double-click on it to run the installation.
- Follow the on-screen instructions to complete the installation. Make sure to check the box that says “Add Python to PATH” during the installation process.
- After the installation is complete, open the command prompt by pressing the Windows key + R, typing “cmd”, and pressing Enter.
- In the command prompt, type “python” and press Enter. If you see the Python version number and the Python prompt (“>>>”), it means Python has been successfully installed.
Congratulations! You have successfully installed Python on your Windows 11 computer. Now you can proceed to the next section to install pip and start installing packages.
Step 1: Open the downloaded Python installer
To install pip on Windows, you first need to download the Python installer. Visit the official Python website and navigate to the Downloads section. Choose the version of Python that you want to install (preferably the latest stable version) and click on the download link.
Once the installer file is downloaded, locate it in your computer’s Downloads folder or the folder where you saved it. Double-click on the installer file to open it.
A setup wizard will appear on your screen. This wizard will guide you through the installation process. Make sure to carefully read and follow the instructions provided by the wizard.
During the installation process, you will be prompted to choose the installation options. Make sure to select the option to install pip along with Python. This will ensure that pip is installed and ready to use on your Windows system.
After selecting the desired installation options, click on the “Install” button to start the installation process. The installer will then proceed to install Python and pip on your Windows system.
Once the installation is complete, you can verify that pip is installed correctly by opening the command prompt and typing “pip” followed by the Enter key. If pip is installed properly, you should see a list of available commands and options.
Congratulations! You have successfully completed the first step of installing pip on Windows. Now you can proceed to the next step to start using pip for installing Python packages and libraries.
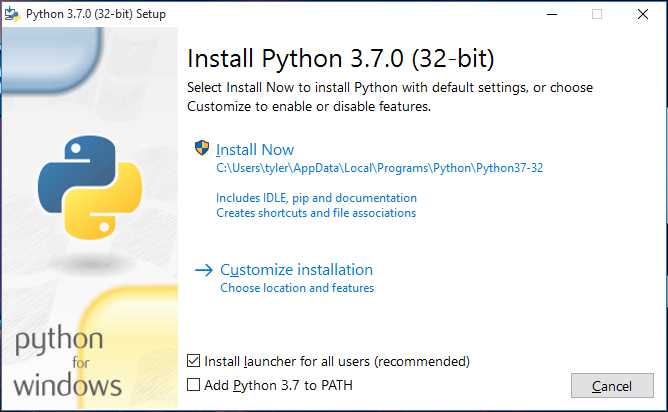
Step 2: Choose the option to “Install Now”
Once you have downloaded the pip installer for Windows 11, you are ready to begin the installation process. Follow the steps below to install pip on your Windows 11 operating system:
| Step 1: | Locate the downloaded pip installer file on your computer. |
| Step 2: | Double-click on the installer file to start the installation process. |
| Step 3: | A dialog box will appear asking for your confirmation to install pip. Click on the “Install Now” option to proceed. |
| Step 4: | Wait for the installation process to complete. This may take a few minutes. |
| Step 5: | Once the installation is finished, you will see a confirmation message indicating that pip has been successfully installed on your Windows 11 system. |
Now that you have successfully installed pip on your Windows 11 operating system, you can proceed to the next step to verify the installation and start using pip to manage your Python packages.
Step 3: Customize the installation settings if desired
Once you have downloaded the pip installer for Windows 11, you can proceed with customizing the installation settings according to your preferences. This step is optional, but it allows you to tailor the installation process to better suit your needs.
During the installation, you will be presented with several options that you can choose to enable or disable. These options include:
- Install pip for all users: By default, pip is installed only for the current user. If you want to make pip available for all users on your Windows 11 system, you can select this option.
- Add pip to the system PATH: The system PATH is a list of directories that Windows searches for executable files. Enabling this option will add the pip executable to the system PATH, allowing you to run pip from any command prompt without specifying its full path.
- Associate .py files with Python: If you work with Python scripts, enabling this option will associate .py files with the Python interpreter. This means that you can double-click on a .py file to run it directly without opening a command prompt.
- Create shortcuts for installed applications: Enabling this option will create shortcuts for pip and other installed Python applications on your desktop and Start menu for easy access.
Once you have made your desired selections, click on the “Next” button to proceed with the installation. The installer will then install pip with the custom settings you have chosen.
Remember, these customization options are not mandatory, and you can always change them later by re-running the pip installer.


