If you’re a Windows 10 user and want to learn how to install PHP on your system, you’ve come to the right place. PHP is a popular scripting language used for web development, and having it installed on your Windows 10 machine can open up a world of possibilities for creating dynamic websites and applications.
Installing PHP on Windows 10 is a relatively straightforward process, but it does require a few steps to ensure everything is set up correctly. In this step-by-step guide, we’ll walk you through the process of installing PHP on your Windows 10 machine, from downloading the necessary files to configuring your system.
Before we begin, it’s important to note that PHP is not included by default in Windows 10, so you’ll need to download and install it manually. Don’t worry, though – the process is easier than you might think, and we’ll guide you through each step to ensure a smooth installation.
Requirements for Installing PHP on Windows 10
Before you can install PHP on your Windows 10 operating system, you need to ensure that you meet the following requirements:
| Requirement | Description |
| Windows 10 | You must have Windows 10 installed on your computer. PHP is compatible with Windows 10 and can be installed on this operating system. |
| Web Server Software | You need to have a web server software installed on your Windows 10 machine. Popular options include Apache, Nginx, and IIS. Make sure the web server is running properly before installing PHP. |
| PHP Installer | Download the PHP installer from the official PHP website. Make sure to choose the correct version of PHP that is compatible with your Windows 10 architecture (32-bit or 64-bit). |
| System Requirements | Check the system requirements for the specific version of PHP you are installing. Ensure that your Windows 10 system meets these requirements in terms of memory, processor, and disk space. |
| Text Editor | You will need a text editor to write and edit PHP code. There are many options available, such as Notepad++, Sublime Text, and Visual Studio Code. |
By ensuring that you meet these requirements, you will be ready to proceed with the installation of PHP on your Windows 10 machine.
Windows 10 Operating System
Windows 10 is the latest version of the Windows operating system developed by Microsoft. It is widely used by individuals and businesses around the world. With its user-friendly interface and powerful features, Windows 10 offers a seamless computing experience.
One of the key advantages of Windows 10 is its compatibility with various software and programming languages, including PHP. PHP is a popular scripting language used for web development. Installing PHP on Windows 10 allows developers to create dynamic and interactive websites.
To install PHP on Windows 10, you can follow a step-by-step guide that will walk you through the process. This guide will show you how to download and install the necessary files, configure the PHP settings, and test your installation to ensure everything is working correctly.
By installing PHP on Windows 10, you can take advantage of the vast ecosystem of PHP libraries and frameworks to build robust web applications. Whether you are a beginner or an experienced developer, PHP on Windows 10 provides a reliable and efficient platform for web development.
So, if you are looking to install PHP on Windows 10, follow the step-by-step guide to get started. With PHP installed on your Windows 10 operating system, you can unleash your creativity and build amazing web applications.
Web Server Software
Before you can install PHP on Windows 10, you need to have a web server software installed on your computer. A web server software is responsible for serving web pages to users when they request them. There are several popular web server software options available, including Apache, Nginx, and Microsoft Internet Information Services (IIS).
To install PHP on Windows 10, you will need to choose a web server software and install it first. Apache is a popular choice for PHP development, as it is open-source and widely supported. Nginx is another popular option known for its high performance and scalability. Microsoft IIS is the web server software developed by Microsoft and is commonly used for hosting ASP.NET applications, but it can also be used to host PHP applications.
Once you have chosen a web server software, you can proceed with the installation of PHP on Windows 10. The process may vary depending on the web server software you have chosen, but generally, it involves downloading the PHP installation package, configuring the web server to work with PHP, and testing the installation to ensure everything is working correctly.
By following the step-by-step guide on how to install PHP on Windows 10, you will be able to set up a local development environment for PHP and start building and testing your PHP applications.
PHP Installer
To install PHP on Windows 10, you will need to use the PHP Installer. The PHP Installer is a convenient tool that simplifies the installation process and ensures that all necessary components are properly set up.
Here is a step-by-step guide on how to use the PHP Installer:
| Step 1: | Download the PHP Installer from the official PHP website. |
| Step 2: | Run the PHP Installer executable file. |
| Step 3: | Choose the installation directory for PHP. |
| Step 4: | Select the PHP components you want to install. You can choose to install the PHP runtime, extensions, and additional tools. |
| Step 5: | Configure the PHP installation by specifying the necessary settings, such as the PHP version, web server integration, and file associations. |
| Step 6: | Start the installation process and wait for it to complete. |
| Step 7: | Verify the installation by opening a command prompt and running the “php -v” command. This will display the installed PHP version. |
By following these steps, you can easily install PHP on your Windows 10 system using the PHP Installer. It is a straightforward process that ensures a smooth installation and configuration of PHP for your development needs.
Step 1: Downloading PHP Installer
To install PHP on Windows 10, you need to download the PHP installer. The PHP installer is a package that contains all the necessary files and components to set up PHP on your Windows operating system.
Here’s how to download the PHP installer:
| 1. | Open your preferred web browser. |
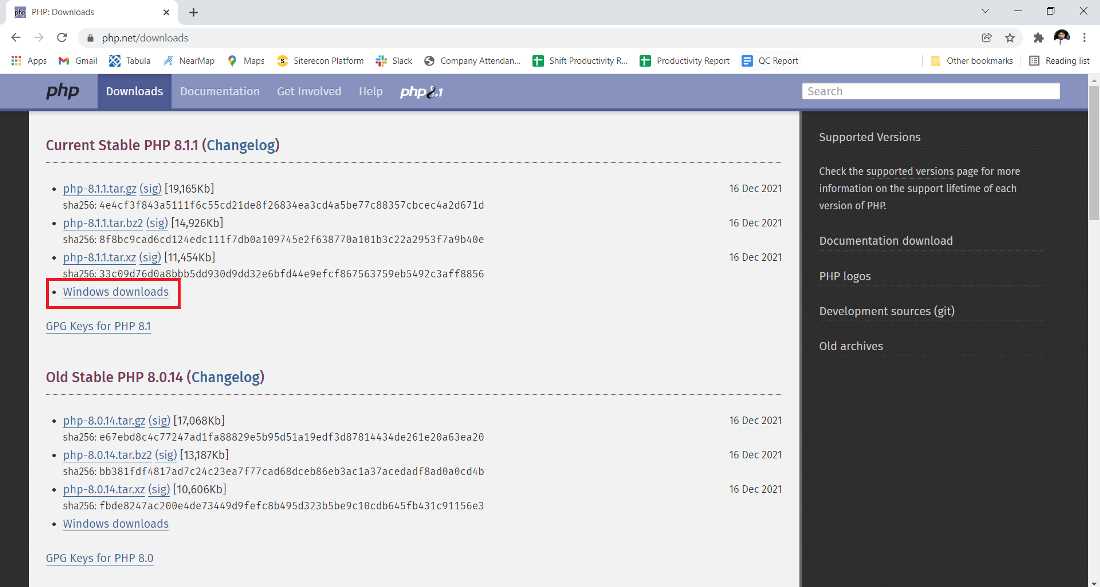
| 2. | Go to the official PHP website at https://www.php.net/downloads.php. |
| 3. | Scroll down to the “Windows downloads” section. |
| 4. | Click on the “Windows downloads” link. |
| 5. | On the Windows downloads page, you will see a list of available PHP versions. |
| 6. | Choose the PHP version that you want to install by clicking on the corresponding link. |
| 7. | On the PHP version page, scroll down to the “Windows downloads” section. |
| 8. | Click on the “VC15 x64 Non Thread Safe” link to download the PHP installer. |
Once the PHP installer is downloaded, you can proceed to the next step of the installation process.
Visit the PHP website
If you want to install PHP on your Windows 10 computer, the first step is to visit the official PHP website. You can do this by opening your preferred web browser and typing in the URL: https://www.php.net/downloads.php.
Once you are on the PHP website, you will see a list of available PHP versions. Choose the version that is compatible with your Windows 10 operating system. Make sure to select the Windows VC15 x64 Non Thread Safe version if you are using a 64-bit version of Windows 10.
After selecting the appropriate PHP version, scroll down to the “Windows downloads” section. Here, you will find a table with different download options. Look for the “Zip” column and click on the link to download the ZIP file for your selected PHP version.
Once the ZIP file is downloaded, you can proceed to the next step of the installation process.
Choose the PHP version
Before you can install PHP on Windows 10, you need to choose the PHP version that you want to install. PHP has multiple versions available, each with its own set of features and compatibility requirements.
To determine which PHP version is right for you, consider the following factors:
| Compatibility: | Make sure the PHP version you choose is compatible with your operating system (Windows 10) and any other software or frameworks you plan to use. |
| Features: | Check the documentation for each PHP version to see what features and improvements it offers. Choose a version that includes the features you need for your project. |
| Support: | Consider the level of support available for each PHP version. Newer versions may have more active community support and frequent updates. |
Once you have considered these factors, you can choose the PHP version that best suits your needs. You can download the PHP installer for Windows from the official PHP website. Make sure to select the appropriate version based on your system architecture (32-bit or 64-bit).
After downloading the PHP installer, you can proceed with the installation process, which will be covered in the next steps of this guide.
Select the Windows VC15 x64 Thread Safe version
When it comes to installing PHP on Windows 10, it is important to choose the right version that is compatible with your operating system. In this step, we will guide you on how to select the Windows VC15 x64 Thread Safe version of PHP.
First, you need to visit the official PHP website and navigate to the downloads section. Look for the Windows downloads and click on it. You will be presented with a list of available PHP versions.
Scroll down the page until you find the Windows VC15 x64 Thread Safe version. This version is specifically designed for Windows operating systems and provides better performance and stability.
Make sure to select the Thread Safe version, as it is recommended for most Windows installations. The Thread Safe version ensures that PHP can handle multiple threads and processes simultaneously, making it suitable for web servers and other multi-threaded applications.
Once you have selected the Windows VC15 x64 Thread Safe version, click on the download link to start the download process. Save the file to a location on your computer where you can easily access it.
After the download is complete, you can proceed to the next step, which is the installation process. We will guide you through the installation steps in the following sections.
Step 2: Installing PHP on Windows 10
Now that you have successfully installed Apache on your Windows 10 system, it’s time to install PHP. PHP is a popular scripting language used for web development and can be easily integrated with Apache.
Here is a step-by-step guide on how to install PHP on Windows 10:
Step 1: Download PHP
First, you need to download the PHP installation package from the official PHP website. Make sure to choose the version that is compatible with your Windows 10 system.
Step 2: Extract the PHP files
Once the download is complete, extract the PHP files to a directory of your choice. It is recommended to extract them to the same directory where Apache is installed.
Step 3: Configure PHP
Next, you need to configure PHP to work with Apache. Open the PHP installation directory and locate the “php.ini” file. Make a copy of this file and rename it to “php.ini-development”.
Open the “php.ini-development” file in a text editor and make the following changes:
Uncomment the line:
extension_dir = "ext"
Uncomment the line:
extension=openssl
Uncomment the line:
extension=mbstring
Save the changes and rename the file back to “php.ini”.
Step 4: Configure Apache
Open the Apache configuration file (httpd.conf) located in the “conf” directory of your Apache installation. Add the following lines at the end of the file:
LoadModule php7_module "C:/path/to/php/php7apache2_4.dll"
AddHandler application/x-httpd-php .php
PHPIniDir "C:/path/to/php"
Make sure to replace “C:/path/to/php” with the actual path to your PHP installation directory.
Step 5: Restart Apache
Save the changes to the Apache configuration file and restart the Apache server. You can do this by opening the Command Prompt and running the following command:
httpd -k restart
Once Apache is restarted, PHP should be successfully installed on your Windows 10 system.
Congratulations! You have now completed the second step of installing PHP on Windows 10. In the next step, we will test the PHP installation to ensure it is working correctly.