When creating a document in Microsoft Word, it’s important to format your content in a way that is easy to read and understand. One way to achieve this is by using bullets to create a list. Bullets can help to organize information and make it more visually appealing.
There are several ways to insert bullets in Word, but one of the quickest and easiest methods is by using a keyboard shortcut. By using this shortcut, you can quickly format your text into a bulleted list without having to manually insert each bullet point.
To insert bullets using the keyboard shortcut, simply place your cursor at the beginning of the paragraph where you want to insert the bullet. Then, press the “Ctrl” and “Shift” keys on your keyboard at the same time, and press the “L” key. This will automatically insert a bullet at the beginning of the paragraph.
If you want to create a bulleted list with multiple paragraphs, simply press the “Enter” key on your keyboard after each paragraph. This will create a new bullet point for each paragraph, allowing you to easily create a formatted list.
Section 1: Accessing the Bullets Menu
In order to insert bullets into your Word document, you need to access the bullets menu. This menu allows you to choose the symbol or format you want to use for your bullet list. There are a few different ways to access the bullets menu in Word.
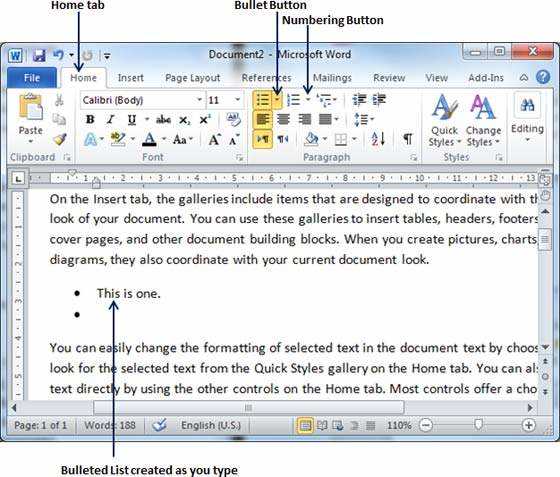
One way to access the bullets menu is to click on the “Bullets” button in the “Paragraph” group on the “Home” tab. This button looks like a small dot with lines next to it. When you click on this button, a drop-down menu will appear with a variety of bullet options to choose from.
Another way to access the bullets menu is to use a keyboard shortcut. By pressing the “Ctrl” key and the “Shift” key at the same time, and then pressing the “L” key, you can quickly insert bullets into your document. This shortcut is especially useful if you frequently use bullet lists in your Word documents.
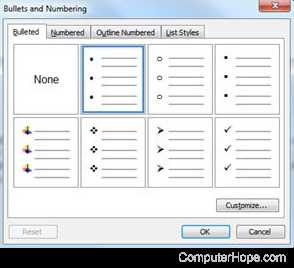
Once you have accessed the bullets menu, you can choose the symbol or format you want to use for your bullet list. There are a variety of options to choose from, including different symbols, colors, and sizes. You can also customize the appearance of your bullets by selecting the “Define New Bullet” option, which allows you to choose a specific symbol or image to use as your bullet.
Overall, accessing the bullets menu in Word is a simple process that allows you to quickly insert and customize bullet lists in your documents. Whether you prefer to use the mouse or a keyboard shortcut, you can easily add bullets to your Word document and format them to your liking.
Step 1: Open Microsoft Word
To begin inserting bullets into your Word document, you first need to open Microsoft Word on your computer. This can be done by clicking on the Word icon on your desktop or by searching for “Microsoft Word” in the Start menu.
Once Word is open, you will be presented with a blank document. This is where you will be able to insert your bullets and create your bulleted lists.
Before we proceed, it’s important to understand what bullets are and how they can be used. Bullets are small symbols or characters that are used to visually separate and organize information in a document. They are commonly used to create lists or highlight important points within a paragraph.
Now that you have Word open and understand the purpose of bullets, we can move on to the next step: inserting bullets into your document.
Step 2: Create a New Document or Open an Existing Document
Once you have familiarized yourself with the keyboard shortcuts for inserting bullets in Word, you can start creating your document. To begin, open Microsoft Word and either create a new document or open an existing one.
To create a new document, click on the “File” tab in the top left corner of the Word window. From the drop-down menu, select “New” to open a new blank document.
If you already have a document that you want to add bullets to, click on the “File” tab and select “Open” from the drop-down menu. Locate the document on your computer and click “Open” to open it in Word.
Once you have your document open, you can start formatting it with bullets. Place your cursor at the beginning of the paragraph or line where you want to insert a bullet. Then, press the “Alt” key on your keyboard and type the number “0149” on the numeric keypad. Release the “Alt” key, and a bullet symbol will appear in your document.
If you want to create a bulleted list, simply press the “Enter” key on your keyboard after each bullet to create a new paragraph with a bullet. You can continue adding bullets and paragraphs as needed to create your list.
Remember to save your document regularly to avoid losing any work. You can do this by clicking on the “File” tab and selecting “Save” or “Save As” from the drop-down menu. Choose a location on your computer to save the document, give it a name, and click “Save”.
Now that you know how to create a new document or open an existing one, you can move on to the next step: formatting your bulleted list.
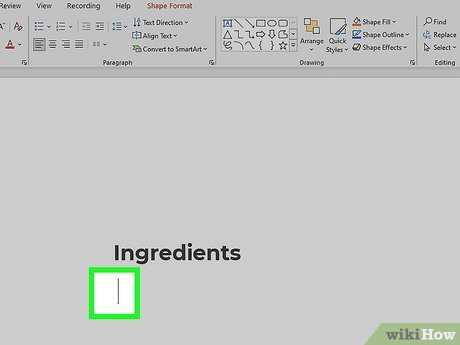
Step 3: Place the Cursor Where You Want to Insert Bullets
Once you have selected the desired format for your bullets, it’s time to insert them into your Word document. To do this, you need to place the cursor at the exact location where you want the bullets to appear.
To place the cursor, simply click with your mouse or use the arrow keys on your keyboard to navigate to the desired spot in your document. You can also use the shortcut key combination Ctrl + Shift + L to quickly insert bullets.
Remember, bullets are typically used to create a list or to highlight important points in your document. So, make sure to position the cursor in the appropriate place within your text where you want the bullets to be displayed.
Once the cursor is in the right position, you are ready to insert the bullets and create your list or highlight your important points. In the next step, we will learn how to actually insert the bullets using different methods.
Section 2: Using the Bullets Button
To insert bullets in Word, you can use the Bullets button located in the Paragraph group on the Home tab. This button allows you to quickly add bullet points to your document without the need to manually format each paragraph.
To use the Bullets button, follow these steps:
- Select the paragraphs or lines of text that you want to format as a bulleted list.
- Click on the Bullets button in the Paragraph group on the Home tab. This button is represented by a symbol that resembles a small black dot.
- Word will automatically apply bullet points to the selected paragraphs, creating a bulleted list.
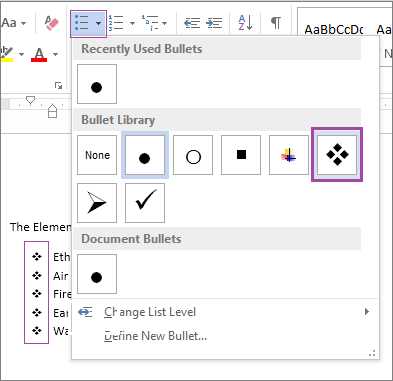
If you want to change the format of the bullets, you can do so by clicking on the small arrow next to the Bullets button. This will open a drop-down menu with different bullet styles to choose from. Simply click on the desired bullet style to apply it to your list.
Alternatively, you can also use a keyboard shortcut to insert bullets in Word. Pressing the “Ctrl” and “.” keys simultaneously will automatically insert a bullet point at the beginning of a new paragraph. This shortcut can be useful if you want to quickly create a bulleted list without using the Bullets button.
Using the Bullets button or the keyboard shortcut, you can easily create and format bulleted lists in Word, making your documents more organized and visually appealing.
Step 1: Select the Text You Want to Add Bullets To
To insert bullets in Word, you first need to select the text you want to add bullets to. This can be a single word, a sentence, or an entire paragraph. To select the text, simply click and drag your mouse over the desired text.
If you prefer using the keyboard, you can use the Shift key in combination with the arrow keys to select the text. Press and hold the Shift key, then use the arrow keys to extend the selection to the desired text.
Once you have selected the text, you are ready to format it as a bulleted list.
Step 2: Click on the “Bullets” Button in the Home Tab
Once you have selected the paragraph or list that you want to format with bullets in Microsoft Word, you can easily insert bullets by following these simple steps:
1. Open the Word document and navigate to the Home tab at the top of the screen.
2. Look for the “Paragraph” section in the Home tab, which is usually located on the right side.
3. Within the “Paragraph” section, you will see a button with three small circles and lines next to it. This button is called the “Bullets” button.
4. Click on the “Bullets” button to apply bullet formatting to the selected paragraph or list.
5. Once you click on the “Bullets” button, you will see that the selected paragraph or list now has bullets at the beginning of each line.
6. You can also customize the bullet format by clicking on the small arrow next to the “Bullets” button. This will open a drop-down menu with different bullet styles to choose from.
7. Select the desired bullet style from the drop-down menu to change the appearance of the bullets in your document.
By following these steps, you can easily insert bullets in your Word document and format your paragraphs or lists with bullet points. This can help make your document more organized and visually appealing.
Step 3: Choose a Bullet Style from the Drop-down Menu

Once you have inserted the bullets into your Word document, it’s time to choose a bullet style that suits your needs. Word provides a variety of bullet styles to choose from, allowing you to customize the appearance of your bulleted list.
To choose a bullet style, follow these steps:
- Select the paragraph or paragraphs you want to apply the bullet style to.
- Click on the “Bullets” button in the “Paragraph” group on the “Home” tab. This will open a drop-down menu with a selection of bullet styles.
- From the drop-down menu, choose the bullet style that you prefer. You can hover your mouse over each style to see a preview of how it will look in your document.
- Once you have selected a bullet style, Word will automatically apply it to the selected paragraphs, creating a bulleted list.
Alternatively, you can use a keyboard shortcut to quickly insert bullets and choose a bullet style. Simply select the paragraph or paragraphs you want to apply the bullet style to and press the “Ctrl” and “Shift” keys on your keyboard at the same time, followed by the “L” key. This will open the bullet style drop-down menu, allowing you to choose a style using the arrow keys and the “Enter” key.
By following these steps, you can easily insert bullets and choose a bullet style in Word, creating organized and visually appealing lists for your documents.
Section 3: Customizing Bullets
Once you have learned how to insert bullets in Word using the keyboard or the symbol library, you may want to customize the appearance of your bullet list to fit your needs. Word offers various formatting options to help you create a visually appealing and organized list.
To customize the bullets in your list, follow these steps:
Step 1: Select the paragraph or list where you want to customize the bullets.
Step 2: Go to the “Home” tab in the Word toolbar.
Step 3: Click on the “Bullets” button in the “Paragraph” group. A drop-down menu will appear.
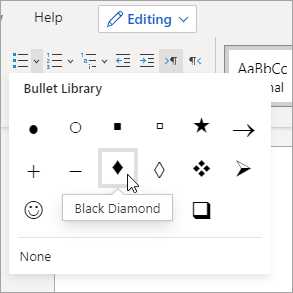
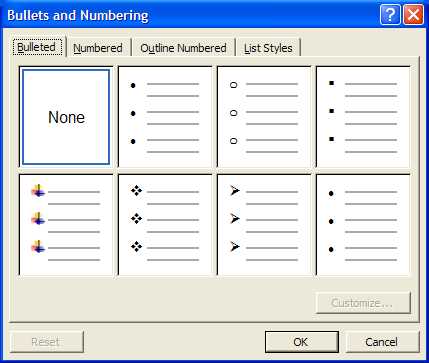
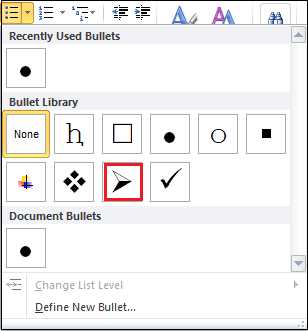
Step 4: Choose the bullet style you want to use from the bullet library. Word provides a variety of bullet styles to choose from, including different shapes, symbols, and even pictures.
Step 5: If you want to further customize the bullet, click on the small arrow next to the “Bullets” button. This will open the “Define New Bullet” dialog box.
Step 6: In the “Define New Bullet” dialog box, you can select a different symbol or picture for your bullet, change the size and color, and adjust the indentation of the bullet. You can also choose to use a different font or character style for your bullet.
Step 7: Once you have customized the bullet to your liking, click “OK” to apply the changes.
By customizing the bullets in your Word document, you can create visually appealing lists that are easy to read and understand. Experiment with different bullet styles and formatting options to find the one that best suits your needs.