
Pipenv is a powerful tool that helps Python developers manage project dependencies and virtual environments. It combines the functionality of pip and virtualenv in a single package, making it easier to create and manage Python projects.
If you’re wondering how to install Pipenv on your system, you’ve come to the right place. In this step-by-step guide, we’ll walk you through the process of installing Pipenv on your machine.
Before we begin, make sure you have pip installed on your system. Pip is the package installer for Python, and it comes pre-installed with most Python distributions. To check if you have pip installed, open a terminal or command prompt and run the following command:
Section 1: Installing Pipenv
To install Pipenv, follow the steps below:
Step 1: Open your command prompt or terminal.
Step 2: Type the following command to install Pipenv:
pip install pipenv
Step 3: Press Enter to execute the command.
Step 4: Wait for the installation process to complete.
Step 5: Once the installation is finished, you can verify the installation by typing the following command:
pipenv --version
Step 6: Press Enter to execute the command.
Step 7: If the installation was successful, you should see the version number of Pipenv displayed on the screen.
Note: If you encounter any errors during the installation process, make sure you have Python and pip installed correctly on your system.
Step 1: Check Python Version
To install and use Pipenv, you need to have Python installed on your system. Before proceeding, it’s important to check the version of Python you have installed. This step is necessary because Pipenv requires Python version 3.6 or higher to work properly.
To check your Python version, open your command prompt or terminal and type the following command:
python --version
If you have Python installed, the command will display the version number. Make sure the version is 3.6 or higher. If you don’t have Python installed or have an older version, you will need to install or upgrade Python before proceeding.
Once you have confirmed that you have the correct version of Python installed, you can move on to the next step and install Pipenv.
Step 2: Install Pip
To install Pip, you need to follow these steps:
- Open your command prompt or terminal.
- Type
python get-pip.pyand press Enter. - Wait for the installation process to complete.
- Verify the installation by typing
pip --versionand pressing Enter. You should see the version number of Pip displayed.
By following these steps, you will be able to install Pip on your system. Pip is a package manager for Python that allows you to easily install and manage Python packages.
Step 3: Install Pipenv
Now that you have Python and pip installed on your system, it’s time to install Pipenv. Pipenv is a package manager that combines pip and virtualenv functionality, making it easier to manage dependencies and create isolated environments for your projects.
To install Pipenv, open your terminal or command prompt and run the following command:
pip install pipenv
This command will download and install Pipenv on your system. Once the installation is complete, you can verify that Pipenv is installed correctly by running the following command:
pipenv --version
If you see the version number of Pipenv printed on the screen, it means that Pipenv is installed successfully.
Now you are ready to start using Pipenv for your Python projects. In the next step, we will learn how to create a new project with Pipenv.
Section 2: Configuring Pipenv
Once you have successfully installed Pipenv, the next step is to configure it according to your project requirements. Here is a step-by-step guide on how to configure Pipenv:
1. Open your terminal or command prompt and navigate to your project directory.
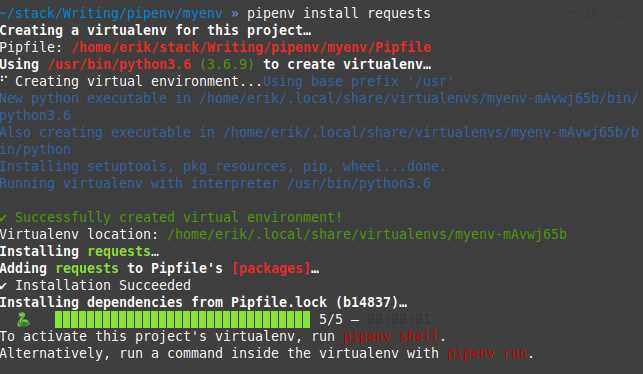
2. Run the command pipenv install to create a new virtual environment and install the required packages specified in your project’s Pipfile.
3. If you already have a Pipfile in your project directory, you can run pipenv sync instead. This command will install the packages specified in the Pipfile.lock file.
4. To install a specific package, you can use the command pipenv install package_name. This will install the package and add it to your Pipfile.
5. If you want to uninstall a package, you can use the command pipenv uninstall package_name. This will remove the package from your virtual environment and update your Pipfile.
6. To update all the packages in your virtual environment to their latest versions, you can run pipenv update. This will update the Pipfile.lock file with the latest versions of the packages.
7. If you want to run a command within your virtual environment, you can use the command pipenv run command. This will execute the specified command within the virtual environment.
By following these steps, you can easily configure Pipenv according to your project’s requirements and manage your Python packages efficiently.
Step 1: Create a New Project Directory
To install Pipenv and start using it, you’ll need to create a new project directory. This directory will serve as the main folder for your project, where all the necessary files and dependencies will be stored.
To create a new project directory, follow these steps:
- Open your terminal or command prompt.
- Navigate to the location where you want to create the project directory using the
cdcommand. - Once you’re in the desired location, use the
mkdircommand followed by the name you want to give to your project directory. For example, if you want to name it “myproject”, you would run the commandmkdir myproject. - After running the command, you will see that a new directory with the specified name has been created in the current location.
Now that you have created the project directory, you can proceed to the next step and install Pipenv.


