If you have recently upgraded your Windows operating system to Windows 11, you may have noticed a folder called “Windows Old” taking up valuable space on your hard drive. This folder contains files and data from your previous Windows installation, and deleting it can help free up storage space on your computer.
Deleting the Windows Old folder is a straightforward process, but it’s important to follow the correct steps to ensure that you don’t accidentally delete any important files or system data. In this step-by-step guide, we will walk you through the process of safely deleting the Windows Old folder in Windows 11.
Step 1: Open File Explorer by clicking on the folder icon in the taskbar or by pressing the Windows key + E on your keyboard.
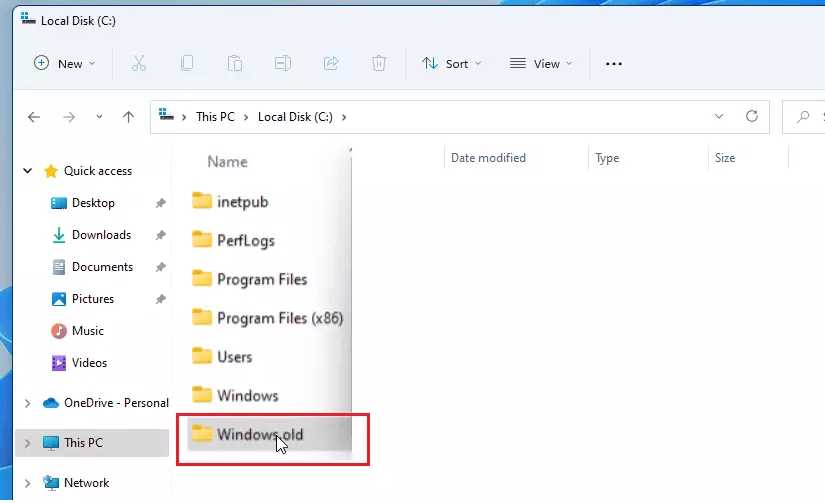
Step 2: In the File Explorer window, navigate to the drive where your Windows operating system is installed. This is usually the C: drive.
Step 3: Locate the “Windows Old” folder in the root directory of your Windows drive. It may be hidden, so make sure to enable the option to show hidden files and folders in File Explorer.
Step 4: Right-click on the “Windows Old” folder and select “Delete” from the context menu. A confirmation prompt will appear.
Step 5: Read the confirmation prompt carefully, as it will inform you that deleting the Windows Old folder will permanently remove all its contents. If you are sure that you no longer need any files or data from your previous Windows installation, click “Yes” to proceed with the deletion.
Step 6: Depending on the size of the Windows Old folder and the speed of your computer, the deletion process may take some time. Once the process is complete, the folder and its contents will be permanently removed from your computer, freeing up valuable storage space.
Note: It is recommended to create a backup of any important files or data before deleting the Windows Old folder, as this action cannot be undone.
By following these simple steps, you can easily delete the Windows Old folder in Windows 11 and reclaim valuable storage space on your computer. Remember to exercise caution and double-check that you no longer need any files or data from your previous Windows installation before proceeding with the deletion.
What is the Windows Old Folder?
The Windows Old folder is a directory that is created when you upgrade your operating system from a previous version of Windows to Windows 11. It contains files and data from your previous installation, including system files, program files, and user data.
When you upgrade to Windows 11, the old version of Windows is stored in the Windows Old folder to ensure that you can revert back to your previous operating system if needed. This folder can take up a significant amount of space on your hard drive, so it is important to delete it if you are sure that you do not need to revert back to the old version of Windows.
Deleting the Windows Old folder can free up valuable disk space and improve the performance of your computer. However, it is important to note that once you delete this folder, you will not be able to revert back to your previous version of Windows without performing a clean installation.
If you are confident that you no longer need the files in the Windows Old folder, you can follow the step-by-step guide to delete it in Windows 11.
Why should you delete the Windows Old Folder?

The Windows Old folder is created when you upgrade your operating system from a previous version of Windows to Windows 11. This folder contains all the files and data from your old Windows installation, including system files, program files, and user data.
While the Windows Old folder can be useful in case you need to revert back to your previous version of Windows, it can also take up a significant amount of disk space. This is especially true if you have a small SSD or limited storage capacity.
Deleting the Windows Old folder can free up valuable disk space and improve the performance of your computer. It can also help you organize your files and folders, making it easier to find and access the files you need.
However, before you delete the Windows Old folder, it’s important to note that once you delete it, you won’t be able to revert back to your previous version of Windows. So, make sure you have all the necessary files and data backed up before proceeding with the deletion.
To delete the Windows Old folder, you can use the built-in Disk Cleanup tool or manually delete the folder from File Explorer. Just make sure to follow the proper steps and take caution to avoid accidentally deleting any important files or folders.
In conclusion, deleting the Windows Old folder can help you reclaim disk space and improve the performance of your Windows 11 system. Just make sure to back up any important files before deleting the folder, as you won’t be able to recover them once they’re gone.
Step 1: Accessing the Disk Cleanup Utility

In order to delete the Windows Old folder in Windows 11, you will need to access the Disk Cleanup utility. This utility allows you to remove unnecessary files and folders from your computer, including the Windows Old folder.
To access the Disk Cleanup utility, follow these steps:
- Click on the Start button located at the bottom left corner of the screen.
- Type “Disk Cleanup” in the search bar and select the Disk Cleanup app from the search results.
- Once the Disk Cleanup window opens, select the drive where the Windows Old folder is located. Typically, this is the C: drive.
- Click on the OK button to proceed.
By following these steps, you will be able to access the Disk Cleanup utility and prepare to delete the Windows Old folder from your Windows 11 system.
Opening the Start Menu
To delete the Windows Old folder in Windows 11, you need to start by opening the Start Menu. The Start Menu is the central hub for accessing all your applications, settings, and files on your computer.
To open the Start Menu, you can either click on the Windows icon located at the bottom left corner of your screen or press the Windows key on your keyboard. This will instantly open the Start Menu, giving you access to all the features and options available in Windows 11.
Once the Start Menu is open, you can proceed with the steps to delete the Windows Old folder and free up valuable storage space on your computer.
Searching for “Disk Cleanup”
When it comes to deleting the Windows.old folder in Windows 11, one of the easiest methods is to use the built-in Disk Cleanup utility. This tool allows you to free up disk space by removing unnecessary files and folders from your system.
To access Disk Cleanup in Windows 11, follow these steps:
- Click on the Start menu and type “Disk Cleanup” in the search bar.
- From the search results, click on the “Disk Cleanup” app.
- Once the Disk Cleanup window opens, select the drive where the Windows.old folder is located. Typically, this will be the C: drive.
- Click on the “OK” button to proceed.
- In the Disk Cleanup window, click on the “Clean up system files” button.
- Wait for the utility to scan your system for files that can be deleted.
- Once the scan is complete, check the box next to “Previous Windows installation(s)” or “Windows.old” (depending on the version of Windows 11 you are using).
- Click on the “OK” button to confirm the deletion.
- Finally, click on the “Delete Files” button to remove the Windows.old folder from your system.
By following these steps, you can easily delete the Windows.old folder using the Disk Cleanup utility in Windows 11. This will help free up valuable disk space on your computer and ensure that your system is running smoothly.