If you are looking to uninstall your Facebook page, you may be wondering how to do it. Facebook is a popular social media platform that allows users to connect with friends and family, but sometimes it’s necessary to cancel or deactivate your account. Whether you want to remove your page for personal reasons or you no longer have a use for it, deleting your Facebook page is a straightforward process.
To delete your Facebook page, follow these simple steps:
Step 1: Log in to your Facebook account and navigate to your page.
Step 2: Click on the “Settings” tab located at the top right corner of your page.
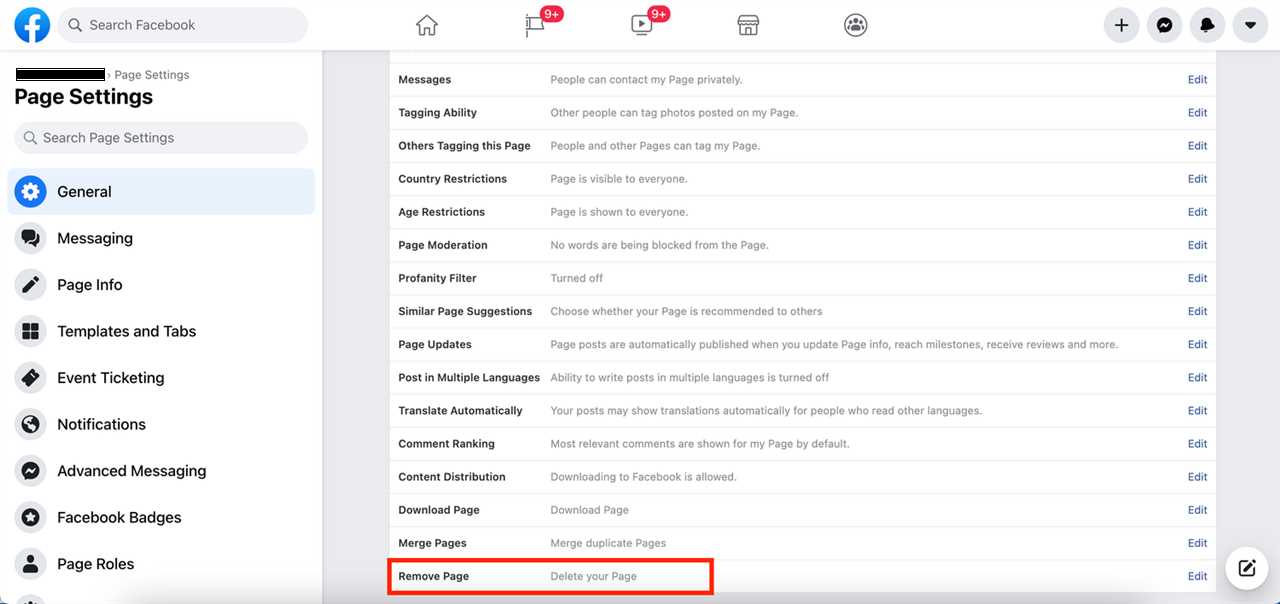
Step 3: Scroll down to the “General” section and click on “Remove Page.”
Step 4: A pop-up window will appear asking you to confirm the deletion. Read the information carefully and click on “Delete” to proceed.
Step 5: Once you click on “Delete,” your Facebook page will be scheduled for deletion. It may take up to 14 days for the page to be permanently removed from Facebook’s servers.
Deleting your Facebook page is a permanent action, so make sure you are certain before proceeding. Keep in mind that once your page is deleted, you will lose all the content, photos, and followers associated with it. If you think you may want to reactivate your page in the future, consider deactivating it instead.
Now that you know how to delete your Facebook page, you can take control of your online presence and remove any unwanted pages from your account. Follow these steps and say goodbye to your Facebook page for good.
Why Delete a Facebook Page?
There are several reasons why you might want to delete a Facebook page. Here are a few:
- Cancel a Page: If you no longer need a Facebook page for your business or organization, deleting it is a good option. It can help you maintain a clean online presence and avoid confusion.
- How to Deactivate a Page: If you want to temporarily remove your Facebook page from public view, deactivating it is the way to go. This allows you to take a break from managing the page without permanently deleting it.
- Remove Unwanted Pages: If you have multiple Facebook pages and want to streamline your online presence, deleting unwanted pages can help you focus on the ones that matter most.
- Delete a Page: If you no longer find value in having a Facebook page or if it’s causing you stress or anxiety, deleting it can provide a sense of relief and freedom.
- Uninstall Facebook: Some people choose to delete their Facebook page as part of a larger effort to uninstall Facebook from their lives. This can be a personal decision based on privacy concerns or a desire to reduce screen time.
Whatever your reason may be, deleting a Facebook page is a straightforward process that can be done in just a few steps. It’s important to note that once a page is deleted, it cannot be recovered, so make sure to back up any important data or content before proceeding.
Important Considerations

Before you proceed to uninstall, delete, cancel, or deactivate your Facebook page, there are a few important considerations to keep in mind:
| 1. | Deleting your page is permanent and irreversible. Once you remove your page, all its content, including posts, photos, and videos, will be permanently deleted. Make sure you have a backup of any important data before proceeding. |
| 2. | Deleting your page will also remove all the likes and followers it has accumulated over time. If you plan on starting a new page in the future, you will have to build your audience from scratch. |
| 3. | Before deleting your page, consider deactivating it instead. Deactivating your page will hide it from the public, but you can reactivate it at any time. This option is useful if you want to take a break from managing your page without losing all your content and followers. |
| 4. | Think about the impact deleting your page will have on any connected apps or services. If you have integrated your page with other platforms, such as Instagram or Shopify, deleting the page may affect the functionality of those integrations. |
| 5. | Consider informing your followers and fans about your decision to delete the page. This can be done through a final post or by sending out a notification. Providing an explanation for your decision can help maintain a positive relationship with your audience. |
By considering these important factors, you can make an informed decision on whether to proceed with deleting your Facebook page or explore alternative options.
Step 1: Accessing the Facebook Page Settings

To remove or delete a Facebook page, you need to access the page settings. Follow the steps below to learn how to deactivate or cancel your Facebook page:
| 1. | Open the Facebook website and log in to your account. |
| 2. | On the top right corner of the Facebook homepage, click on the arrow pointing downwards. |
| 3. | A drop-down menu will appear. Click on the “Manage Pages” option. |
| 4. | You will be redirected to the “Pages” section of your Facebook account. |
| 5. | Find the page that you want to delete and click on it. |
| 6. | Once you are on the page, click on the “Settings” tab located at the top right corner. |
| 7. | A drop-down menu will appear. Click on the “Remove Page” option. |
| 8. | A confirmation pop-up will appear. Click on the “Delete” button to confirm the deletion of your Facebook page. |
By following these steps, you will be able to uninstall or delete your Facebook page. Make sure to double-check your decision as deleting a page is irreversible. Once deleted, all the content and data associated with the page will be permanently removed from Facebook.
Logging into Your Facebook Account

To uninstall or delete a Facebook page, you need to first log into your Facebook account. Here is a step-by-step guide on how to do it:
1. Open your preferred web browser and go to the Facebook website.
2. Enter your login credentials – your email address or phone number and your password.
3. Click on the “Log In” button to access your Facebook account.
4. Once logged in, navigate to the top right corner of the Facebook homepage and click on the down arrow icon.
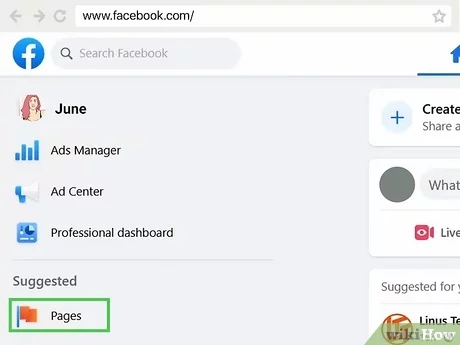
5. From the drop-down menu, select the “Manage Pages” option.
6. You will be redirected to the “Pages” section, where you can see all the pages you manage.
7. Find the page you want to delete or remove and click on it.
8. On the page’s dashboard, click on the “Settings” tab located in the top right corner.
9. Scroll down to the bottom of the settings page and click on the “Remove Page” option.
10. A pop-up window will appear asking you to confirm the deletion. Read the information provided and click on the “Delete” button to proceed.
11. After confirming the deletion, your Facebook page will be deactivated and scheduled for permanent deletion within 14 days. During this period, you can still cancel the deletion process by logging back into your account and following the instructions provided by Facebook.
By following these steps, you can easily log into your Facebook account and delete or remove a page that you no longer want to keep.
Navigating to Your Facebook Pages
To delete, uninstall, cancel, or remove a Facebook page, you need to navigate to the settings section of your Facebook account. Follow these steps to access your Facebook pages:
- Open the Facebook app or go to the Facebook website and log in to your account.
- Click on the menu icon (three horizontal lines) located at the top right corner of the screen.
- Scroll down the menu and click on “Pages”.
- You will be directed to a page that displays all the Facebook pages you manage.
- Select the page you want to delete, uninstall, cancel, or remove.
- Once you are on the page, click on the “Settings” tab located at the top right corner of the screen.
- In the settings menu, scroll down and click on “General”.
- Scroll down again and you will find the option to “Remove Page”.
- Click on “Remove Page” and follow the prompts to confirm the deletion.
By following these steps, you will be able to navigate to your Facebook pages and access the settings to delete, uninstall, cancel, or remove a page.
Step 2: Choosing the Page to Delete

Once you have decided to uninstall Facebook, you will need to cancel or remove the page that you want to delete. This step is crucial as it ensures that you are deleting the correct page and not deactivating your entire Facebook account.
To delete a specific page on Facebook, follow these steps:
| 1. | Log in to your Facebook account. |
| 2. | Go to the page that you want to delete. |
| 3. | Click on the “Settings” option located at the top right corner of the page. |
| 4. | From the drop-down menu, select “Page Settings”. |
| 5. | Scroll down to the bottom of the page settings and click on the “Remove Page” option. |
| 6. | Confirm your decision to delete the page by clicking on the “Delete” button. |
By following these steps, you will be able to deactivate or delete a specific page on Facebook without affecting your personal account or other pages that you may manage.
Selecting the Page from the List
Once you have decided to remove or uninstall a Facebook page, you need to follow a few simple steps. First, log in to your Facebook account and navigate to the main page. From there, locate the “Pages” tab on the left-hand side of the screen and click on it.
Next, you will see a list of all the pages you have created or manage. Scroll through the list and find the page that you want to delete or deactivate. Make sure to double-check the page name and details to ensure that you are selecting the correct page.
Once you have identified the page, click on the page name to open it. This will take you to the page’s main dashboard, where you can manage all aspects of the page. From here, locate the “Settings” tab at the top of the page and click on it.
In the settings menu, you will find various options and configurations for your page. Scroll down until you find the “General” section. Within this section, you will see a button labeled “Remove Page” or “Delete Page”. Click on this button to proceed with the deletion process.
Facebook will then ask you to confirm your decision to delete the page. Read through the information provided and make sure that you understand the consequences of deleting the page. If you are certain that you want to proceed, click on the “Delete” or “Deactivate” button to cancel the page.
After confirming the deletion, Facebook will remove the page from your account and it will no longer be accessible to you or anyone else. Keep in mind that this action is permanent and cannot be undone, so make sure to carefully consider your decision before deleting a Facebook page.
Confirming Your Choice

Once you have followed the steps to deactivate your Facebook page, it’s important to confirm your choice before proceeding with the uninstallation process. Take a moment to reflect on your decision and ensure that deleting your page is what you truly want.
Deleting your Facebook page is a permanent action, and once it’s done, you won’t be able to recover any of the content or information associated with it. This includes photos, videos, posts, and any other data that you have shared on your page.
If you are certain that you want to proceed with the deletion, make sure to double-check that you have backed up any important data or content that you want to keep. This can include downloading photos or saving important posts.
It’s also important to note that deleting your page will remove all your followers and likes. If you have built a community or have a significant number of followers, consider informing them about your decision before deleting the page.
Once you have confirmed your choice and are ready to proceed, you can follow the steps outlined in the previous sections to remove and delete your Facebook page.
Remember, understanding how to delete a Facebook page is essential, as it allows you to take control of your online presence and manage your social media accounts effectively.
Step 3: Initiating the Deletion Process
Once you have made the decision to delete your Facebook page, you can start the process by following these steps:
1. Log in to your Facebook account: Open the Facebook app or go to the Facebook website and enter your login credentials to access your account.
2. Navigate to your Facebook page: From the homepage, click on the menu icon (three horizontal lines) located in the top-right corner of the screen. Scroll down and click on “Pages” to view a list of all the pages you manage.
3. Select the page you want to delete: Click on the page you wish to remove from the list. This will take you to the page’s dashboard.
4. Access the “Settings” menu: On the left-hand side of the page’s dashboard, click on the “Settings” tab. This will open a drop-down menu with various options.
5. Deactivate the page: In the “General” section of the “Settings” menu, scroll down until you find the “Remove Page” option. Click on it to proceed.
6. Confirm the deletion: A pop-up window will appear asking you to confirm the deletion. Read the information provided and make sure you understand the consequences of deleting your page. If you are certain about your decision, click on the “Delete” button.
7. Cancel the deletion process: If you change your mind or want to keep your page, you can cancel the deletion process by clicking on the “Cancel Deletion” button within 14 days of initiating the deletion. After this period, the page will be permanently deleted and cannot be recovered.
By following these steps, you can easily initiate the deletion process for your Facebook page. Make sure to carefully consider your decision before proceeding, as deleting a page is permanent and cannot be undone.