If you’re looking to install Windows 10 on your HP laptop, using a USB drive is a convenient and efficient method. With a USB drive, you can easily transfer the installation files from your computer to your laptop, allowing you to install the latest version of Windows without the need for a CD or DVD. In this step-by-step guide, we’ll walk you through the process of installing Windows 10 from a USB drive on your HP laptop.
Step 1: Prepare the USB Drive
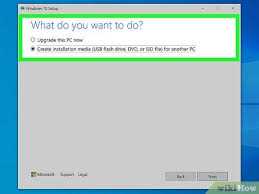
Before you can install Windows 10 from a USB drive, you’ll need to prepare the drive by formatting it and creating a bootable USB. To do this, insert the USB drive into your computer and open the Windows 10 Media Creation Tool. Follow the on-screen instructions to format the USB drive and create a bootable USB with the Windows 10 installation files.
Step 2: Configure the BIOS Settings
Next, you’ll need to configure the BIOS settings on your HP laptop to boot from the USB drive. Restart your laptop and press the designated key (usually F2, F10, or Del) to enter the BIOS setup. Navigate to the Boot tab and set the USB drive as the primary boot device. Save the changes and exit the BIOS.
Step 3: Install Windows 10
Once you’ve configured the BIOS settings, restart your laptop with the USB drive inserted. The Windows 10 installation process will begin. Follow the on-screen instructions to select your language, region, and keyboard layout. When prompted, choose the option to install Windows 10 and select the appropriate drive to install it on. Wait for the installation process to complete.
Step 4: Set Up Windows 10
After the installation is complete, your HP laptop will restart. Follow the on-screen instructions to set up Windows 10, including creating a user account, choosing privacy settings, and customizing your desktop. Once you’ve completed the setup process, you’ll be ready to use Windows 10 on your HP laptop.
By following this step-by-step guide, you can easily install Windows 10 from a USB drive on your HP laptop. This method allows for a quick and hassle-free installation, ensuring that you have the latest version of Windows up and running on your device.
Preparing for Installation
Before you can install Windows 10 from a USB on your HP laptop, you need to make sure you have the necessary tools and information. Here’s how to prepare for the installation:
- Ensure that your HP laptop meets the minimum system requirements for Windows 10. Check the official Microsoft website for the specific requirements.
- Backup any important files or data on your HP laptop. Installing Windows 10 will erase all existing data on your laptop, so it’s crucial to have a backup in case anything goes wrong.
- Create a bootable USB drive with the Windows 10 installation files. You can do this by using a tool like Rufus or the Windows 10 Media Creation Tool. Make sure you have a USB drive with at least 8GB of storage space.
- Download the necessary drivers for your HP laptop. Visit the official HP website and locate the drivers section for your specific laptop model. Download the drivers and save them to a separate USB drive or an external hard drive.
- Make note of your HP laptop’s product key. You will need this key during the installation process to activate your copy of Windows 10.
By following these steps, you will be well-prepared to install Windows 10 from a USB on your HP laptop. This will ensure a smooth and successful installation process.
Checking System Requirements
Before you install Windows 10 on your HP laptop from a USB, it is important to ensure that your system meets the necessary requirements. This will help ensure a smooth installation process and optimal performance of the operating system.
Here are the system requirements you need to check:
- Processor: Make sure your HP laptop has a compatible processor that meets the minimum requirements for Windows 10. The specific processor requirements can be found on the official Microsoft website.
- Memory (RAM): Windows 10 requires a minimum of 1 gigabyte (GB) of RAM for 32-bit or 2 GB for 64-bit. Check your laptop’s RAM capacity and make sure it meets or exceeds these requirements.
- Storage Space: Ensure that your HP laptop has enough free storage space to accommodate the Windows 10 installation files. Microsoft recommends a minimum of 20 GB for the 64-bit version and 16 GB for the 32-bit version.
- Graphics Card: Verify that your laptop’s graphics card is compatible with Windows 10. Some older graphics cards may not be supported, so it’s important to check the manufacturer’s website for compatibility information.
- Internet Connection: Although not mandatory, having an internet connection during the installation process can be beneficial as it allows for updates and drivers to be downloaded automatically.
By ensuring that your HP laptop meets these system requirements, you can proceed with confidence to install Windows 10 from a USB drive.
Backing Up Important Data
Before you begin the installation process of Windows 10 on your HP laptop using a USB drive, it is crucial to back up any important data that you have on your computer. This step is important to ensure that you do not lose any valuable files or documents during the installation process.
To back up your data, you can use an external storage device such as a USB drive or an external hard drive. Connect the storage device to your laptop and copy all the files and folders that you want to save onto the device.
Make sure to include important documents, photos, videos, and any other files that you cannot afford to lose. It is also a good idea to create a backup of your bookmarks, email contacts, and any other personalized settings that you have on your current Windows installation.
Once you have successfully backed up all your important data, you can proceed with the installation process of Windows 10 on your HP laptop. Remember to keep the backup device in a safe place so that you can easily access your files after the installation is complete.
Note: It is always recommended to regularly back up your data to prevent any unexpected data loss. This practice ensures that you have a copy of your important files in case of any hardware or software issues.
Creating a Bootable USB Drive
To install Windows 10 on your HP laptop, you will need to create a bootable USB drive. This will allow you to easily install the operating system without the need for a DVD drive.
Here is how you can create a bootable USB drive:
- First, you will need a USB drive with at least 8GB of storage space. Make sure it is empty, as all data on the drive will be erased during the process.
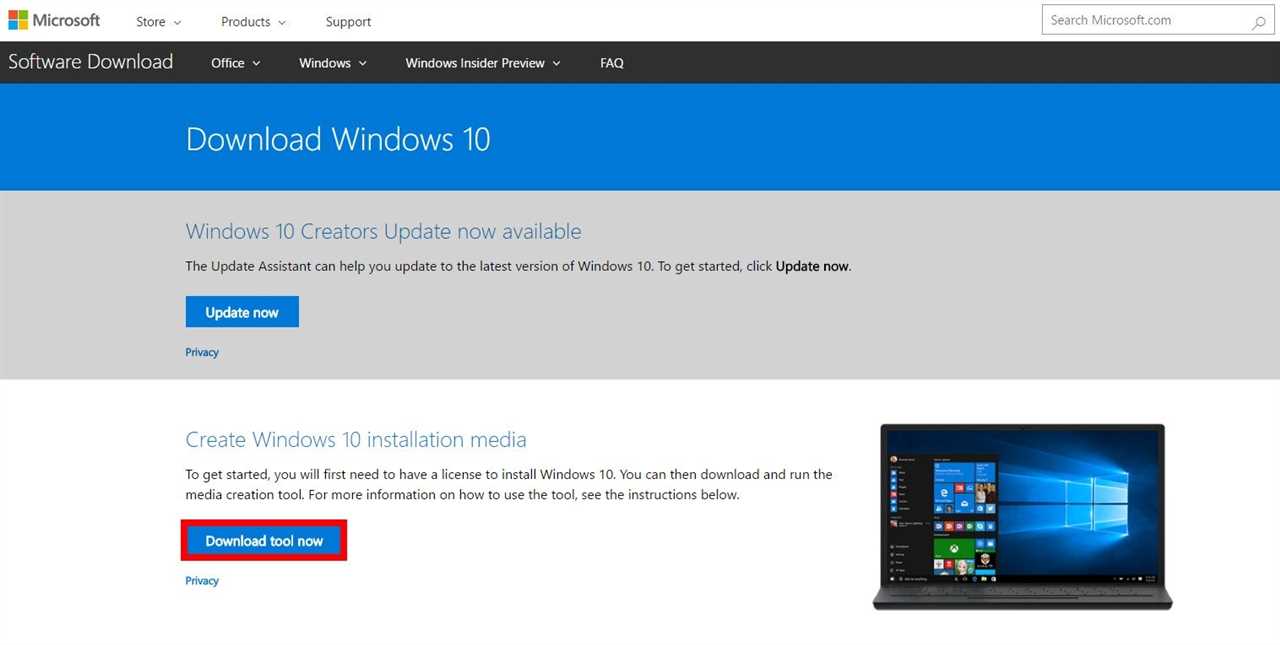
- Next, download the Windows 10 ISO file from the official Microsoft website. Make sure to select the correct version and edition of Windows 10 that you want to install on your HP laptop.
- Once the ISO file is downloaded, you will need to use a tool to create a bootable USB drive. One popular tool is Rufus, which is free to download and easy to use.
- Open Rufus and select your USB drive from the “Device” dropdown menu.
- Under the “Boot selection” section, click on the “Select” button and browse to the location where you saved the Windows 10 ISO file. Select the file and click “Open”.
- Make sure that the “Partition scheme” is set to “MBR” and the “File system” is set to “FAT32”. These are the recommended settings for most HP laptops.
- Click on the “Start” button to begin the process of creating the bootable USB drive. This may take some time, so be patient.
- Once the process is complete, you will have a bootable USB drive with Windows 10. You can now use this drive to install Windows 10 on your HP laptop.
Remember to backup any important data on your HP laptop before proceeding with the installation. Installing Windows 10 will erase all data on your laptop’s hard drive.
Note: The steps above are a general guide for creating a bootable USB drive. The exact steps may vary depending on the tool you use and the version of Windows 10 you are installing.
Installing Windows 10
When it comes to installing Windows 10 on your HP laptop, one of the most convenient methods is to use a USB drive. This allows for a faster and more efficient installation process, as well as the ability to easily transfer the installation files from one device to another.
To begin the installation process, you will need a USB drive with at least 8GB of storage capacity. Make sure to backup any important files on the USB drive, as the installation process will erase all data on it.
First, download the Windows 10 installation files from the official Microsoft website. These files will be in the form of an ISO image, which you will need to extract onto your USB drive. You can use a program like 7-Zip to extract the files.
Once the files are extracted, insert the USB drive into your HP laptop and restart the computer. As the computer boots up, press the appropriate key (usually F12 or Esc) to access the boot menu. From the boot menu, select the USB drive as the boot device.
The Windows 10 installation process will now begin. Follow the on-screen instructions to select your language, time zone, and keyboard layout. When prompted, choose the option to install Windows 10 and select the USB drive as the installation location.
Windows 10 will now be installed on your HP laptop. The installation process may take some time, so be patient. Once the installation is complete, your laptop will restart and you will be prompted to set up your Windows 10 account.
After setting up your account, you can begin using Windows 10 on your HP laptop. Make sure to install any necessary drivers and updates to ensure optimal performance. Enjoy your new Windows 10 experience!
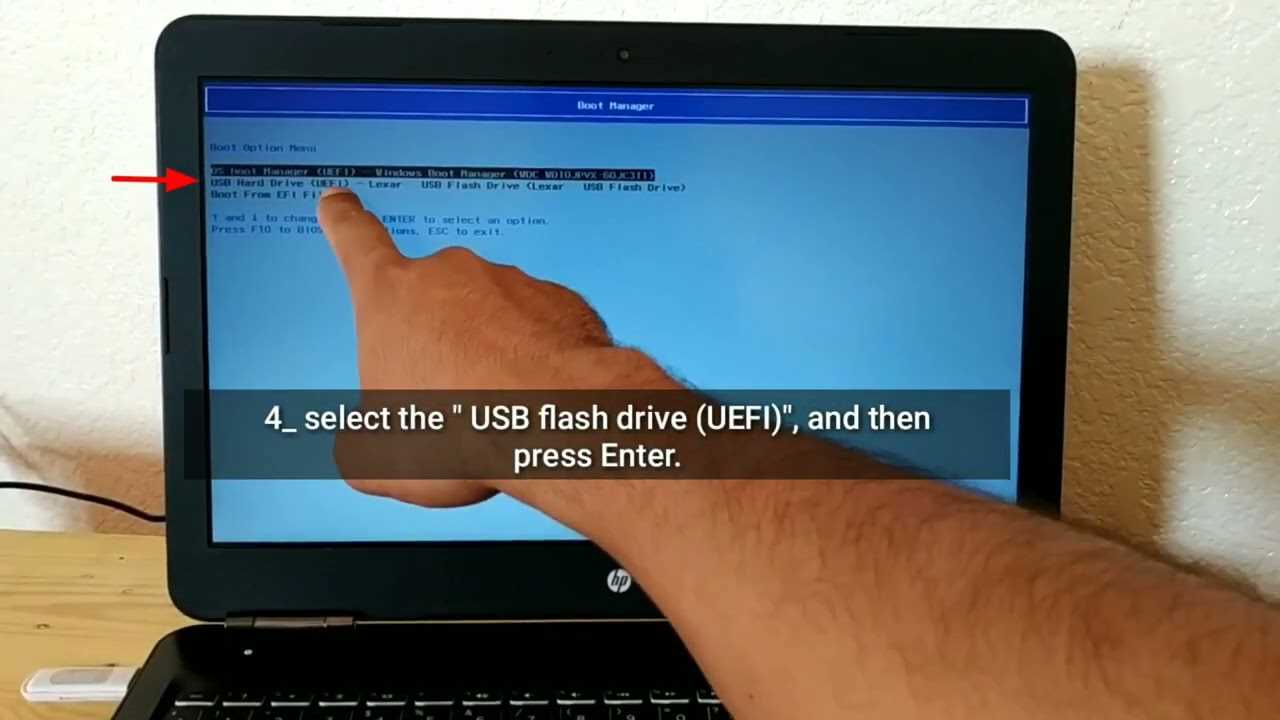
Booting from USB Drive
To install Windows 10 from a USB drive on your HP laptop, you need to boot your laptop from the USB drive. Here is how you can do it:
- Insert the USB drive into one of the USB ports on your HP laptop.
- Turn on your laptop and immediately press the key (usually F12, F10, or Esc) to enter the boot menu.
- Use the arrow keys to navigate to the “Boot” or “Boot Options” menu.
- Select the USB drive from the list of boot options.
- Press Enter to boot from the USB drive.
Once your laptop boots from the USB drive, the Windows 10 installation process will begin. Follow the on-screen instructions to complete the installation.
Selecting Language and Region Settings
When you install Windows 10 from a USB on your HP laptop, one of the first steps you will encounter is selecting the language and region settings. This step is crucial as it determines the language in which your operating system will be displayed and the region-specific settings that will be applied.
To begin, insert the USB drive containing the Windows 10 installation files into your HP laptop. Then, power on your laptop and press the appropriate key (usually F12 or Esc) to access the boot menu. From the boot menu, select the USB drive as the primary boot device and press Enter.
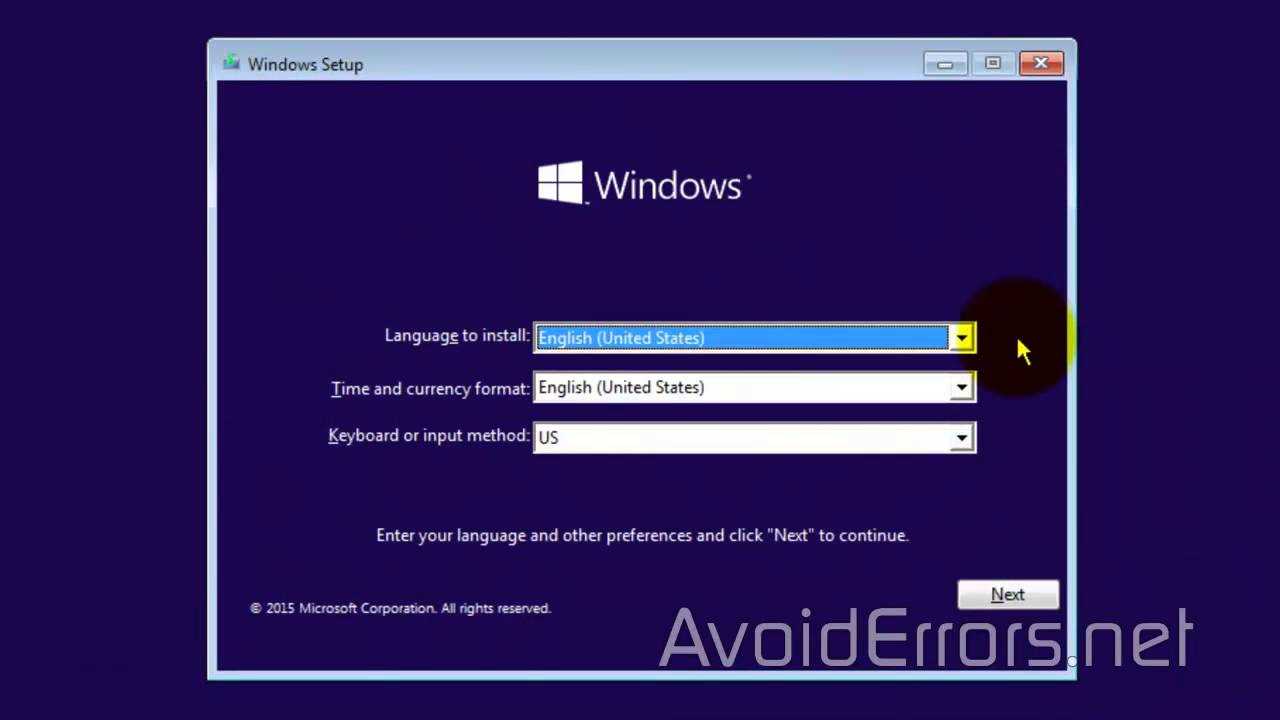
Once the Windows 10 installation process starts, you will be prompted to select your language and region settings. Use the arrow keys on your keyboard to navigate through the options and press Enter to make a selection.
In the language selection screen, choose the language that you want Windows 10 to be displayed in. This can be your preferred language or the language that is commonly used in your region. After selecting the language, press Next to proceed.
Next, you will be asked to choose your region. This selection determines the default settings for date, time, and currency formats, as well as the keyboard layout. Select the region that matches your location or preference and click Next.
Once you have made your language and region selections, Windows 10 will continue with the installation process. It is important to note that these settings can be changed later in the operating system, so don’t worry if you need to make adjustments in the future.
| Language | Region |
|---|---|
| English (United States) | United States |
| English (United Kingdom) | United Kingdom |
| Spanish | Spain |
| French | France |
After completing the language and region settings, you can proceed with the installation of Windows 10 on your HP laptop. Follow the on-screen instructions to complete the installation process and set up your new operating system.
Choosing Installation Type
When it comes to installing Windows 10 on your HP laptop from a USB, you have a few different options to choose from. The installation type you select will depend on your specific needs and preferences.
Upgrade: If you already have a previous version of Windows installed on your laptop and you want to keep your files and settings, you can choose the “Upgrade” option. This will install Windows 10 while preserving your existing data.
Custom: If you want to perform a clean installation of Windows 10, wiping out all the data on your laptop, you can select the “Custom” option. This is recommended if you’re experiencing issues with your current operating system or if you want to start fresh.
Partition: If you have multiple partitions on your laptop’s hard drive and you want to choose a specific partition to install Windows 10 on, you can select the “Partition” option. This allows you to select the desired partition and install Windows 10 on it.
Advanced: The “Advanced” option provides additional customization options during the installation process. This includes options like formatting partitions, creating new partitions, and managing disk space. Only choose this option if you have advanced knowledge and experience with Windows installations.
Now that you know the different installation types available, you can choose the one that best suits your needs. Follow the step-by-step guide to learn how to install Windows 10 from a USB on your HP laptop.
Completing the Installation

Once the Windows 10 installation process on your HP laptop from the USB drive is complete, you will need to follow a few final steps to finish the setup.
- First, remove the USB drive from your laptop to prevent the system from booting from it again.
- Next, your laptop will restart. During the restart process, you may see the HP logo or a black screen with a loading icon. This is normal and indicates that the installation is in progress.
- After the restart, you will be prompted to choose your region and language preferences. Select the appropriate options and click “Next” to continue.
- On the next screen, you will be asked to connect to a network. Choose your Wi-Fi network and enter the password if necessary. If you prefer, you can also skip this step and connect to a network later.
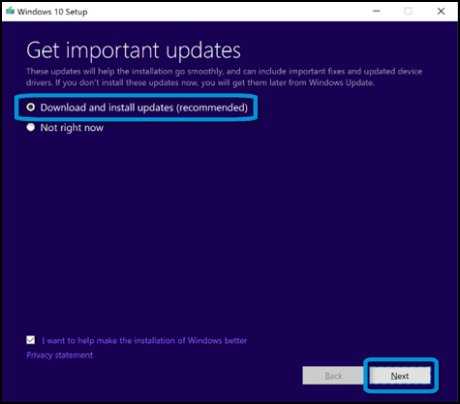
- Once connected to a network, Windows will check for updates. It is recommended to install any available updates to ensure your laptop is up to date.
- After the updates are installed, you will be asked to sign in with a Microsoft account or create a new one. This step is optional, but it allows you to access additional features and services.
- Finally, you will be presented with the “Get going fast” screen. Here, you can choose to use the recommended settings or customize them according to your preferences. Click “Next” to proceed.
- Windows 10 will then finalize the installation and prepare your laptop for use. This process may take a few minutes.
Once the completion process is finished, you will be taken to the Windows 10 desktop. Congratulations! You have successfully installed Windows 10 on your HP laptop from a USB drive.