If you’re wondering how to install Windows 11 on your NVMe SSD, you’ve come to the right place. In this step-by-step guide, we’ll walk you through the process of installing the latest version of Windows on your NVMe SSD, ensuring a smooth and efficient installation.
Windows 11 is the latest operating system from Microsoft, packed with new features and a sleek user interface. Installing it on an NVMe SSD can significantly improve your system’s performance, thanks to the lightning-fast read and write speeds offered by NVMe technology.
Before we dive into the installation process, it’s important to note that not all computers support NVMe SSDs. Make sure your computer has an available NVMe slot and that your BIOS is up to date. If you’re unsure, consult your computer’s manual or contact the manufacturer for assistance.
Once you’ve confirmed that your computer supports NVMe SSDs, you’re ready to begin the installation process. Follow the steps below to install Windows 11 on your NVMe SSD:
Preparation
Before you can install Windows 11 on your NVMe SSD, you need to make sure you have everything you need and that your system meets the necessary requirements. Here’s a step-by-step guide on how to prepare:
1. Check system requirements:
Make sure your computer meets the minimum system requirements for Windows 11. This includes having a compatible processor, sufficient RAM, and a supported graphics card.
2. Backup your data:
Before proceeding with the installation, it’s important to back up all your important files and data. This will ensure that you don’t lose any valuable information in case something goes wrong during the installation process.
3. Download Windows 11:
Go to the official Microsoft website and download the Windows 11 installation media. You can choose to download the ISO file or use the Media Creation Tool to create a bootable USB drive.
4. Create a bootable USB drive:
If you chose to download the ISO file, you’ll need to create a bootable USB drive using software like Rufus or the Media Creation Tool. This will allow you to install Windows 11 from the USB drive.
5. Prepare your NVMe SSD:
Ensure that your NVMe SSD is properly connected to your computer and recognized by the BIOS. You may need to adjust the BIOS settings to enable NVMe support if it’s not already enabled.
6. Disable Secure Boot:
If Secure Boot is enabled in your BIOS settings, you’ll need to disable it before installing Windows 11. This can usually be done by accessing the BIOS settings and navigating to the Secure Boot option.
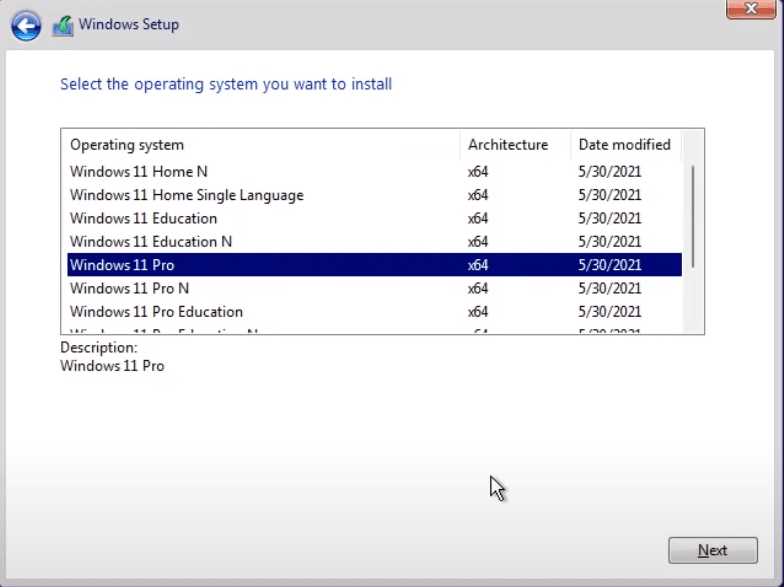
7. Prepare for clean installation:
If you’re planning to do a clean installation of Windows 11, make sure you have your product key ready. You’ll need it during the installation process.
By following these steps, you’ll be well-prepared to install Windows 11 on your NVMe SSD and enjoy the benefits of the latest operating system.
Check System Requirements
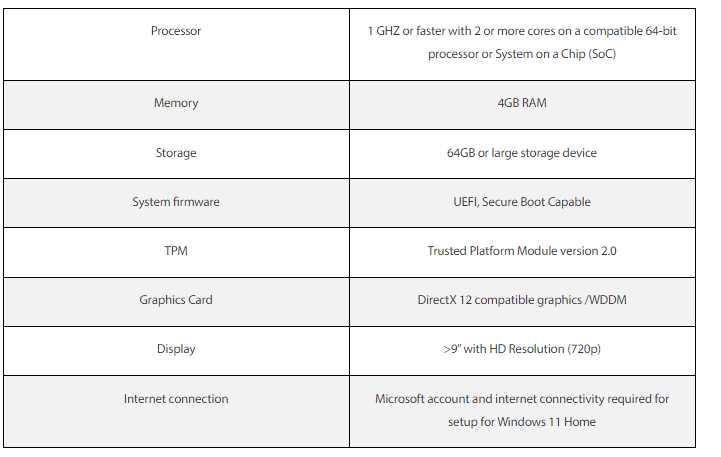
Before installing Windows 11 on an NVMe SSD, it is important to ensure that your system meets the necessary requirements. Here’s how to check if your system is compatible:
| Requirement | Description |
|---|---|
| NVMe SSD | Your system must have an NVMe SSD installed. NVMe (Non-Volatile Memory Express) is a high-performance storage interface designed specifically for SSDs. |
| Windows 11 | Make sure you have a copy of Windows 11 installation media. You can download the ISO file from the official Microsoft website. |
By ensuring that your system meets these requirements, you can proceed with the installation of Windows 11 on your NVMe SSD.
Backup Your Data

Before proceeding with the installation of Windows 11 on your NVMe SSD, it is crucial to back up your data to ensure that you don’t lose any important files or documents. The installation process involves formatting the drive, which will erase all existing data on it.
To back up your data, you can follow these steps:
- Connect an external storage device, such as a USB drive or an external hard drive, to your computer.
- Copy and paste all the files and folders that you want to back up onto the external storage device.
- Double-check that all your important data has been successfully copied to the external storage device.
By backing up your data, you can have peace of mind knowing that even if something goes wrong during the installation process, you will still have a copy of your files. Once you have completed the backup process, you can proceed with the installation of Windows 11 on your NVMe SSD.
Create a Bootable USB Drive

To install Windows 11 on an NVMe SSD, you will need to create a bootable USB drive. This will allow you to easily install the operating system on your computer.
Here is how you can create a bootable USB drive:
- First, you will need a USB drive with at least 8GB of storage space. Make sure there is no important data on the drive, as it will be formatted during the process.
- Download the Windows 11 ISO file from the official Microsoft website.
- Insert the USB drive into your computer.
- Open the Windows 11 ISO file using a program like WinRAR or 7-Zip.
- Copy all the files from the ISO file to the USB drive.
- Once the copying process is complete, safely eject the USB drive from your computer.
Your bootable USB drive is now ready to be used for installing Windows 11 on your NVMe SSD. Make sure to set your computer to boot from the USB drive in the BIOS settings before starting the installation process.