Are you looking to install Windows 10 on your computer? Look no further! In this step-by-step guide, we will show you how to install Windows 10 from a USB drive. Installing Windows 10 from a USB drive is a convenient and efficient way to get the latest version of Windows up and running on your machine.
First, you will need a USB drive with at least 8GB of storage space. Make sure to back up any important files on the USB drive, as the installation process will erase all data on it. Next, you will need to download the Windows 10 installation files from the official Microsoft website. These files will be in the form of an ISO image, which you will need to extract onto the USB drive.
Once you have the Windows 10 installation files on your USB drive, you can proceed with the installation process. Restart your computer and enter the BIOS settings by pressing the appropriate key (usually F2 or Del) during startup. In the BIOS settings, change the boot order so that the USB drive is the first boot device. Save the changes and exit the BIOS settings.
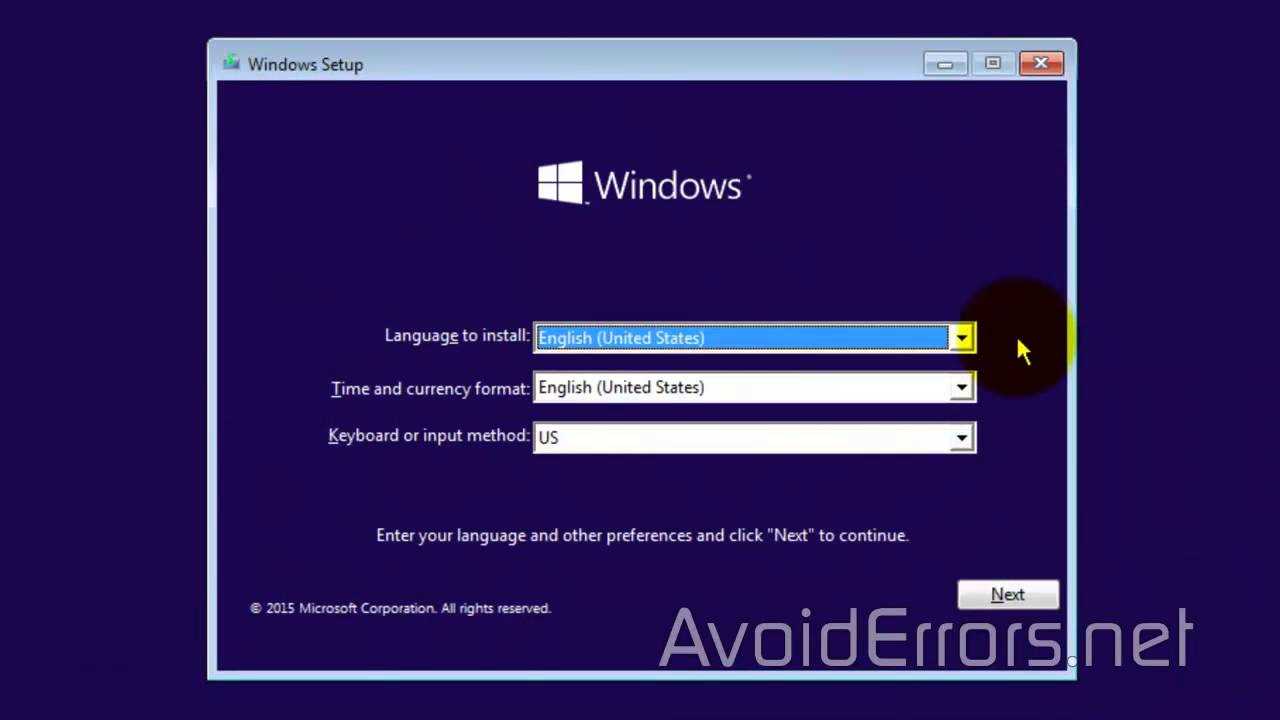
Now, insert the USB drive into your computer and restart it. The Windows 10 installation process will begin. Follow the on-screen instructions to select your language, region, and keyboard layout. Next, you will be prompted to enter your product key. If you don’t have a product key, you can skip this step and activate Windows later.
After entering the product key, you will need to select the installation type. Choose “Custom: Install Windows only (advanced)” to perform a clean installation of Windows 10. Select the partition where you want to install Windows and click “Next” to start the installation process. The installation may take some time, so be patient.
Once the installation is complete, your computer will restart. Remove the USB drive from your computer and follow the on-screen instructions to set up Windows 10. You will need to create a user account and customize your settings. Congratulations, you have successfully installed Windows 10 from a USB drive!
In conclusion, installing Windows 10 from a USB drive is a straightforward process that allows you to get the latest version of Windows up and running on your computer. Follow the step-by-step guide above, and you’ll be enjoying all the new features and improvements of Windows 10 in no time!
Preparing the USB Drive
Before you can install Windows 10 from a USB drive, you need to prepare the drive properly. Follow these steps to ensure a smooth installation:
- Insert the USB drive into your computer.
- Open the Windows 10 installation media creation tool.
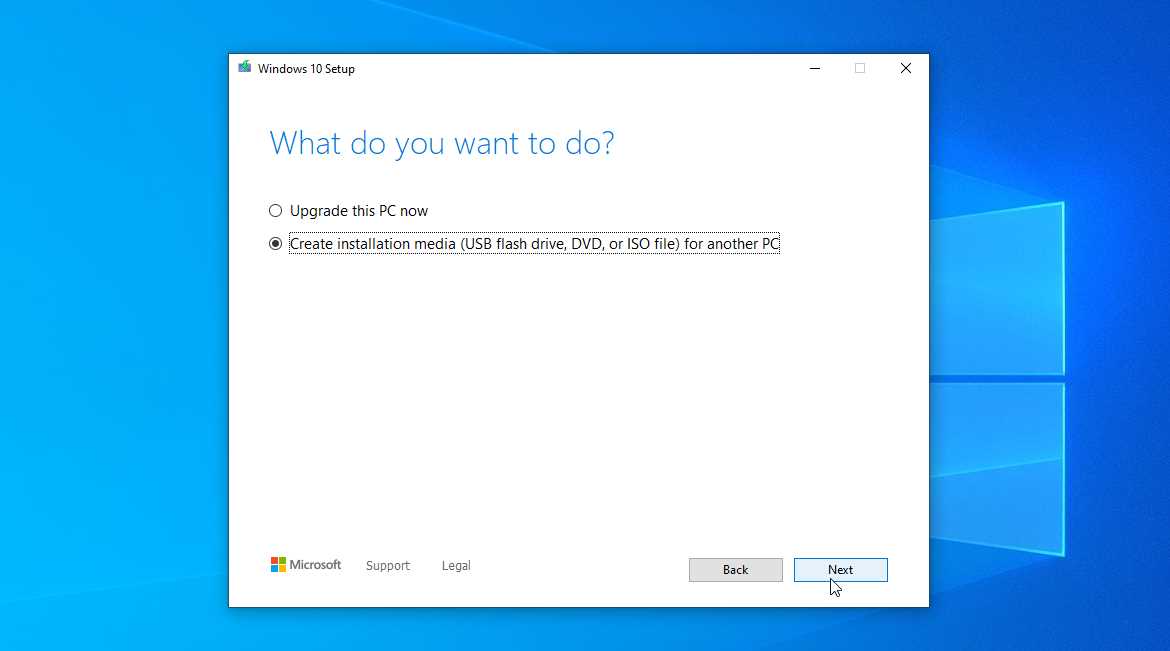
- Select “Create installation media (USB flash drive, DVD, or ISO file) for another PC” and click “Next”.
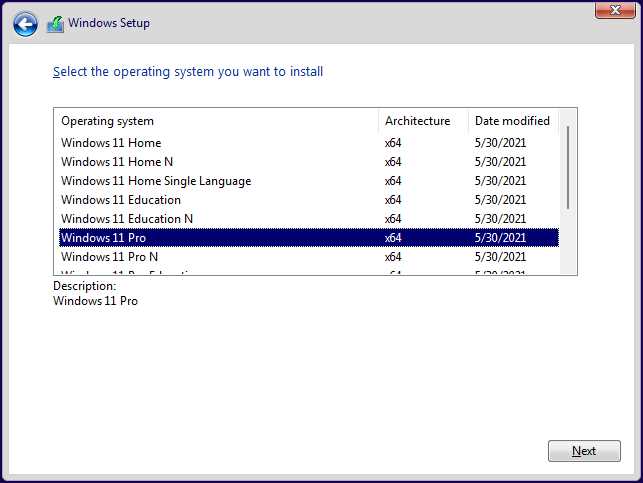
- Choose the language, edition, and architecture (32-bit or 64-bit) of Windows 10 that you want to install.
- Select “USB flash drive” as the media to use.
- Click “Next” and choose the USB drive you inserted earlier.
- Click “Next” again and wait for the tool to download and create the Windows 10 installation files on the USB drive.
- Once the process is complete, safely eject the USB drive from your computer.
Your USB drive is now ready to be used for installing Windows 10. Make sure to keep it in a safe place until you’re ready to proceed with the installation.
Format the USB Drive
Before you can install Windows 10 from a USB drive, you need to make sure that the drive is properly formatted. Formatting the USB drive will erase all the data on it, so make sure to back up any important files before proceeding.
To format the USB drive, follow these steps:
- Connect the USB drive to your computer.
- Open File Explorer and locate the USB drive.
- Right-click on the USB drive and select “Format” from the context menu.
- In the Format window, make sure that the File System is set to “FAT32”.
- Check the “Quick Format” option.
- Click on the “Start” button to begin the formatting process.
- Wait for the formatting to complete.
- Once the formatting is done, you can proceed to create a bootable USB drive with Windows 10.
Formatting the USB drive will ensure that it is compatible with the Windows 10 installation process. It will also remove any existing data on the drive, so be sure to back up any important files beforehand.
Create a Bootable USB Drive
To install Windows 10 from a USB drive, you will need to create a bootable USB drive. This will allow you to boot your computer from the USB drive and begin the installation process. Here’s how to create a bootable USB drive:
- First, you will need a USB drive with at least 8GB of storage. Make sure there is no important data on the USB drive, as it will be formatted during the process.
- Download the Windows 10 installation media from the official Microsoft website. You can find the download link on the Windows 10 download page.
- Once the download is complete, insert the USB drive into your computer.
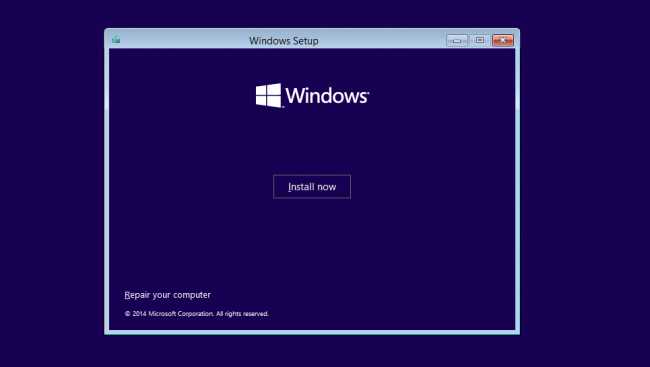
- Open the downloaded Windows 10 installation media and run the setup file.
- Follow the on-screen instructions to select your language, edition, and architecture.
- When you reach the “Choose which media to use” screen, select “USB flash drive”.
- Click “Next” and then select your USB drive from the list of available drives.
- Click “Next” again and wait for the Windows 10 installation media to be created on the USB drive.
- Once the process is complete, you will have a bootable USB drive with Windows 10.
Now you can use this bootable USB drive to install Windows 10 on any computer. Simply insert the USB drive into the computer you want to install Windows 10 on, boot from the USB drive, and follow the on-screen instructions to complete the installation.
Copy Windows 10 Installation Files to the USB Drive
To install Windows 10 from a USB drive, you need to first copy the installation files onto the USB drive. This process allows you to create a bootable USB drive that can be used to install Windows 10 on any compatible computer.
Here are the steps to copy the Windows 10 installation files to the USB drive:
- Insert the USB drive into your computer’s USB port.
- Open File Explorer and navigate to the location where you have saved the Windows 10 ISO file.
- Right-click on the ISO file and select “Mount” from the context menu. This will create a virtual DVD drive with the Windows 10 installation files.
- Open the virtual DVD drive and select all the files and folders.
- Right-click on the selected files and click on “Copy”.
- Go back to File Explorer and navigate to the USB drive.
- Right-click on an empty space in the USB drive and select “Paste”. This will copy the Windows 10 installation files to the USB drive.
- Wait for the copying process to complete. This may take a few minutes depending on the size of the installation files and the speed of your USB drive.
- Once the copying process is complete, you can safely remove the USB drive from your computer.
Now you have successfully copied the Windows 10 installation files to the USB drive. You can use this USB drive to install Windows 10 on any compatible computer by booting from the USB drive.
Installing Windows 10
Are you wondering how to install Windows 10 from a USB drive? Look no further! This step-by-step guide will walk you through the process.
Step 1: Prepare your USB drive. Make sure it has at least 8GB of storage space and is formatted correctly.
Step 2: Download the Windows 10 installation media from the official Microsoft website. You will need a valid product key to proceed.
Step 3: Connect the USB drive to your computer and restart it. Press the necessary key to enter the boot menu and select the USB drive as the boot device.
Step 4: Follow the on-screen instructions to begin the installation process. Choose your language, time zone, and keyboard layout.
Step 5: Select “Custom installation” and choose the hard drive where you want to install Windows 10. Make sure to back up any important files before proceeding.
Step 6: Wait for the installation process to complete. Your computer will restart several times during this process.
Step 7: Once the installation is finished, you will need to set up your Windows 10 account. Follow the prompts to create a username and password.
Step 8: Customize your settings, such as privacy options and automatic updates.
Step 9: Congratulations! You have successfully installed Windows 10 from a USB drive. Enjoy exploring all the new features and improvements!
Insert the USB Drive and Restart Your Computer
To install Windows 10 from a USB drive, you will need to insert the USB drive into a USB port on your computer. Make sure that the USB drive contains the Windows 10 installation files. If you don’t have the installation files on the USB drive, you can create a bootable USB drive using the Windows 10 Media Creation Tool.
Once the USB drive is inserted, you will need to restart your computer. To do this, click on the Start menu, select the Power option, and then click on Restart. Alternatively, you can press the Windows key + X and select the Restart option from the menu.
When your computer restarts, it will boot from the USB drive instead of the internal hard drive. This will allow you to begin the Windows 10 installation process. If your computer does not automatically boot from the USB drive, you may need to change the boot order in the BIOS settings. Consult your computer’s documentation or manufacturer’s website for instructions on how to do this.