Welcome to our step-by-step guide on how to install Ubuntu Server! Whether you are a beginner or an experienced user, this guide will walk you through the process of installing Ubuntu Server on your server machine. Ubuntu Server is a powerful and reliable operating system that is widely used for hosting websites, running applications, and managing data. By following this guide, you will have a fully functional Ubuntu Server up and running in no time!
Why choose Ubuntu Server?
Ubuntu Server is a popular choice for server installations due to its stability, security, and extensive software ecosystem. It is based on the Debian Linux distribution and is known for its ease of use and flexibility. Whether you are setting up a small home server or a large-scale enterprise infrastructure, Ubuntu Server provides the tools and features you need to get the job done.
Installing Ubuntu Server
Now let’s dive into the installation process. Before you begin, make sure you have a server machine with compatible hardware and a bootable USB drive or DVD with the Ubuntu Server installation image. Follow the steps below to install Ubuntu Server:
Preparing for Installation

Before you begin the installation process, there are a few things you need to do to prepare your system for Ubuntu Server.
1. Check System Requirements: Make sure your hardware meets the minimum system requirements for Ubuntu Server. This includes having a compatible processor, sufficient RAM, and enough disk space.
2. Download Ubuntu Server: Visit the official Ubuntu website and download the latest version of Ubuntu Server. You can choose to download the ISO file or use the torrent option if you prefer.
3. Create a Bootable USB Drive: Once you have downloaded the Ubuntu Server ISO file, you will need to create a bootable USB drive. This will allow you to install Ubuntu Server from the USB drive instead of using a CD or DVD.
4. Backup Your Data: Before you proceed with the installation, it is always a good idea to backup any important data on your system. This will ensure that you don’t lose any files in case something goes wrong during the installation process.
5. Configure BIOS Settings: Depending on your system, you may need to configure the BIOS settings to boot from the USB drive. Consult your system’s documentation or manufacturer’s website for instructions on how to do this.
6. Test the Bootable USB Drive: Before you start the installation, it is recommended to test the bootable USB drive to make sure it is working properly. Restart your system and boot from the USB drive to ensure that Ubuntu Server loads correctly.
By following these steps, you will be well-prepared to install Ubuntu Server on your system.
System Requirements
Before you begin the installation process, make sure your system meets the following requirements:
| Operating System | Ubuntu Server |
| Processor | 1 GHz or faster |
| Memory | 2 GB RAM |
| Storage | 25 GB available disk space |
| Network | Ethernet connection |
Ensure that your system meets these requirements to ensure a smooth and successful installation of Ubuntu Server.
Downloading Ubuntu Server ISO

To install Ubuntu Server, you will need to download the Ubuntu Server ISO file. The ISO file contains the complete installation package for the server version of Ubuntu.
To download the Ubuntu Server ISO, follow these steps:
- Go to the official Ubuntu website at https://ubuntu.com/download/server.
- Click on the “Download” button.
- On the download page, select the version of Ubuntu Server that you want to install. You can choose between the LTS (Long-Term Support) version or the latest version.
- Choose the architecture that matches your server hardware. Ubuntu Server is available for both 64-bit (amd64) and 32-bit (i386) systems.
- Click on the “Download” button to start the download.
Once the download is complete, you will have the Ubuntu Server ISO file ready for installation. You can then proceed to the next step of the installation process.
Creating a Bootable USB Drive

To install Ubuntu Server, you will need to create a bootable USB drive. This will allow you to easily install the server on your computer. Here is a step-by-step guide on how to create a bootable USB drive:
1. Download the Ubuntu Server ISO file from the official Ubuntu website.
2. Insert a USB drive into your computer. Make sure it has enough storage space to hold the Ubuntu Server ISO file.
3. Open a terminal and run the following command to identify the USB drive:
sudo fdisk -l
4. Note down the device name of the USB drive (e.g., /dev/sdb).
5. Run the following command to unmount the USB drive:
sudo umount /dev/sdb
6. Run the following command to create a bootable USB drive:
sudo dd bs=4M if=/path/to/ubuntu-server.iso of=/dev/sdb status=progress
Make sure to replace /path/to/ubuntu-server.iso with the actual path to the Ubuntu Server ISO file, and /dev/sdb with the device name of the USB drive.
7. Wait for the command to finish. This may take some time depending on the size of the ISO file and the speed of your USB drive.
8. Once the command is complete, you will have a bootable USB drive with Ubuntu Server. You can now use this USB drive to install Ubuntu Server on your computer.
By following these steps, you can easily create a bootable USB drive to install Ubuntu Server. This will allow you to set up your own server and take advantage of the many features and capabilities it offers.
Installing Ubuntu Server

To install Ubuntu Server, follow these steps:
- Download the Ubuntu Server ISO from the official website.
- Create a bootable USB drive or burn the ISO to a DVD.
- Insert the bootable USB drive or DVD into the server.
- Boot the server from the USB drive or DVD.
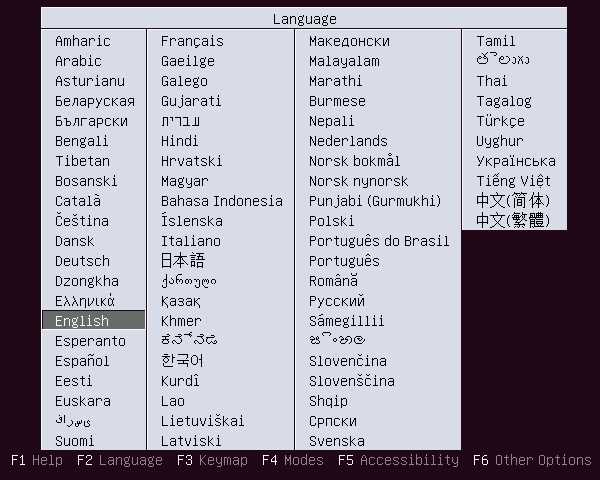
- Select the language and press Enter.
- Select “Install Ubuntu Server” from the menu.
- Choose your language again and press Enter.
- Select your location and press Enter.
- Configure your keyboard layout and press Enter.
- Enter a hostname for the server and press Enter.
- Choose your timezone and press Enter.
- Create a user account and set a password.
- Choose whether to encrypt your home directory.
- Partition your disks or use the entire disk.
- Confirm the changes and wait for the installation to complete.
- Remove the installation media and reboot the server.
Once the server has rebooted, you can log in with your username and password to start using Ubuntu Server.
Booting from USB Drive

To install Ubuntu Server, you will need to boot your server from a USB drive. Here is a step-by-step guide on how to do it:
Step 1: Insert the USB drive into your server’s USB port.
Step 2: Power on your server and access the BIOS settings. The key to access the BIOS settings may vary depending on your server’s manufacturer, but it is usually one of the function keys (F1, F2, F10, etc.) or the Delete key.
Step 3: In the BIOS settings, navigate to the “Boot” or “Boot Order” section.
Step 4: Change the boot order to prioritize the USB drive. Move the USB drive to the top of the boot order list.
Step 5: Save the changes and exit the BIOS settings. Your server will now restart.
Step 6: When your server restarts, it will boot from the USB drive. The Ubuntu Server installation menu will appear.
Step 7: Follow the on-screen instructions to install Ubuntu Server. You can choose the language, keyboard layout, and other installation options.
Step 8: Once the installation is complete, remove the USB drive and restart your server. Ubuntu Server will now be installed on your server’s hard drive.
Note: Make sure to back up any important data on your server before installing Ubuntu Server, as the installation process will format the server’s hard drive.
Selecting Installation Options
Once you have booted into the Ubuntu Server installation media, you will be presented with a series of options to configure your server. This step-by-step guide will walk you through the process of selecting the appropriate installation options.
First, you will need to choose the language for the installation process. Use the arrow keys to navigate and press Enter to select your preferred language.
Next, you will be prompted to select your location. This will determine the time zone and other regional settings for your server. Again, use the arrow keys to navigate and press Enter to make your selection.
After selecting your location, you will be asked to configure the keyboard layout. Use the arrow keys to navigate and press Enter to choose the appropriate layout for your keyboard.
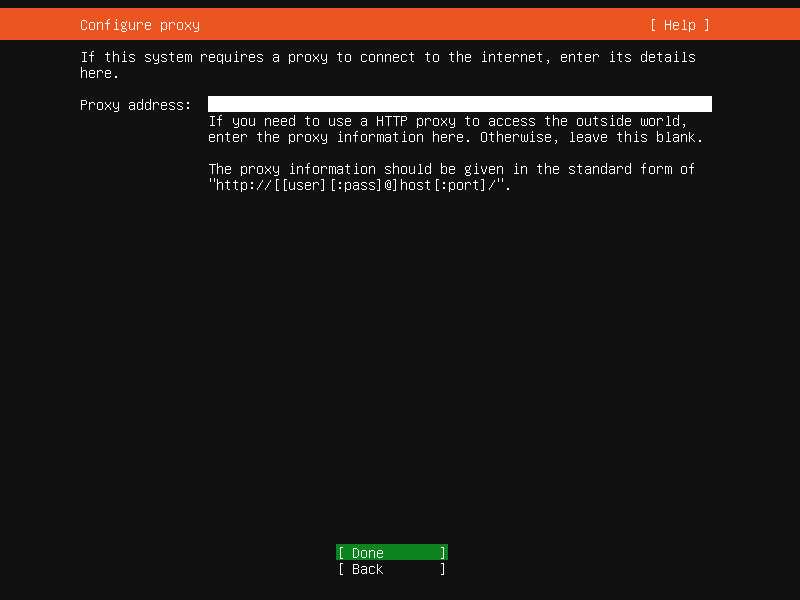
Once you have configured the keyboard layout, you will be presented with the option to configure the network. If you are installing Ubuntu Server on a physical machine, you will need to select the network interface that you want to use for the installation. Use the arrow keys to navigate and press Enter to select the desired network interface.
If you are installing Ubuntu Server on a virtual machine, you may need to configure the network settings manually. Consult the documentation for your virtualization software for more information on how to do this.
Finally, you will be asked to enter a hostname for your server. This is the name that will be used to identify your server on the network. Choose a descriptive and unique hostname that reflects the purpose of your server.
Once you have completed these steps, you will be ready to proceed with the installation process. Press Enter to continue and follow the on-screen instructions to install Ubuntu Server on your machine.