If you want to install Ubuntu on your computer without making any changes to your existing operating system, VirtualBox is the perfect solution. VirtualBox is a free and open-source virtualization software that allows you to run multiple operating systems on a single machine. In this step-by-step guide, we will show you how to install Ubuntu on VirtualBox.
Step 1: Download and Install VirtualBox
The first step is to download and install VirtualBox on your computer. VirtualBox is available for Windows, macOS, and Linux. Visit the official VirtualBox website and download the appropriate version for your operating system. Once the download is complete, run the installer and follow the on-screen instructions to install VirtualBox.
Step 2: Download the Ubuntu ISO
Next, you need to download the Ubuntu ISO file. The ISO file contains the installation files for Ubuntu. Visit the official Ubuntu website and download the latest version of Ubuntu. Make sure to select the appropriate version for your system architecture (32-bit or 64-bit).
Step 3: Create a New Virtual Machine
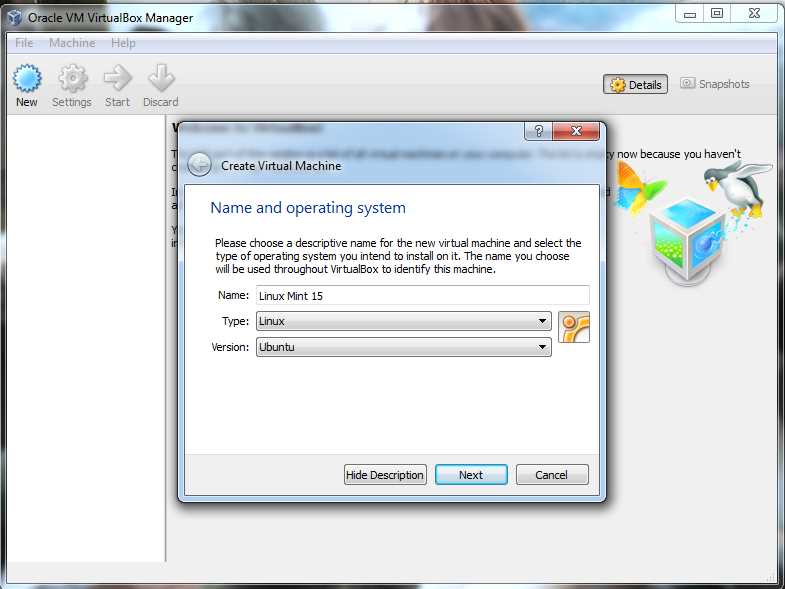
Once you have VirtualBox installed and the Ubuntu ISO file downloaded, open VirtualBox and click on the “New” button to create a new virtual machine. Give your virtual machine a name and select “Linux” as the type and “Ubuntu” as the version. Set the amount of memory you want to allocate to the virtual machine and click “Next”.
Step 4: Configure the Virtual Machine
In the next step, you need to configure the virtual machine. Select “Create a virtual hard disk now” and click “Create”. Choose the hard disk file type and click “Next”. Select “Dynamically allocated” for the storage on physical hard disk and set the size for the virtual hard disk. Click “Create” to finish creating the virtual machine.
Step 5: Install Ubuntu
With the virtual machine created, select it from the list and click on the “Settings” button. In the settings window, go to the “Storage” tab and click on the empty CD/DVD drive. On the right side, click on the disk icon and select “Choose a disk file”. Browse and select the Ubuntu ISO file you downloaded earlier. Click “OK” to save the settings.
Finally, click on the “Start” button to launch the virtual machine. The Ubuntu installation process will begin. Follow the on-screen instructions to install Ubuntu on the virtual machine. Once the installation is complete, you can start using Ubuntu on VirtualBox.
By following these step-by-step instructions, you can easily install Ubuntu on VirtualBox and enjoy the benefits of running multiple operating systems on a single machine. VirtualBox provides a safe and convenient way to explore different operating systems without affecting your main system.
Requirements
To install Ubuntu on VirtualBox, you will need the following:
- VirtualBox: Download and install the latest version of VirtualBox from the official website.
- Ubuntu ISO: Download the Ubuntu ISO file from the official website. Choose the version that you want to install.
- Computer: Make sure your computer meets the minimum system requirements for running VirtualBox and Ubuntu.
- Storage: Allocate enough storage space on your computer to install VirtualBox and the Ubuntu virtual machine.
- RAM: Allocate enough RAM to the Ubuntu virtual machine to ensure smooth performance.
- Internet connection: Make sure you have a stable internet connection to download VirtualBox and the Ubuntu ISO file.
Once you have all the requirements, you can proceed with the installation process.
VirtualBox Installation

If you want to install Ubuntu on your computer without affecting your current operating system, you can use VirtualBox. VirtualBox is a virtualization software that allows you to run multiple operating systems on a single machine.
Here is a step-by-step guide on how to install Ubuntu on VirtualBox:
- First, you need to download and install VirtualBox on your computer. You can download it from the official VirtualBox website.
- Once the installation is complete, open VirtualBox and click on the “New” button to create a new virtual machine.
- Give your virtual machine a name, select “Linux” as the type, and choose “Ubuntu (64-bit)” as the version.
- Allocate the amount of memory you want to allocate to the virtual machine. It is recommended to allocate at least 2GB of memory.
- Next, create a virtual hard disk for your virtual machine. Choose “Create a virtual hard disk now” and click “Create”.
- Choose the type of virtual hard disk you want to create. It is recommended to choose “VDI (VirtualBox Disk Image)”.
- Select “Dynamically allocated” for the storage on physical hard disk.
- Allocate the amount of storage you want to allocate to the virtual machine. It is recommended to allocate at least 20GB of storage.
- Click “Create” to create the virtual hard disk.
- Once the virtual machine is created, select it from the list and click on the “Settings” button.
- In the settings, go to the “Storage” tab and click on the “Empty” CD/DVD drive.
- Click on the CD/DVD icon next to “IDE Secondary Master” and select “Choose a disk file”.
- Select the Ubuntu ISO file you downloaded earlier and click “OK”.
- Click “OK” to save the settings.
- Finally, click on the “Start” button to start the virtual machine.
- Follow the on-screen instructions to install Ubuntu on VirtualBox.
That’s it! You have successfully installed Ubuntu on VirtualBox. Now you can enjoy using Ubuntu without affecting your current operating system.
Ubuntu ISO File

Before you can install Ubuntu on VirtualBox, you will need to download the Ubuntu ISO file. The ISO file contains the installation files for Ubuntu, and it is necessary for the installation process.
To download the Ubuntu ISO file, you can visit the official Ubuntu website and navigate to the “Download” section. From there, you can choose the version of Ubuntu you want to install and click on the corresponding download link. Make sure to select the version that is compatible with VirtualBox.
Once the ISO file is downloaded, you can proceed with the installation process. In VirtualBox, create a new virtual machine and configure its settings. During the setup, you will be prompted to select the ISO file you downloaded as the installation media. This will allow VirtualBox to install Ubuntu on the virtual machine.
It is important to have the Ubuntu ISO file ready before starting the installation process. Without it, you will not be able to install Ubuntu on VirtualBox.
Sufficient System Resources
Before you proceed with the installation, it is important to ensure that your system has sufficient resources to run VirtualBox and Ubuntu smoothly. Here are the recommended system requirements:
- Processor: A dual-core processor or higher is recommended.
- Memory (RAM): At least 4GB of RAM is recommended for optimal performance.
- Storage: You will need at least 20GB of free disk space to install Ubuntu and any additional software.
- Graphics: A graphics card capable of supporting 3D acceleration is recommended for better visual performance.
- Internet Connection: An internet connection is required for downloading Ubuntu and any updates during the installation process.
It is important to note that these are the recommended system requirements, and you may be able to run VirtualBox and Ubuntu with lower specifications. However, for the best experience, it is recommended to meet or exceed these requirements.
Once you have ensured that your system meets the necessary requirements, you can proceed with the installation of VirtualBox and Ubuntu.
Step 1: Create a New Virtual Machine
To install Ubuntu on VirtualBox, you first need to create a new virtual machine. Here’s how:
1. Open VirtualBox and click on the “New” button in the toolbar.
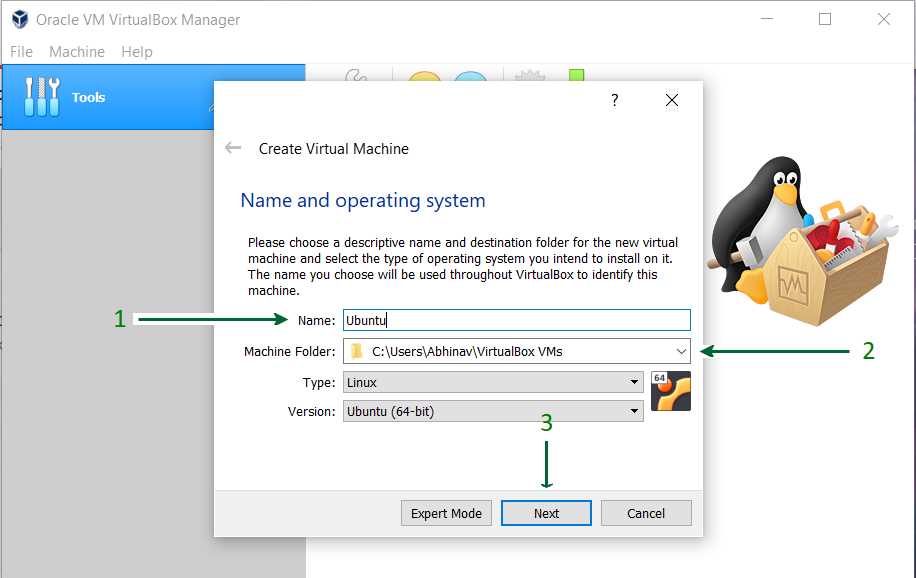
2. In the “Name” field, enter a name for your virtual machine, such as “Ubuntu”.
3. In the “Type” field, select “Linux”.
4. In the “Version” field, select “Ubuntu (64-bit)” if you’re installing a 64-bit version of Ubuntu, or “Ubuntu” if you’re installing a 32-bit version.
5. Click “Next” to proceed.
6. In the “Memory size” field, specify the amount of RAM you want to allocate to the virtual machine. It’s recommended to allocate at least 2GB for a smooth experience.
7. Click “Next” to proceed.
8. In the “Hard disk” section, select “Create a virtual hard disk now” and click “Create”.
9. Choose the “VDI (VirtualBox Disk Image)” option and click “Next”.
10. Select “Dynamically allocated” for the storage on physical hard disk and click “Next”.
11. Specify the size of the virtual hard disk. It’s recommended to allocate at least 20GB for the Ubuntu installation.
12. Click “Create” to create the virtual machine.
Now you have successfully created a new virtual machine for installing Ubuntu on VirtualBox. In the next step, we will proceed with installing Ubuntu on this virtual machine.
Open VirtualBox

To install Ubuntu on VirtualBox, you first need to open VirtualBox on your computer. VirtualBox is a free and open-source virtualization software that allows you to run multiple operating systems on your computer simultaneously.
Here is how you can open VirtualBox:
- Click on the “Start” menu on your computer and search for “VirtualBox”.
- Click on the VirtualBox application to open it.
- Once VirtualBox is open, you will see the main interface with a list of virtual machines.
Now that you have VirtualBox open, you can proceed with the installation of Ubuntu. Make sure you have the Ubuntu ISO file and enough system resources to run a virtual machine.
Click on “New” to Create a New Virtual Machine

To install Ubuntu on VirtualBox, you need to create a new virtual machine. Follow the steps below:
- Open VirtualBox and click on “New” to start the creation process.
- In the “Name” field, enter a name for your virtual machine, such as “Ubuntu”.
- From the “Type” dropdown menu, select “Linux”.
- From the “Version” dropdown menu, select “Ubuntu (64-bit)” if you are installing a 64-bit version of Ubuntu. If you are installing a 32-bit version, select “Ubuntu”.
- Click “Next” to proceed.
- In the “Memory size” field, enter the amount of RAM you want to allocate to the virtual machine. It is recommended to allocate at least 2GB for a smooth experience.
- Click “Next” to proceed.
- In the “Hard disk” section, select “Create a virtual hard disk now” and click “Create”.
- Choose the “VDI (VirtualBox Disk Image)” option and click “Next”.
- Choose the “Dynamically allocated” option and click “Next”.
- In the “File location and size” field, enter the desired location and size for the virtual hard disk. It is recommended to allocate at least 20GB of disk space.
- Click “Create” to create the virtual hard disk.
Once you have created the virtual machine, you can proceed with the installation of Ubuntu on VirtualBox.
Set the Name, Type, and Version of the Virtual Machine
Before you can install Ubuntu on VirtualBox, you need to set up a virtual machine with the appropriate settings. Follow these steps to configure the virtual machine:
- Open VirtualBox and click on the “New” button to create a new virtual machine.
- In the “Name” field, enter a descriptive name for your virtual machine, such as “Ubuntu VM”.
- Choose the “Type” of the virtual machine. In this case, select “Linux” as the operating system.
- Select the “Version” of Linux that matches the version of Ubuntu you want to install. For example, if you are installing Ubuntu 20.04, choose “Ubuntu (64-bit)”.
- Click “Next” to proceed to the next step.
By setting the name, type, and version of the virtual machine, you are ensuring that VirtualBox is properly configured to install Ubuntu on it. This information helps VirtualBox allocate the necessary resources and provide the appropriate environment for the Ubuntu installation process.
Step 2: Configure the Virtual Machine Settings
Once you have successfully installed VirtualBox on your computer, it’s time to configure the virtual machine settings to install Ubuntu.
1. Open VirtualBox and click on the “New” button to create a new virtual machine.
2. In the “Name” field, enter a name for your virtual machine, such as “Ubuntu”.
3. In the “Type” field, select “Linux” as the operating system.
4. In the “Version” field, select “Ubuntu (64-bit)” if you have downloaded the 64-bit version of Ubuntu. If you have downloaded the 32-bit version, select “Ubuntu”.
5. Click on the “Next” button to proceed.
6. In the “Memory size” field, specify the amount of RAM you want to allocate to the virtual machine. It is recommended to allocate at least 2GB of RAM for a smooth Ubuntu experience.
7. Click on the “Next” button to proceed.
8. In the “Hard disk” section, select “Create a virtual hard disk now” and click on the “Create” button.
9. Select “VDI (VirtualBox Disk Image)” as the hard disk file type and click on the “Next” button.
10. Select “Dynamically allocated” as the storage on physical hard disk and click on the “Next” button.
11. Specify the size of the virtual hard disk. It is recommended to allocate at least 20GB of disk space for Ubuntu.
12. Click on the “Create” button to create the virtual hard disk.
13. Once the virtual machine is created, select it from the left sidebar and click on the “Settings” button.
14. In the “Settings” window, go to the “Storage” tab and click on the “Empty” CD/DVD icon under the “Controller: IDE” section.
15. In the “Attributes” section on the right side, click on the CD/DVD icon and select “Choose a disk file”.
16. Navigate to the location where you have downloaded the Ubuntu ISO file and select it.
17. Click on the “OK” button to save the settings.
Now, you have successfully configured the virtual machine settings to install Ubuntu on VirtualBox. In the next step, we will proceed with the installation process.