
Are you wondering how to install Python on your Mac? Look no further! In this step-by-step guide, we will walk you through the process of installing Python on your Mac computer. Python is a powerful and versatile programming language that is widely used in various fields, such as web development, data analysis, and artificial intelligence. By installing Python on your Mac, you will have access to a wide range of libraries and tools that will help you in your coding journey.
Step 1: Download Python
The first step in installing Python on your Mac is to download the Python installer from the official Python website. Visit the website and navigate to the Downloads section. Choose the version of Python that is compatible with your Mac operating system. It is recommended to download the latest stable version of Python to ensure you have access to the latest features and bug fixes.
Note: Make sure to download the macOS installer package (.pkg) and not the source code (.tar.gz) file.
Step 2: Run the Installer
Once the Python installer package is downloaded, locate the file in your Downloads folder or the location where you saved it. Double-click on the installer package to run it. You may be prompted to enter your administrator password to proceed with the installation.
Note: It is recommended to close all other applications before running the installer to avoid any conflicts.
Step 3: Customize the Installation
During the installation process, you will be presented with various options to customize your Python installation. It is recommended to leave the default settings as they are unless you have specific requirements. However, you can choose to install additional features, such as the Python documentation or the IDLE development environment, if desired.
Note: Make sure to select the option to add Python to your system’s PATH during the installation process. This will allow you to run Python from the command line.
Step 4: Verify the Installation
Once the installation is complete, you can verify that Python is successfully installed on your Mac. Open the Terminal application and type python --version to check the installed Python version. If the command returns the version number, congratulations! You have successfully installed Python on your Mac.
Note: You can also open the Python interpreter by typing python in the Terminal. This will allow you to run Python code directly in the command line.
Now that you have Python installed on your Mac, you are ready to start coding! Whether you are a beginner or an experienced developer, Python offers a wide range of possibilities and resources to help you achieve your programming goals. Happy coding!
Section 1: Downloading Python
One of the first steps to start programming with Python is to download and install the Python interpreter on your Mac. The Python interpreter is the program that reads and executes Python code. Here’s how to download Python on your Mac:
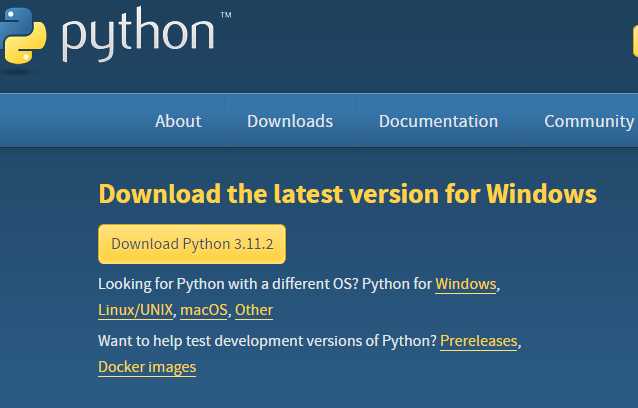
1. Open a web browser and go to the official Python website at https://www.python.org/downloads/.
2. On the downloads page, you will see different versions of Python available for download. Choose the version that is compatible with your Mac operating system. If you are unsure which version to choose, you can click on the “Downloads for macOS” link to download the latest version.
3. Once you have selected the version, click on the download link to start the download. The download may take a few minutes depending on your internet connection speed.
4. After the download is complete, locate the downloaded file in your Downloads folder or the location where you saved it. The file will be named something like “python-3.9.6-macosx10.9.pkg”.
5. Double-click on the downloaded file to start the installation process. You may be prompted to enter your administrator password.
6. Follow the on-screen instructions to complete the installation. Make sure to select the option to install the Python interpreter and any additional components or packages that you may need.
7. Once the installation is complete, you can verify that Python is installed correctly by opening the Terminal application on your Mac and typing “python –version” without the quotes. If Python is installed correctly, it will display the version number.
Now that you have successfully downloaded and installed Python on your Mac, you are ready to start writing and running Python code!
Step 1: Visit the Python website
To install Python on your Mac, you need to visit the official Python website. Open your preferred web browser and go to https://www.python.org/downloads/. This is the official website where you can find the latest version of Python for Mac.
Once you are on the website, you will see a list of available Python versions. Make sure to choose the version that is compatible with your Mac operating system. You can check your Mac OS version by clicking on the Apple menu in the top-left corner of your screen and selecting “About This Mac”.
After selecting the appropriate version, scroll down to the bottom of the page and you will find the download links. There are two main versions of Python: Python 2 and Python 3. It is recommended to choose Python 3 as it is the latest version with more features and improvements.
Click on the download link for the Python 3 version that matches your Mac OS. The download will start automatically, and you can monitor the progress in your browser’s download manager.
Once the download is complete, you can proceed to the next step to install Python on your Mac.
Step 2: Click on the “Downloads” tab
Once you have successfully accessed the Python website, you need to navigate to the “Downloads” tab. This tab contains all the necessary files and resources you need to install Python on your Mac.
To find the “Downloads” tab, follow these steps:
| 1. | Locate the navigation menu at the top of the Python website. |
| 2. | Click on the “Downloads” option in the menu. |
By clicking on the “Downloads” tab, you will be redirected to a page where you can find different versions of Python available for download. This page also provides additional information about each version, such as release notes and system requirements.
Make sure to select the version of Python that is compatible with your Mac operating system. Once you have made your selection, you can proceed to the next step to download and install Python on your Mac.
Step 3: Select the latest version of Python
Now that you have successfully installed Homebrew on your Mac, it’s time to install Python. Before proceeding, it’s important to note that Python comes in different versions, and it’s recommended to always use the latest stable version.
To install Python on your Mac, open the Terminal application and type the following command:
brew install python
This command will download and install the latest version of Python available through Homebrew. Homebrew will automatically handle all the dependencies and configurations required for Python to run smoothly on your Mac.
Once the installation is complete, you can verify that Python is installed correctly by typing the following command:
python –version
This command will display the version of Python installed on your Mac. If you see the version number, it means that Python has been successfully installed.
Now that you have Python installed on your Mac, you can move on to the next step and start using Python to write and run your own programs.
Section 2: Installing Python
Now that you have a Mac, let’s dive into how to install Python on it. Python is a popular programming language that is widely used for various purposes, including web development, data analysis, and artificial intelligence.
Here are the steps to install Python on your Mac:
| Step 1: | Open your preferred web browser and go to the official Python website. |
| Step 2: | Click on the “Downloads” tab and select the latest version of Python for Mac. |
| Step 3: | Once the download is complete, open the installer file. |
| Step 4: | Follow the instructions provided by the installer to complete the installation process. |
| Step 5: | After the installation is finished, open the Terminal application on your Mac. |
| Step 6: | Type “python” in the Terminal and press Enter to check if Python is installed correctly. You should see the Python version number displayed. |
Congratulations! You have successfully installed Python on your Mac. Now you can start coding in Python and explore its vast capabilities.


