
If you’re a Minecraft enthusiast and own a PS4, you might be wondering how to enhance your gaming experience by installing mods. While mods are typically associated with the PC version of Minecraft, it’s also possible to install them on your PS4. In this step-by-step guide, we’ll walk you through the process of installing mods on your PS4, so you can enjoy new features, gameplay mechanics, and more!
Step 1: Prepare Your PS4
Before you can start installing mods, you’ll need to make sure your PS4 is ready. First, ensure that your PS4 is connected to the internet and has the latest version of Minecraft installed. You’ll also need a USB flash drive with enough storage space to hold the mod files.
Step 2: Find and Download Mods
Next, you’ll need to find and download the mods you want to install. There are various websites and forums where you can find Minecraft mods specifically designed for the PS4. Make sure to choose mods that are compatible with the version of Minecraft you have installed on your PS4.
Step 3: Transfer Mods to Your PS4
Once you’ve downloaded the mods, you’ll need to transfer them to your PS4. Insert the USB flash drive into your computer and create a new folder called “Minecraft Mods”. Copy the downloaded mod files into this folder.
Step 4: Install Mods on Your PS4
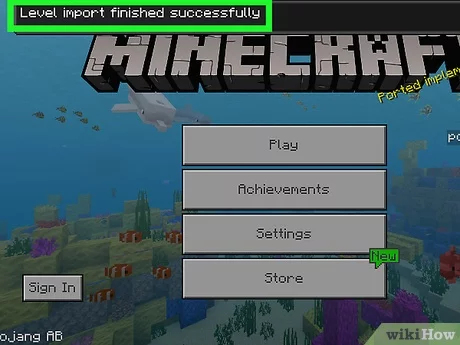
Now it’s time to install the mods on your PS4. Safely remove the USB flash drive from your computer and insert it into your PS4. Open Minecraft on your PS4 and go to the “Settings” menu. Select “Global Resources” and then choose “Import from USB”. You should see a list of the mods you transferred to the USB flash drive. Select the mods you want to install and confirm your selection.
Step 5: Enjoy Your Mods!
Once the installation process is complete, you can start enjoying your mods in Minecraft on your PS4. Explore new worlds, try out new gameplay mechanics, and have fun with the enhanced features that mods bring to the game. Remember to regularly check for updates and new mods to keep your Minecraft experience fresh and exciting!
With this step-by-step guide, you now have the knowledge to install mods on your PS4 and take your Minecraft adventures to the next level. Happy modding!
What are Minecraft Mods?

Minecraft mods are modifications or add-ons that can be installed on the PS4 version of Minecraft. These mods enhance the gameplay experience by adding new features, items, blocks, or even changing the game mechanics. They are created by the Minecraft community and can be downloaded and installed to customize your Minecraft experience.
Mods can range from simple cosmetic changes, such as new textures or skins, to more complex additions like new biomes, creatures, or even entire dimensions. They can also introduce new gameplay mechanics, quests, or challenges, allowing players to explore different aspects of the game.
Installing mods on Minecraft for PS4 can be a bit more complicated compared to other platforms, as the console version has certain limitations and restrictions. However, with the right tools and instructions, it is still possible to install mods and enjoy a customized Minecraft experience on your PS4.
Before installing mods on Minecraft for PS4, it is important to note that modding is not officially supported by Mojang or Sony. This means that there may be risks involved, such as potential compatibility issues or even the possibility of getting banned from online play. It is always recommended to proceed with caution and to only download mods from trusted sources.
Now that you know what Minecraft mods are, let’s dive into the step-by-step guide on how to install mods on PS4.
Why Install Mods on PS4?
Mods, short for modifications, are user-created content that can enhance and customize your gaming experience. In the case of Minecraft, mods can add new features, gameplay mechanics, items, and even entirely new worlds to explore.
So, how do you install mods on PS4? By following a step-by-step guide, you can unlock a whole new level of creativity and excitement in your Minecraft gameplay.
Installing mods on PS4 allows you to:
- Enhance gameplay: Mods can introduce new challenges, quests, and objectives, making your Minecraft adventures even more engaging.
- Customize your world: With mods, you can add new blocks, items, and structures to your world, allowing you to create unique and personalized environments.
- Expand your possibilities: Mods can introduce new gameplay mechanics, such as magic systems or advanced crafting, giving you more options and ways to play.
- Join the modding community: Installing mods opens up a world of creativity and collaboration. You can share your own mods or try out mods created by other players.
By installing mods on your PS4, you can take your Minecraft experience to the next level and discover a whole new world of possibilities.
Step 1: Prepare Your PS4
Before you can install mods on your PS4, you need to make sure that your console is ready for the process. Here are the steps to prepare your PS4:
- Make sure your PS4 is connected to the internet.
- Ensure that your PS4 is updated to the latest firmware version.
- Create a backup of your game saves and data to prevent any loss during the mod installation process.
- Disable automatic updates on your PS4 to avoid any conflicts with the mods.
- Enable the option to install applications from unknown sources in the PS4 settings.
- Clear up some space on your PS4’s hard drive to accommodate the mods.
By following these steps, you will ensure that your PS4 is ready to install mods and that you have taken the necessary precautions to prevent any issues during the process.
Check for System Updates
Before you can install mods on your PS4, it’s important to make sure that your system is up to date. System updates often include important bug fixes and security patches that can help ensure a smooth installation process.
To check for system updates on your PS4, follow these steps:
- Turn on your PS4 console and navigate to the main menu.
- Select the “Settings” option.
- Scroll down and select “System Software Update”.
- Choose the “Check for Update” option.
- If there is an available update, follow the prompts to download and install it.
Once your system is up to date, you can proceed with the installation of mods on your PS4. It’s always a good idea to keep your system updated to ensure the best performance and compatibility with the latest mods.


