If you’re a Minecraft player who wants to take your gaming experience to the next level, installing mods is the way to go. Mods allow you to customize and enhance your Minecraft world, adding new features, items, and gameplay mechanics. In this step-by-step guide, we’ll show you how to install mods in Java, the programming language Minecraft is built on.
Installing mods in Java may seem daunting at first, but with the right tools and a little know-how, it’s actually quite straightforward. Whether you’re a seasoned Minecraft player or a newbie looking to spice up your gameplay, this guide will walk you through the process, from finding and downloading mods to getting them up and running in your game.
So, if you’re ready to dive into the world of Minecraft mods and unleash your creativity, let’s get started! Follow along with this guide, and you’ll be installing mods in Java like a pro in no time.
Section 1: Preparing Your Minecraft Installation
Before you can start installing mods in Minecraft, you need to make sure you have the Java version of the game installed on your computer. Java is required to run Minecraft and mods, so if you don’t have it installed, you’ll need to download and install it first.
To install Java, follow these steps:
- Go to the official Java website at www.java.com.
- Click on the “Java Download” button.
- On the next page, click on the “Agree and Start Free Download” button.
- Once the download is complete, run the installer.
- Follow the on-screen instructions to complete the installation process.
Once Java is installed, you can proceed to the next step of installing mods in Minecraft. Make sure you have a compatible version of Minecraft installed on your computer before continuing.
Note: It’s important to download Java from the official website to ensure you get the latest and most secure version of the software.
Check Minecraft Version Compatibility
Before you install any mods, it’s important to check if they are compatible with your version of Minecraft. Mods are typically designed to work with specific versions of Minecraft, so installing a mod that is not compatible with your version can cause issues or even crash your game.
To check the compatibility of a mod, you need to know the version of Minecraft you are using. You can find your Minecraft version by launching the game and looking at the bottom-left corner of the main menu screen.
Once you know your Minecraft version, you can search for mods that are compatible with that version. Many mod websites and forums have filters or tags that allow you to search for mods based on the Minecraft version they are designed for.
When downloading a mod, make sure to read the mod description or documentation to confirm that it is compatible with your version of Minecraft. Some mods may have specific installation instructions or additional requirements, so it’s important to follow the instructions carefully.
Installing mods that are not compatible with your version of Minecraft can lead to crashes, errors, or other issues. It’s always a good idea to double-check the compatibility before installing any mods to ensure a smooth and enjoyable Minecraft experience.
Download and Install Java Development Kit (JDK)
In order to install Minecraft mods in Java, you will need to have the Java Development Kit (JDK) installed on your computer. The JDK is a software development environment that provides the necessary tools and libraries to develop and run Java applications.
Here are the steps to download and install the JDK:
| Step 1: | Go to the official Oracle website. |
| Step 2: | Navigate to the Java SE Downloads page. |
| Step 3: | Choose the version of Java that is compatible with your operating system. |
| Step 4: | Click on the download link to start the download. |
| Step 5: | Once the download is complete, run the installer. |
| Step 6: | Follow the on-screen instructions to complete the installation process. |
| Step 7: | Verify the installation by opening a command prompt and typing “java -version”. |
After successfully installing the JDK, you will be ready to proceed with installing Minecraft mods in Java.
Backup Your Minecraft World and Game Files
Before you start installing mods to your Minecraft Java edition, it’s important to create a backup of your game files and world. This will ensure that you can easily revert back to the original state if anything goes wrong during the installation process.
To backup your Minecraft world and game files, follow these steps:
- Open the file explorer on your computer and navigate to the Minecraft installation directory. This is usually located in the “AppData” folder on Windows, or in the user’s home directory on macOS and Linux.
- Once you’re in the Minecraft installation directory, locate the “saves” folder. This folder contains all your Minecraft worlds.
- Copy the entire “saves” folder and paste it to a different location on your computer. This will create a backup of all your Minecraft worlds.
- Next, navigate back to the Minecraft installation directory and locate the “versions” folder. This folder contains all the different versions of Minecraft that you have installed.
- Copy the folder corresponding to the version of Minecraft you are currently using and paste it to a different location on your computer. This will create a backup of the game files for that specific version.
By following these steps, you will have created a backup of your Minecraft world and game files. This backup will come in handy if anything goes wrong during the installation of mods, as you can simply restore the backup to revert back to the original state of your game.
Section 2: Installing Minecraft Forge
To install Minecraft Forge in Java, follow these steps:
Step 1: First, you need to download the Minecraft Forge installer from the official website. Make sure to choose the version that matches your Minecraft version and Java installation.
Step 2: Once the installer is downloaded, locate the file and double-click on it to run the installer.
Step 3: The installer will open a setup wizard. Follow the on-screen instructions to proceed with the installation. Make sure to select the correct Minecraft directory where the game is installed.
Step 4: After the installation is complete, open the Minecraft launcher.
Step 5: In the launcher, click on the “Installations” tab. You should see a new installation with the Forge version you just installed.
Step 6: Select the Forge installation and click on the “Play” button to launch Minecraft with Forge.
Step 7: Once Minecraft is launched, you can verify that Forge is installed by checking the main menu. It should display the Forge version in the bottom left corner.
Congratulations! You have successfully installed Minecraft Forge in Java. Now you can start exploring the world of Minecraft mods and enhance your gaming experience.
Download the Latest Version of Minecraft Forge
In order to install mods in Minecraft Java Edition, you will need to download and install Minecraft Forge. Minecraft Forge is a modding platform that allows you to easily install and manage mods for the game.
To download the latest version of Minecraft Forge, follow these steps:
- Go to the official Minecraft Forge website at https://files.minecraftforge.net/.
- On the website, you will see a list of available Minecraft Forge versions. Look for the latest version that is compatible with your version of Minecraft.
- Click on the download link for the version you want to install. Make sure to choose the version that matches your Minecraft version and operating system (Windows, macOS, or Linux).
- Once the download is complete, locate the downloaded file on your computer.
- Double-click on the downloaded file to run the installer.
- Follow the on-screen instructions to install Minecraft Forge. Make sure to select the correct Minecraft installation directory when prompted.
- After the installation is complete, open the Minecraft launcher.
- In the launcher, click on the “Installations” tab.
- Create a new installation by clicking on the “New” button.
- In the new installation settings, select the Minecraft Forge version you just installed from the “Version” dropdown menu.
- Click on the “Create” button to create the new installation.
- Once the new installation is created, select it from the list of available installations and click on the “Play” button to launch Minecraft with Minecraft Forge.
Now that you have Minecraft Forge installed, you can start installing mods to enhance your Minecraft experience. Follow the next steps in this guide to learn how to install mods using Minecraft Forge.
Run the Minecraft Forge Installer
Once you have downloaded the Minecraft Forge installer, you can proceed with the installation process. Follow these steps to install Minecraft mods:
- Locate the Minecraft Forge installer file on your computer.
- Double-click on the installer file to run it.
- A setup wizard will appear on your screen. Click “Install Client” and then click “OK”.
- The installer will automatically install Minecraft Forge into your Minecraft game directory.
- Once the installation is complete, you can close the installer.
Running the Minecraft Forge installer is an essential step in installing mods for Minecraft. It ensures that your game is compatible with the mods you want to install and provides the necessary framework for them to work correctly.
Launch Minecraft with Forge Profile
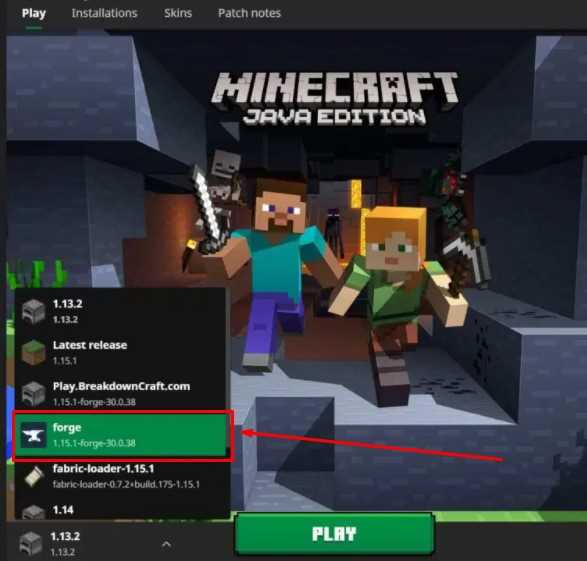
After successfully installing Forge and the desired mods, it’s time to launch Minecraft with the Forge profile. Here’s how:
| Step 1: | Open the Minecraft Launcher. |
| Step 2: | Click on the drop-down menu next to the “Play” button. |
| Step 3: | Select the Forge profile from the list of available profiles. |
| Step 4: | Click on the “Play” button to launch Minecraft with the Forge profile. |
Once Minecraft is launched with the Forge profile, you will be able to enjoy the mods that you have installed. Remember to always check the compatibility of the mods with the version of Minecraft you are using, as well as any additional requirements or dependencies they may have.
Now that you know how to launch Minecraft with the Forge profile, you can start exploring the exciting world of Minecraft mods and enhance your gaming experience!