
If you’re a Windows 10 user and want to take advantage of the powerful features of Jupyter Notebook, you’re in luck! Jupyter Notebook is a popular open-source web application that allows you to create and share documents that contain live code, equations, visualizations, and narrative text. In this step-by-step guide, we’ll walk you through the process of installing Jupyter Notebook on your Windows 10 machine.
Step 1: Install Python
The first step in installing Jupyter Notebook is to install Python. Jupyter Notebook requires Python 3.3 or greater, so make sure you have a compatible version installed on your Windows 10 machine. You can download the latest version of Python from the official Python website and follow the installation instructions.
Step 2: Install Jupyter Notebook
Once you have Python installed, you can use the Python package manager, pip, to install Jupyter Notebook. Open the command prompt on your Windows 10 machine and type the following command:
pip install jupyter
This will download and install Jupyter Notebook and its dependencies on your machine. Depending on your internet connection, this process may take a few minutes.
Step 3: Launch Jupyter Notebook
After the installation is complete, you can launch Jupyter Notebook by typing the following command in the command prompt:
jupyter notebook
This will start the Jupyter Notebook server and open a new tab in your default web browser. From here, you can create new notebooks, open existing ones, and run code cells.
That’s it! You’ve successfully installed Jupyter Notebook on your Windows 10 machine. Now you can start exploring its powerful features and using it for data analysis, machine learning, and more.
Requirements
In order to install Jupyter Notebook on Windows 10, you need to meet the following requirements:
1. Python: Jupyter Notebook requires Python to be installed on your Windows 10 system. Make sure you have Python installed before proceeding with the installation.
2. Pip: Pip is a package management system used to install and manage software packages written in Python. Make sure you have Pip installed on your Windows 10 system.
3. Command Prompt: You will need to use the Command Prompt to execute commands for installing Jupyter Notebook. Make sure you have access to the Command Prompt on your Windows 10 system.
4. Internet Connection: An active internet connection is required to download and install Jupyter Notebook and its dependencies.
Once you have met these requirements, you can proceed with the installation of Jupyter Notebook on your Windows 10 system.
Windows 10 Operating System

Windows 10 is a popular operating system developed by Microsoft. It is widely used by individuals and businesses around the world. With its user-friendly interface and powerful features, Windows 10 provides a seamless computing experience.
Installing Jupyter Notebook on Windows 10 is a straightforward process. Jupyter Notebook is an open-source web application that allows you to create and share documents that contain live code, equations, visualizations, and narrative text.
To install Jupyter Notebook on Windows 10, follow these steps:
- Open your web browser and go to the official Jupyter Notebook website.
- Download the latest version of Anaconda, which includes Jupyter Notebook.
- Run the Anaconda installer and follow the on-screen instructions to complete the installation.
- Once the installation is complete, open the Anaconda Navigator.
- In the Anaconda Navigator, click on the “Launch” button next to Jupyter Notebook.
- A new browser window will open with the Jupyter Notebook interface.
- You can now create and run Jupyter Notebook files on your Windows 10 operating system.
By following these steps, you can easily install Jupyter Notebook on your Windows 10 operating system and start using it for data analysis, machine learning, and other tasks.
Note: It is recommended to regularly update your Windows 10 operating system and Jupyter Notebook to ensure you have the latest features and security patches.
In conclusion, Windows 10 is a versatile operating system that provides a stable and efficient platform for installing and running Jupyter Notebook. With its intuitive interface and powerful capabilities, Windows 10 is an ideal choice for data scientists, developers, and researchers.
Python 3.x Installed

Python 3.x is a programming language that is widely used for various purposes, including data analysis, machine learning, and web development. In order to use Jupyter Notebook on your Windows 10 operating system, you need to have Python 3.x installed.
To install Python 3.x on your Windows 10 machine, you can follow these steps:
- Go to the official Python website at https://www.python.org/downloads/.
- Click on the “Downloads” tab.
- Scroll down to the “Python Releases for Windows” section.
- Click on the “Latest Python 3 Release – Python x.x.x” link.
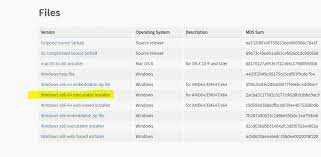
- Scroll down to the “Files” section.
- Click on the “Windows x86-64 executable installer” link if you have a 64-bit version of Windows 10, or click on the “Windows x86 executable installer” link if you have a 32-bit version of Windows 10.
- The installer will start downloading.
- Once the download is complete, double-click on the downloaded file to run the installer.
- Follow the on-screen instructions to complete the installation process.
After the installation is complete, you can verify that Python 3.x is installed by opening the command prompt and typing python –version. If you see the version number displayed, it means that Python 3.x is successfully installed on your Windows 10 machine.
Now that you have Python 3.x installed, you can proceed with the installation of Jupyter Notebook on your Windows 10 machine.
Installation Steps

Follow these steps to install Jupyter Notebook on your Windows system:
- Go to the official Jupyter Notebook website.
- Click on the “Download” button.
- Choose the Windows installer for Jupyter Notebook.
- Run the installer and follow the on-screen instructions.
- Once the installation is complete, open the Jupyter Notebook application.
- You can now start using Jupyter Notebook on your Windows system.
By following these simple steps, you can easily install Jupyter Notebook on your Windows system and start using it for data analysis, coding, and more.


